Showing posts with label Configuration. Show all posts

Thursday, May 01, 2014

Managed Metadata Navigation, Anonymous Users in SP2013

The new term-driven navigation in SP2013 has some gotchas for anonymous users, resulting in them not seeing a full navigation menu. These are some things to check:
Finally, remember that you have to publish a major version for each page that you link to from the navigation node, otherwise anonymous users won't see the page, and neither the term. This includes all items on the page that also requires approval, such as images. An easy thing to forget, if you've been so stupid as not to use the simple publishing configuration for your site. If you as an admin or logged in user can see terms and view a page, while visitors can not - you forgot to publish. An empty page or no term is a sure sign.

Related to the managed navigation is the friendly URL (FURL) mechanism, which uses the term set structure to build the FURL from the linked-to term. To prevent broken links when moving a term, SP2013 stores links using the FIXUPREDIRECT.ASPX page, with params such as the termID, which will be resolved server-side into a friendly URL when rendered (see navigation term GetResolvedDisplayUrl). Do not render RichHtmlField using the simple "SPWC:FieldValue" web-control, as this will not resolve the fixup-links. In addition, having the same control both in an edit mode panel and in a display mode panel might cause problems.

This all applies to author-in-place (AIP) usage of term-driven navigation and friendly URLs; cross-site publishing (XSP) have different kind of issues.

Note that the managed navigation term set is stored in the default MMS of the hosting web-application. It uses the local term store for the site-collection it belongs to (IsSiteCollectionGroup). This will affect your backup/restore procedure as not only the content database or the site-collection backup will be needed for a restore, the MMS database or tenant backup is also needed. As all host-named site-collections (HNSC) share a web-application, restoring the MMS with it's term stores will affect the navigation term set of all site-collections. Take care.

Saturday, June 23, 2012

SharePoint Publishing Site Map Providers and Navigation

Configuring the navigation of SharePoint 2010 publishing sites and subsites can be a bit confusing, also when configuring the navigation from code or from your web templates (or even old school site definitions). Add to that the UI that changes based on which settings you chose combined with what site or subsite context you're currently in. Plus the quite large number of site map providers defined in the web.config when using the PortalSiteMapProvider from code.

This post is about how the UI settings can be repeated in your site provisioning code, that is: first configure the navigation settings in your prototype to make it work according to your navigation concept, then package the settings into feature code.

The PortalSiteMapProvider works in combination with the PublishingWeb navigation settings, and of course with the top and current navigation controls used to render the navigation as HTML. The latter needs to look at the publishing web's PortalNavigation settings when querying the portal site map provider for the CurrentNode or when getting a set of navigation nodes to render. The navigation controls' code use the PortalSiteMapProvider properties IncludeSubSites, IncludePages, IncludeAuthoredLinks and IncludeHeadings to set the filtering applied to GetChildNodes when rendering nodes. These filter properties are typically set to IncludeOption.PerWeb to reflect the navigation settings of the current site or subsite.

The navigation settings UI tries to show the effects of your navigation settings (upper half) by rendering a preview of what nodes GetChildNodes would return for the *current* site (lower half) from the applicable site map provider. The PortalSiteMapProvider exposes several of the providers defined in web.config as static properties, but only two of them are typically used: CombinedNavSiteMapProvider and CurrentNavSiteMapProvider. The former is what feeds the top navigation, the latter feeds the current (left, local) navigation.


Note that when inheriting global navigation, the UI won't show the global navigation container as it only supports configuring the navigation of the current site. The term "parent site" in the UI refers to the top-level site of the site-collection, which is not the direct parent of a subsite beyond level 1 children.


Configuring the navigation settings from your site provisioning feature is quite simple once you've got a working prototype of your navigation concept. Use the mapping shown in the above figure to program the configuration settings for both global navigation (InheritGlobal, GlobalIncludeSubSites, GlobalIncludePages) and current navigation (InheritCurrent, CurrentIncludeSubSites, CurrentIncludePages, ShowSiblings).

The only little pitfall is for "Display the current site, the navigation items below the current site, and the current site's siblings" which requires a combination of InheritCurrent = false and ShowSiblings = true. Use this setting to show the same local navigation for a section of your web-site and all its child sites. A typical example is for the Quality Management section (level 1 subsite) and its QMS areas (level 2 subsites) to have a shared navigation experience. The QMS section would not use ShowSiblings while all the child areas would have ShowSiblings turned on.

Implementing a custom navigation concept is as simple as writing your own navigation rendering controls, and inheriting the PortalSiteMapProvider to override the logic for CurrentNode and GetChildNodes to suit your needs by applying the applicable node filtering properties to control which nodes are returned and rendered in which context. I've also used this approach for reading the navigation items from a central SharePoint list to get common cross site-collection top-navigation.

I hope this helped you understand how to realize your navigation concept from code, and that you're not totally confused by all the available site map providers and how they are used anymore.

Monday, April 30, 2012

Almost Excluding Specific Search Results in SharePoint 2010

Sometimes you want to hide certain content from being exposed through search in certain SharePoint web-applications, even if the user really has access to the information in the actual content source. A scenario is intranet search that is openly used, but in which you want to prevent accidental information exposure. Think of a group working together on reqruiting, where the HR manager use the search center looking for information - you wouldn't want even excerpts of confidential information to be exposed in the search results.

So you carefully plan your content sources and crawl rules to only index the least possible amount of information. Still, even with crawl rules you will often need to tweak the query scope rules to exclude content at a more fine-grained level, or even add new scopes for providing search-driven content to users. Such configuration typically involves using exclude rules on content types or content sources. This is a story of how SharePoint can throw you a search results curveball, leading to accidental information disclosure.

In this scenario, I had created a new content source JobVault for crawling the HR site-collection in another SharePoint web-application, to be exposed only through a custom shared scope. So I tweaked the rules of the existing scopes such as "All Sites" to exclude the Puzzlepart JobVault content source, and added a new JobReqruiting scope that required the JobVault content source and included the content type JobHired and excluded the content type JobFired.

So no shared scopes defined in the Search Service Application (SSA) included JobFired information, as all scopes either excluded the HR content source or excluded the confidential content type. To my surprise our SharePoint search center would find and expose such pages and documents when searching for "you're fired!!!".

Knowing that the search center by default uses the "All Sites" scope when no specific scope is configured or defined in the keyword query, it was back to the SSA to verify the scope. It was all in order, and doing a property search on Scope:"All Sites" got me the expected results with no confidential data in it. The same result for Scope:"JobReqruiting", no information exposure there either. It looked very much like a best bet, but there where no best bet keywords defined for the site-collection.


The search center culprit was the Top Federated Results web-part in our basic search site, by default showing results from the local search index very much like best bets. That was the same location as defined in the core results web-part, so why this difference?

Looking into the details of the "Local Search Results" federated location, the reason became clear: "This location provides unscoped results from the Local Search index". The keyword here is "unscoped".


The solution is to add the "All Sites" scope to the federated location to ensure that results that you want to hide are also excluded from the federated results web-part. Add it to the "Query Template" and optionally also to the "More Results Link Template" under the "Location Information" section in "Edit Federated Location".


Now the content is hidden when searching. Not through query security trimming, but through query filtering. Forgetting to add the filter somewhere can expose the information, but then only to users that have permission to see the content anyway. The results are still security trimmed, so this no actual information disclosure risk.

Note that this approach is no replacement for real information security; if that is what you need, don't crawl confidential information from an SSA that is exposed through openly available SharePoint search, even on your intranet.

Saturday, April 21, 2012

Migrate SharePoint 2010 Term Sets between MMS Term Stores

When using the SharePoint 2010 managed metadata fields connected to termsets stored in the Managed Metadata Service (MMS) term store in your solutions, you should have a designated master MMS that is reused across all your SharePoint environment such as the development, test, staging and production farms. Having a single master termstore across all farms gives you the same termsets and terms with the same identifiers all over, allowing you to move content and content types from staging to production without invalidating all the fields and data connected to the MMS term store.

You'll find a lot of termset tools on CodePlex, some that use the standard SharePoint 2010 CSV import file format (which is without identifiers), and some that on paper does what you need, but don't fully work. Some of the better tools are SolidQ Managed Metadata Exporter for export and import of termset (CSV-style), SharePoint Term Store Powershell Utilities for fixing orphaned terms, and finally SharePoint Taxonomy and TermStore Utilities for real migration.

There are, however, standard SP2010 PowerShell cmdlets that allow you to migrate the complete termstore with full fidelity between Managed Metadata Service applications across farms. The drawback is that you can't do selective migration of specific termsets, the whole term store will be overwritten by the migration.

This script exports the term store to a backup file:

# MMS Application Proxy ID has to be passed for -Identity parameter

Export-SPMetadataWebServicePartitionData -Identity "12810c05-1f06-4e35-a6c3-01fc485956a3" -ServiceProxy "Managed Metadata Service" -Path "\\Puzzlepart\termstore\pzl-staging.bak"

This script imports the backup by overwriting the term store:

# MMS Application Proxy ID has to be passed for -Identity parameter
# NOTE: overwrites all existing termsets from MMS
# NOTE: overwrites the MMS content type HUB URL - must be reconfigured on target MMS proxy after restoring

Import-SPMetadataWebServicePartitionData -Identity "53150c05-1f06-4e35-a6c3-01fc485956a3" -ServiceProxy "Managed Metadata Service" -path "\\Puzzlepart\termstore\pzl-staging.bak" -OverwriteExisting

Getting the MMS application proxy ID and the ServiceProxy object:

$metadataApp= Get-SpServiceApplication | ? {$_.TypeName -eq "Managed Metadata Service"}
$mmsAppId = $metadataApp.Id
$mmsproxy = Get-SPServiceApplicationProxy | ?{$_.TypeName -eq "Managed Metadata Service Connection"}

Tajeshwar Singh has posted several posts on using these scripts, including how to solve typical issues:
In addition to such issues, I've run into this issue:

The Managed Metadata Service or Connection is currently not available. The Application Pool or Managed Metadata Web Service may not have been started. Please Contact your Administrator. 

The cause of this error was neither the app-pool nor the 'service on server' not being started, but the service account used in the production farm not being available in the staging farm. Look through the user accounts listed in the ECMPermission table in the MMS database, and correct the "wrong" accounts. Note that updating the MMS database directly might not be supported.

Note that after the term store migration, the MMS content type HUB URL configuration will also have been overwritten. You may not notice for some time, but the content type HUB publishing and subscriber timer jobs will stop working. What you will notice, is that if you try to click republish on a content type in the HUB, you'll get an "No valid proxy can be found to do this operation" error. See How to change the Content Type Hub URL by Michal Pisarek for the steps to rectify this.

Set-SPMetadataServiceApplication -Identity "Managed Metadata Service" -HubURI "http://puzzlepart:8181/"

After resetting this MMS configuration, you should verify that the content type publishing works correctly by republishing and running the timer jobs. Use "Site Collection Administration > Content Type Publishing" as shown on page 2 in Chris Geier's article to verify that the correct HUB is set and that HUB content types are pushed to the subscribers.

Thursday, January 19, 2012

Custom ADFS Login Form for SharePoint 2010 Claims

This week I've been involved in creating a custom login page for SharePoint 2010 to bypass the standard "select a login method" page for multi-mode claims-enabled web-applications. What we wanted was similar to the Claims Login Web Part for SharePoint Server 2010 for Forms-Based Authentication (FBA) by Jeremy Jameson, but for a trusted ADFS 2.0 identity provider instead.


Having a custom login page allows you to stay in your site and avoid the passive STS authN redirect dance back and forth between SP and the ADFS STS for authentication. This requires you to use active mode (WS-Trust) rather than the passive mode used by SharePoint. Note that this active approach won't give you single sign-on, because you won't get the MSISAuth ADFS SSO cookies - it will simply authenticate you first and then give you the SharePoint FedAuth cookie.

The code you need to call ADFS to make it authenticate you, and thus issue a claims token for use with SharePoint, can be found at Using an Active Endpoint to sign into a Web Application by Dominick Baier or Making a web application use an active STS by Koen Willemse. The missing detail not shown in their code is the URL to the ADFS endpoint, which needs to match the chosen client credentials and security mode; when using UserNameWSTrustBinding and sending the username and password in the WCF message secured using SSL (i.e. mixed), the URL should be like "http://adfs.pzl/adfs/services/trust/13/usernamemixed/" including the important ending / slash to avoid "405 method not allowed" error from IIS.

protected void btnLogin_Click(object sender, EventArgs e)
{
    // authenticate with WS-Trust endpoint
    var factory = new WSTrustChannelFactory(
        new UserNameWSTrustBinding(SecurityMode.TransportWithMessageCredential),
        new EndpointAddress(
"https://adfs.puzzlepart.com/adfs/services/trust/13/usernamemixed/"));
 
 
    factory.Credentials.UserName.UserName = txtUserName.Text;
    factory.Credentials.UserName.Password = txtPassword.Text;
 
    var channel = factory.CreateChannel();
 
    var rst = new RequestSecurityToken
    {
        RequestType = RequestTypes.Issue,
        AppliesTo = new EndpointAddress("urn:sharepoint:puzzlepart"),
        KeyType = KeyTypes.Bearer
    };
 
    var genericToken = channel.Issue(rst) as GenericXmlSecurityToken;
 
 
    // parse token
    var handlers = FederatedAuthentication.ServiceConfiguration
.SecurityTokenHandlers;
    var token = handlers.ReadToken(new XmlTextReader(
       new StringReader(genericToken.TokenXml.OuterXml)));
         
    SPSecurity.RunWithElevatedPrivileges(delegate(){
        SPFederationAuthenticationModule.Current
.SetPrincipalAndWriteSessionToken(token);
    });
    Response.Redirect("~/pages/default.aspx");
}

After getting authenticated against the ADFS STS when calling Issue on the WS-Trust channel with a RequestSecurityToken, the returned SAML security token must first be parsed and then written to a FedAuth cookie created from the SAML token. The SharePoint FAM wrapper will both set the thread principal and write the cookie, making the user a logged in SharePoint user.

Note how the writing of the cookie is wrapped with RunWithElevatedPrivileges to ensure that  it runs as the app-pool identity and not as the impersonated SharePoint user. This is to avoid the dreaded "CryptographicException: The system cannot find the file specified" error in the internal ProtectedDataCookieTransform call.

When calling ValidateToken you will run into the SecurityTokenException: Issuer of the Token is not a Trusted Issuer error if your STS is not trusted by SharePoint. SharePoint is configured to use its own SPPassiveIssuerNameRegistry and that will either validate against the built-in SharePoint STS or the set of trusted STS token issuers. See how to add your STS certificate(s) at SharePoint 2010 Claims-Based Auth with ADFS v2 by Eric Kraus. The trusted providers are apparently only used if the login page is located under the /_trust/ folder that is part of the above "redirect dance" when authenticating against a trusted identity provider.

Over at stack overflow, Matt Whetton had run into the same exception as us and solved it by replacing the passive <issuerNameRegistry> with the Windows Identity Foundation (WIF) ConfigurationBasedIssuerNameRegistry instead. The Configuration of WIF post shows how to add the set of certificate names and thumbprints to the <trustedIssuers> list. This is how your web.config list of trusted STS token issuers may look like:

<issuerNameRegistry type="Microsoft.IdentityModel.Tokens.ConfigurationBasedIssuerNameRegistry, 
Microsoft.IdentityModel, Version=3.5.0.0, Culture=neutral, PublicKeyToken=31bf3856ad364e35"> 
  <trustedIssuers> 
    <add thumbprint="1337133713371337" name="CN=adfs-puzzlepart" /> 
    <add thumbprint="0000000000000000" name="CN=SharePoint Security Token Service" />
  </trustedIssuers> 
</issuerNameRegistry> 

Remember to add the SharePoint self-issued certificates such as the "SharePoint Security Token Service" certificate to the list of trusted issuers, in addition to your own STS.

I strongly recommend putting your custom ADFS login page under /_trust/ to avoid having to change the SharePoint web.config files. We chose this approach to minimize risks.

Note that Fiddler seems to break the ADFS login process, at least when decrypting SSL. The customized rule provided in Fiddler and Channel Binding Tokens Revisited by Eric Lawrence alleviates this problem. Just make sure you click "remember my credentials" when logging in so that Fiddler can get it from the Windows Credential Manager.

Disclaimer: Note that even if things seems to work as normal after this configuration change, there is no guarantee that nothing was affected in the huge platform that SharePoint 2010 is. The combination of SP2010 claims and WIF is not very well documented, and any changes beyond supported configuration involves risks. Do not apply these changes if you are not sure that it will not break any of your SharePoint solutions or services.

Tuesday, January 03, 2012

SharePoint 2010 Localized Publishing Web Template

When you try to create a new localized publishing site based on a minimal SharePoint 2010 publishing web template (or a similar minimal site definition), it might fail with a "CreateWelcomePage" error such as this:

System.Runtime.InteropServices.COMException (0x80070001): 0x80070001 at 
Microsoft.SharePoint.Library.SPRequestInternalClass.GetMetadataForUrl
(String bstrUrl, Int32 METADATAFLAGS, Guid& pgListId, Int32& plItemId, 
Int32& plType, Object& pvarFileOrFolder) at 
Microsoft.SharePoint.Library.SPRequest.GetMetadataForUrl
(String bstrUrl, Int32 METADATAFLAGS, Guid& pgListId, Int32& plItemId, 
Int32& plType, Object& pvarFileOrFolder) - 
-- End of inner exception stack trace --- at 
Microsoft.SharePoint.SPGlobal.HandleComException(COMException comEx)
  at 
Microsoft.SharePoint.Library.SPRequest.GetMetadataForUrl
(String bstrUrl, Int32 METADATAFLAGS, Guid& pgListId, Int32& plItemId, 
Int32& plType, Object& pvarFileOrFolder) at 
Microsoft.SharePoint.SPWeb.GetListItem
(String strUrl, Boolean bFields, String[] fields) at 
Microsoft.SharePoint.Publishing.PublishingWeb.GetPublishingPage(String strUrl) at 
Microsoft.SharePoint.Publishing.Internal.AreaProvisioner.CreateWelcomePage
(PublishingWeb area, PageLayout pageLayout) at 
Microsoft.SharePoint.Publishing.Internal.AreaProvisioner.SetDefaultPageProperties
(PublishingWeb area, Boolean& updateRequired) at 
Microsoft.SharePoint.Publishing.Internal.AreaProvisioner.
InitializePublishingWebDefaults() 
- -- End of inner exception stack trace --- at 
Microsoft.SharePoint.Publishing.Internal.AreaProvisioner.
InitializePublishingWebDefaults() at 
Microsoft.SharePoint.Publishing.Internal.AreaProvisioner.Provision()
  at 
Microsoft.SharePoint.Publishing.PublishingFeatureHandler.<>c_DisplayClass3.b_0() at 
Microsoft.Office.Server.Utilities.CultureUtility.RunWithCultureScope
(CodeToRunWithCultureScope code) at 
Microsoft.SharePoint.Publishing.CmsSecurityUtilities.RunWithWebCulture
(SPWeb web, CodeToRun webCultureDependentCode) at 
Microsoft.SharePoint.Publishing.PublishingFeatureHandler.FeatureActivated
(SPFeatureReceiverProperties receiverProperties).

The typical cause is that your web template/site definition is a bit too minimal. The "Publishing" feature needs some initial configuration property data during feature activation. Don't strip these properties away completely. Also, activating the "Publishing" feature from code or a feature stapler will not work for localized sites if you don't pass in this configuration. It is not standard, but you can pass property XML data from code to feature activation as shown in Specifying Properties When Activating Features Through Code.

You must pass in the publishing feature property configuration for the "WelcomePageUrl" to ensure that is reference the localized pages library during activation, which is /sider/ for LCID 1044. The fallback for when this property is not set or is empty seems to be hardcoded to /pages/. Note that using "osrvcore" as the resource file is needed for some languages if you don't have SP1 of the language pack installed.

<!-- Feature: Publishing -->        
<Feature ID="22A9EF51-737B-4ff2-9346-694633FE4416">  
      <Properties xmlns="http://schemas.microsoft.com/sharepoint/">
            <Property Key="ChromeMasterUrl" 
              Value="~SiteCollection/_catalogs/masterpage/puzzlepart.master" />
            <Property Key="WelcomePageUrl" 
              Value="$Resources:cmscore,List_Pages_UrlName;/default.aspx"/>

It is important to reference an existing page in an existing library as the welcome page (home page). Deploy a page using a module if needed. Note that not all of these properties need to be specified as they have working default settings as fallback.

Wednesday, July 06, 2011

Problem creating a FAST Content SSA in SharePoint 2010

While installing Fast Search Server for SharePoint 2010 (FS4SP) on a dev farm today, I got a problem with the provisioning of a new FAST Content SSA (Search Service Application), it would hang forever at "0:01 Configuring the Search Service..." waiting for the TopologyConfigFinish.aspx page to complete.


The problem turned out to be that the SharePoint 2010 Administration service wasn't started after the mandatory server reboot after installing FS4SP. The FAST "nctrl status" cmdlet does not check this. Make sure that both the SP2010 Administration and Timer services are running:


If you still can't create new or delete search service application instances, or make topology changes at all, then you might need to delete the old SSA the hard way. See Deleteing the search service application and How to delete orphan configuration objects from SharePoint farm. Heed this warning: "Please be VERY careful when executing the deleteconfigurationobject command, if this command is not used in the correct way (if you end up deleting the wrong object) there is NO way to revert back the changes and it has the potential to render your Configuration Database useless, hence you may require to restore / rebuild your SharePoint farm".

Remember to configure SSL enabled communication again when recreating the FAST Content SSA, otherwise your next crawl will be stuck on starting while retrying every 60 seconds to connect to the document engine. Also remember to restart the FAST Search for SharePoint and the SharePoint Server Search 14 services before starting a new full crawl.

Wednesday, February 23, 2011

Help Content Cannot Be Displayed in SharePoint 2010

Today we had a weird error on our SharePoint 2010 production farm: clicking on help got the "help content cannot be displayed" error for all normal sites, even though it worked perfectly well in Central Admin. The same applied to Site Settings>Help Settings for the site-collection, it worked in Central Admin, but not in any other site. In addition, the 'SharePoint Foundation Search' service was running on one WFE server.

First I checked all settings in KB939313 without that fixing the problem, then I checked the log files and found this access denied error for our site's app-pool account:

SqlError: 'The EXECUTE permission was denied on the object 'proc_EnumResourcesAtScope', database 'SharePoint_AdminContent_ABBAef34-7603-4da5-823a-43ee1327ABBA', schema 'dbo'.'

Before embarking on changing any database rights, we decided to test with an English site just in case, as all our custom site definitions are in Norwegian. Lo and behold - help worked for the new team-site; and what's more, suddenly help was working for all our existing Norwegian LCID 1044 sites also. Go figure...

[UPDATE] See the comments for tips on granting execute rights on the sprocs listed in the ULS to fix this problem once and for all - even beyond IISRESET.

Friday, August 27, 2010

SharePoint 2010 My Tasks Web Part using Search Driven Cross-Site Query with Muenchian Grouping

There always seems to be a requirement for rolling up data from all sites in one or more SharePoint solutions, such as getting a list of my tasks, a list of new documents this week, or creating a searchable news archive for publishing sites; or such as creating a site map or dynamic site directory based on metadata collected in your site provisioning workflow, that are later maintained by site owners.

SharePoint has several web-parts that can do cross-list and cross-subsite queries, such as the Content Query web-part, but all restricted to a single site-collection. In addition, there are the classic Data View web-part and the new XSLT List View web-parts that can be configured using SharePoint Designer. These web-parts can connect to a diverse set of data sources, from internal SharePoint lists to external REST and OData services.

Still, the simplest solution for cross-site/cross-solution rollups is to customize the ootb search web-parts against custom search scopes in the Search Service application. In most cases, no coding will be required, pure configuration of SharePoint will go a long way. This post will show how to configure a search driven "My Tasks" web-part that will show all tasks assigned to the user across all SharePoint sites across all indexed SharePoint solutions. The unstyled cross-site task rollup web-part looks like this, included some debug info:


First you need to configure the results scope behind the search driven web-part in Central Admin. Start by adding a new scope in 'Search Service Application>Scopes' called TaskRollup using the rules as shown here:


If you can't see ContentType when adding a rule, then go to 'Search Service Application>Metadata Properties' and edit the managed property to set Allow this property to be used in scopes.

As the TaskStatus site column is not mapped to any managed property by default, you must map the crawled property ows_Status to one before it can be used. Go to 'Search Service Application>Metadata Properties' and create a managed property called TaskStatus using the mapping as shown here:


Do not go creative with the naming, stay away from spaces and special characters such as ÆØÅ - a SharePoint best practice for any artifact name used as an identifier or an URL fragment. For example, a name like "Contoso Web Ingress" first gets encoded as "Contoso_x0020_Web_x0020_Ingress" when stored, and then once more encoded as "Contoso_x005F_x0020_Web_x005F_x0020_Ingress" in a search result XML.

A full crawl is required after adding or changing crawled or managed properties. Do a full crawl of the content source you used in the TaskRollup scope. Note that there must be some matching content stored in SharePoint for these properties to be added to the property database in the first place. Thus after provisioning new site content types or site columns, you must add some sample content and then do a full recrawl of the applicable content source.

Verifying that the full crawl of the SharePoint sites content source finished without errors completes the Central Admin configuration. Now it's time to configure the ootb Search Core Results web-part to become the customized My Tasks web-part.

Open a team-site and add the Search Core Results web-part to a page. Switch to page edit mode and select 'Edit Web Part' to open the Search Core Results settings panel. Rename the web-part 'Title' to Task Rollup (cross-site) and set the 'Cross Web-Part Query ID' to User query and 'Fixed Keyword Query' to scope: "TaskRollup" as shown here:


The Search Core Results web-part requires a user query, or a configured fixed or appended query, to actually perform a search. No configured or no user query will just show a message asking for query input. The cross-page query ID setting User query is chosen here for reasons explained later.

If you want to further limit what tasks are shown in the My Tasks web-part, just add more query keywords to the 'Append Text to Query' setting as shown here:


The My Tasks web-part will show the two task fields 'Status' and 'Assigned to' in the task list. Any managed crawled property can be added to the search results by configuring the 'Fetched Properties' setting. Add the following XML <Column Name="AssignedTo"/> <Column Name="TaskStatus"/> as shown here:


You need to uncheck the 'Use Location Visualization' setting to enable the controls for customizing the result set and XSL formatting. See A quick guide to CoreResultsWebPart configuration changes in SharePoint 2010 by Corey Roth to learn more about the new search location concept in SharePoint 2010. Read all his Enterprise Search posts for an excellent introduction to the improved SharePoint 2010 search services and web-parts.

After adding 'TaskStatus' and 'AssignedTo' to the fetched properties, you will also need to customize the XSL used to format and show the search results to also include your extra task fields. Click the 'XSL Editor' button in the 'Display Properties' section of the web-part settings panel, and add the fields to the match="Result" xsl:template according to your design. Note that the property names must be entered in lower case in the XSL.

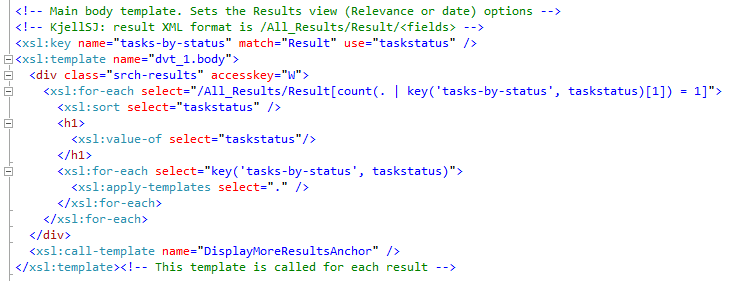
The astute reader will have noticed the nice grouping of the search results. This is done using the Muenchian method as SharePoint 2010 still uses XLST 1.0, thus no simple XSLT 2.0 xsl:for-each-group. The customized "My Tasks" results XSL creates a key called 'tasks-by-status' that selects 'Result' elements and groups them on the 'taskstatus' field as shown here:


Again, note the requirement for lower case names for the fetched properties when used in the XSL. Use the <xmp> trick to see the actual result XML.

The final part of the puzzle is how to turn the cross-site task list into a personal task list. Unfortunately, the [Me] and [Today] filter tokens cannot be used in the enterprise search query syntax, so some coding is required to add such dynamic filter tokens. Export the customized Search Core Results web-part to disk to start packaging into a WSP solution.

Create a new TaskRollupWebPart web-part SPI in your web-parts feature in Visual Studio 2010. Make the new web-part class inherit from CoreResultsWebPart in the Microsoft.Office.Server.Search assembly. Override the methods shown here to add dynamic filtering of the query through the SharedQueryManager for the web-part page:

namespace PuzzlepartTaskRollup.WebParts
{
[ToolboxItemAttribute(false)]
public class TaskRollupWebPart : 
Microsoft.Office.Server.Search.WebControls.CoreResultsWebPart
{
QueryManager _queryManager;
protected override void OnInit(EventArgs e) {
  base.OnInit(e);
  _queryManager = SharedQueryManager.GetInstance(this.Page).QueryManager;
}
 
protected override System.Xml.XPath.XPathNavigator GetXPathNavigator(string viewPath)
{
  SPUser user = SPContext.Current.Web.CurrentUser;
  _queryManager.UserQuery = string.Format("scope:\"TaskRollup\" AssignedTo:\"{0}\""
user.Name);
  return base.GetXPathNavigator(viewPath);
}
 
protected override void CreateChildControls()
{
  base.CreateChildControls();
  //debug info
  //Controls.Add(new Label { Text = string.Format("FixedQuery: {0}<br/>
AppendedQuery: {1}<br/>UserQuery: {2}", 
FixedQuery, AppendedQuery, _queryManager.UserQuery) });
}
}
}

The code in GetXPathNavigator is what adds the current user to the QueryManager.UserQuery to filter tasks based on the assigned user by [me]. There are five query objects available on a search web-part page, where QueryId.Query1 is the default. This is also what is exposed in the web-part settings as the 'User Query' option. Use the GetInstance(Page, QueryId) overload in SharedQueryManager to get at a specific cross-page query object.

Replace the content of the TaskRollupWebPart.webpart file with the exported Search Core Results configuration. This will ensure that all the configuration done to customize the ootb web-part into the My Tasks web-part is applied to the new TaskRollupWebPart. A small change is needed in the metadata type element to load the new TaskRollupWebPart code rather than the CoreResultsWebPart code:

<webParts>
<webPart xmlns="http://schemas.microsoft.com/WebPart/v3">
<metaData>
<type name="PuzzlepartTaskRollup.WebParts.TaskRollupWebPart, 
$SharePoint.Project.AssemblyFullName$" />
<importErrorMessage>$Resources:core,ImportErrorMessage;</importErrorMessage>
</metaData>

Build the feature and deploy the package to your test site from Visual Studio 2010. Add the web-part to a page and verify that you get only your tasks as expected.

I know that this seems like a lot of work, but a search-driven web-part is easily created and tested before lunch. The inevitable styling & layout using XSL and CSS is what will burn hours, as usual.
 
A drawback of search driven web-parts or code is the delay before new/updated content is shown due to the periodical crawling schedule, typically five or ten minutes. On the positive side, the results will be automatically security trimmed for you based on the logged on user - no authentication hassles or stored username password required as with the XSL List View.

Note that most enterprise search classes are still sealed in SharePoint 2010 as in SharePoint 2007, except the CoreResultsWebPart and some new classes, so you're limited to what customizations can be achieved with configuration or the SharedQueryManager. Search driven web-parts works equally well in SharePoint 2007, except that there is no SharedQueryManager, but rather the infamous search results hidden object (SRHO) which is unsupported.

Recommended: SharePoint Search XSL Samples and the Search Community Toolkit at CodePlex.

Thursday, May 10, 2007

WCF+EntLib3: Getting started

In addition to the WCF+EntLib3 validation and exception handling posts at Guy Burstein's blog/CodeProject, this info from David Hayden's blog about logging should get you started:
  • A new EntLibLoggingProxyTraceListener class. This trace listener is designed to be used in WCF’s System.ServiceModel trace source, which is configured within the <system.diagnostics> section. This trace listener receives WCF messages logged to this trace source, wraps them in an XmlLogEntry class, and forward them to the Logging Application Block where it can be processed according to the application block configuration.
  • A new XmlLogEntry class, which derives from LogEntry but includes a new Xml property that preserves the original XML data provided by WCF.
  • A new XmlTraceListener class, which derives from the .NET XmlWriterTextWriter class. This class can extract XML data from an XmlLogEntry class
In short, attributes and the interceptor mechanisms of WCF are used to integrate EntLib3 features for validation and exception handling, while logging is just another trace listener. You'll need to understand how to configure all three application blocks to make the WCF integration work. I recommend using the EntLibConfig.exe tool to configure the EntLib3 stuff, and the SvcConfigEditor.exe tool to configure WCF tracing wrt logging. The WCF toolbox is included in the .NET3 SDK.

That is all I have managed to find regarding the WCF features of EntLib3. The online MSDN docs contains mostly "new WCF features added to the ____ Application Block" statements and no code samples.

Sunday, May 06, 2007

EntLib3 should apply convention over configuration

After using the EntLib3 validation application block (VAB) for a while now, and also some of the new configuration mechanisms such as external configuration source and environmental overrides for different build types; it occurs to me that there is a bit to much XML noise in the config.

EntLib3 should do as in Castle Windsor and MonoRail and Ruby on Rails; apply "convention over configuration". In EntLib3 config files, you have to add mandatory attributes to identify the default configuration when there are multiple config options. Using "first is default" as in the Windsor 'constructor injection' mechanism would make configuration simpler and less error prone (see VAB issue below). I understand the reasons for having a default-identifier as a separate attribute, but with the new config override and merging mechanisms in EntLib3, there should be less need for compulsory config "switching" attributes.

The convention "first is default" would prevent silly omission errors such as not setting the default rule set in VAB less drastic. As it is now, if you forget to set the VAB default rule set, no validation will be applied, neither will there be any "no rules" exception - and your code will run as if all validations passed, even if there are plenty of broken rules in the input.

While I'm at it, the caching of connection strings and service URLs in the Settings class and the service proxies, is also really silly; you will not be able to detect that some configuration is missing until you move the solution to an isolated staging environment that has no access to the databases/service resources referenced in the development environment. Most test environments are not that isolated from the development environment, and such config errors can go undetected for a long time during testing. This is one area where it would be better if Microsoft could make configuration compulsory.

Wednesday, June 07, 2006

VB.NET multi-assembly .config settings

The new 'Settings' mechanism of VB.NET 2.0 and the related My.Settings object make it convenient to add new settings and to access the configuration settings from code as strongly typed data.

To bad that the project 'Settings' property page does not show e.g. <connectionStrings> settings imported (copy-paste) into the "Syden.Trio.ClientApp.exe.config" file from the config files of other assemblies, such as the typical "Syden.Trio.DataAccessLogic.dll.config" file which most likely contains the database connection string. Neither will these non-native configuration settings be available in the My.Settings object.

If you want to have a single config file, i.e. not use multiple .dll.config files in addition to the .exe.config file, you must use the ConfigurationManager class to access non-native (imported) settings. This class gives provides a .ConnectionStrings collection, in addition to the classic .AppSettings collection.

Thus, to get to the connection string used by generated TableAdapter code, use code like this:

configInfo.Text = ConfigurationManager.ConnectionStrings
("Syden.Trio.Kasse.DataAccessLogic.My.MySettings.TrioConnectionString")
.ConnectionString

Note how VB.NET use the assembly's full namespace to prefix all config settings. This is why My.Settings does not like/support imported settings.

The ConfigurationManager is new in .NET 2.0 and requires you to add a reference to the System.Configuration assembly.