The Puzzlepart Content Link web-part works like the Content Editor web-part in ContentLink mode, but does not require you to configure anonymous access on source web-applications for cross site-collection linked content URLs. ContentLink is useful for showing common content stored in a central document library for use across other site-collections and sites.
Use the ContentLink property to set a server relative or absolute URL of the linked content to show. The user must of course have at least read-access to the document library where the linked content is stored. Note that the web-part is not suitable for solution gallery/sandboxed deployment due to the use of web request.
The web-part will work for retrieving linked content from other web-applications and site-collections even if anonymous access is not turned on. It also works when anonymous access is turned on, when the anonymous web-application policy is "no policy", "deny write" or "deny all". The code use the default credentials of the user when making the web request.
Download the WSP package or just the C# source for the web-part under Source Code at CodePlex.
Friday, December 10, 2010
Monday, November 22, 2010
Managing Memberships, Colleagues and Links for Other SharePoint User Profiles
Programming the SharePoint 2010 UserProfileManager, ColleagueManager, QuickLinkManager and MembershipManager seems simple enough, until you try to manage these profile aspects for other users. There are several quirks that when forgotten throws an UnauthorizedAccessException with the message "This operation requires you to be managing your own data or have administrator privileges".
Note that using the well known RunWithElevatedPrivileges is not sufficient to read the profile data of other users. To be able to do that, your UserProfileManager code must either run as a user profile manager, or be configured to respect the built-in privacy control using the IgnoreUserPrivacy parameter. Note how the SDK is very vague on using true or ...hmm... true?
Set IgnoreUserPrivacy to false when creating the UserProfileManager object, as shown here:
If you need to ignore the user privacy to filter memberships or access private profile properties, or manage user profiles in general, then you must be an UPA administrator or the code must implement Windows impersonation as the user profile manager ignores RunWithElevatedPrivileges.
Note that SharePoint site memberships are periodically processed by the "User Profile Service Application Proxy - User Profile to SharePoint Full/Quick Synchronization" timer jobs, and that only direct account membership in a site's member SharePoint group will be registered in the user profile membership list. Having access to a site through an AD security group will not do, as SharePoint don't resolve AD group memberships.
Note that using the well known RunWithElevatedPrivileges is not sufficient to read the profile data of other users. To be able to do that, your UserProfileManager code must either run as a user profile manager, or be configured to respect the built-in privacy control using the IgnoreUserPrivacy parameter. Note how the SDK is very vague on using true or ...hmm... true?
When this parameter is true, administrators can load and access complete user records for any user profile objects. When this parameter is true, administrators work as regular users and can load only trimmed profile information based on the user profile’s privacy setting.As it turns out, you must use false to get the expected behavior to avoid getting the access denied exception as a normal user. Only accounts that are registered as User Profile service application (UPA) managers will have access to ignore user privacy. If your code use IgnoreUserPrivacy = true and runs as an account that is not an UPA administrator, you will get this error:
You must have manage user profiles administrator rights to use administrator mode.
Set IgnoreUserPrivacy to false when creating the UserProfileManager object, as shown here:
//profile and membership internally use ValidateIsSelfOrAdmin, must use IgnoreUserPrivacy = false
string siteUrl = SPContext.Current.Site.Url;
using (SPSite mySite = new SPSite(siteUrl))
{
SPServiceContext context = SPServiceContext.GetContext(mySite);
UserProfileManager profileManager = new UserProfileManager(context, false);
MySiteUtilities profileSiteInfo = new MySiteUtilities(Page);
UserProfile userProfile = profileManager.GetUserProfile(profileSiteInfo.CurrentProfileSiteAccountName);
MembershipManager memberManager = userProfile.Memberships;
Membership[] membershipList = memberManager.GetItems(MembershipSortType.Alphabetical);
. . .
//membership management code here
. . .
}
If you need to ignore the user privacy to filter memberships or access private profile properties, or manage user profiles in general, then you must be an UPA administrator or the code must implement Windows impersonation as the user profile manager ignores RunWithElevatedPrivileges.
Note that SharePoint site memberships are periodically processed by the "User Profile Service Application Proxy - User Profile to SharePoint Full/Quick Synchronization" timer jobs, and that only direct account membership in a site's member SharePoint group will be registered in the user profile membership list. Having access to a site through an AD security group will not do, as SharePoint don't resolve AD group memberships.
Wednesday, October 06, 2010
Secure Store Service: Create Site-Collections avoiding UnauthorizedAccessException
The MSDN forums is full of questions on how to create a new site-collection from code, especially on what permissions are required to avoid the UnauthorizedAccessException "Access is denied" HRESULT: 0x80070005 error. Your code might work fine when running as you on your development server, and of course under the identity of the SharePoint farm account; but not when running under another application pool identity, or as a normal end-user or even as the SHAREPOINT\System account in workflows or event receivers using SPSecurity.RunWithElevatedPrivileges.
The simple answer is that CreateSite requires the same permissions as the SharePoint farm account. You certainly do not want to give all your end-users those permissions, so typically you would do a revert-to-self using RunWithElevatedPrivileges and run the site provisioning code as your SharePoint web-application application pool identity. Alas, adding the app-pool identity to the farm administrator group, giving it "full control" and "run as system" in web-app User Permission Policy, adding it to server local groups such as WSS_WPG or even to SQL Server db_owner and WSS_Content_Application_Pools database roles in the config and content databases, will not provide a configuration that works across all scenarios from web-parts to event receivers, workflows and integration tests.
Always try to assign a managed service account for the SP web-app application pool identity using Central Admin first or run GrantAccessToProcessIdentity in PowerShell. Still, getting access to the content database might not be enough for creating new site-collections, access to the configuration database is also needed for the process account.
The simple solution to this problem is to run all SharePoint web-applications using the farm account. This is definitely not recommended, and the Central Admin Health Analyzer will report the "The server farm account should not be used for other services" error in the security category.
A better alternative is to do a real RevertToSelf using WindowsImpersonationContext rather than the SharePoint RunWithElevatedPrivileges abstraction. This will require that your code knows the login name and password of the farm account. It is not best practice to store these in clear text in your code or config files, so I recommend using the SharePoint 2010 Secure Store Service to provide the farm account credentials to your code. Here's the code to implement impersonation in ASP.NET and the code to get credentials from the default secure store provider to get you started.

Use a Secure Store target application of type "Group" to store the Windows credentials of the farm account. Add only the required app-pool identities as target application "Members" when setting the target application access permissions, and then use RunWithElevatedPrivileges when retrieving the farm account credentials from the Secure Store Service.
So the final solution is this: retrieve the farm account credentials in your code using the app-pool identity, impersonate the farm account using those credentials, and then create a new site-collection from your code.
Note that there are also issues with claims-based authentication (CBA) when adding sites from code. The known workaround is to enable self-service site creation (SSSC) and use SelfServiceCreateSite from code.
Need to provision lists, pages and other stuff to your new site? Check out the SharePoint Site Configurator Feature over at CodePlex. Its a great resource for learning how to configure SharePoint sites.
Tuesday, September 28, 2010
Customizing the Search Action Links in SharePoint 2010
The SharePoint 2010 Search Action Links web-part is really just the Search Core Results web-part with the 'Show search results' settings set to false. Some of the action links have configurable captions such as the 'Show more results' link, while the 'Alert me' and 'RSS feed' link captions are not exposed in the web-part settings. However, it is quite easy to customize the layout, styling, links and content of the Search Action Links web-part - you can even add custom action links.
This example shows a searchable site directory built from customized standard SharePoint 2010 search web-parts:

Customizing the Search Action Links web-part is done exactly like for the Search Core Results web-part: you customize the embedded XSL or provide a custom XSL file using the hidden XslLink setting in the .webpart file. The following example shows how to customize the caption of the alerts and RSS links:

The example XSL shows how to set an <xsl:variable> field based on different conditions using <xsl:choose>. XSL don't have variables like in programming languages; they behave like C# const or read-only fields, they cannot be changed when first set.
The example XSL also shows how to fix an error with the RSS feed link when using a 'Fixed query' in your search page, or when using a specific search 'Scope' and no user query keyword by default, to show all results from that scope. The RSS link do not pick up these settings from the web-part, and the query RSS feed will generate the "Search RSS feed generation failed" error message. This error is caused by there being no keyword, which is fixed by adding a keyword to the URL using the k= querystring key. Just add the fixed query or the scope as the keyword:
/_layouts/srchrss.aspx?k=scope:"Puzzlepart"
Note that the 'Alert me' link don't have the k= RSS feed issue, rather it uses JavaScript and the hidden <input name="P_Query"> field on the page. This field is emitted by the Search Core Result web-part and contains the complete keyword query including the user query and the Scope, FixedQuery and AppendedQuery property settings.
Add custom parameters to the XSL when you need to have extra web-part configuration options beyond the provided standard parameters. For example, to simulate the P_Query mechanism, pass the query keywords as custom parameters. The example XSL shows how to use the custom parameter, along with the standard parameters. Use the 'Parameters Editor' in the web-part tool pane to configure your custom web-part setting:
<ParameterBinding Name="AppendedFilter" Location="None" DefaultValue="scope:&qout;Puzzlepart&qout;" />
Pass your configuration value using the DefaultValue attribute, using "None" as the Location. You can of course also set the 'alert me' and 'RSS feed' link captions using parameters.
I use code like this in a FeatureActivated event receiver to configure and add the customized web-part to our custom web part pages:
private static void AddWebPartResultsActionLinks(SPLimitedWebPartManager lwpm, string title, string siteTemplate)
{
string xslParams = "";
if(!String.IsNullOrEmpty(siteTemplate))
xslParams = String.Format("<ParameterBinding Name='AppendedFilter' Location='None' DefaultValue='SiteInfoSiteTemplate:\"{0}\"' />", siteTemplate);
CoreResultsWebPart ralwp = new CoreResultsWebPart()
{
Title = title,
ChromeType = PartChromeType.None,
QueryNumber = QueryId.Query1, //must be UserQuery because user can search the SiteInfoScope
ShowActionLinks = true,
ShowSearchResults = false, //this makes it an "action links" web-part
ShowWindowsSearch = false,
DisplayRSSLink = true,
DisplayAlertMeLink = true,
XslLink = "/CenterPages/XSL/SearchActionLinks.xsl",
ParameterBindings = xslParams,
UseLocationVisualization = false,
ShowMessages = false
};
lwpm.AddWebPart(ralwp, "MiddleRightZone", 1);
}
You can of course export the customized Search Action Links web-part and use <AllUsersWebPart> in a file module to provision the web-part to a page, but the elements.xml file quickly gets huge and unmanageable. In addition, you'll have to encode any CDATA sections embedded in the exported web-part XML, as CDATA sections cannot be nested. That's why I recommend using XslLink rather than embedded XSL, and then code to provision the customized web-parts.
Wednesday, September 22, 2010
Missing "I Like It" in SharePoint 2010
The social tagging capability in SharePoint 2010 takes several dependencies on different service applications: the Managed Metadata Service application (MMS) for storing and providing tag definitions, the User Profile Service application (UPA) for storing the actual tagging and notes, and the Search Service for several tag-based web-parts to show tagging information such as those on the tag profile page. The identity used to run your SharePoint 2010 solutions and the content crawler identity needs to have access to the service applications that manage and store your social tagging data.
I recently added a new web-application to my development farm, and today to my surprise I noticed that the "I Like It" button in the global area was missing. In addition, the button was disabled in the item "Tags and Notes" ribbon.

The Tags & Notes buttons worked as expected in other sites in the farm, so the "Social Tags and Note Board Ribbon Controls" farm feature was activated, enabling these buttons for all sites in the farm.
I first verified that I had the "Use Social Feaures" permissions in the User Profile Service application, and did some tagging in another SharePoint site in the farm, ruling out that this had something to do with my SharePoint user. So I knew it had to be something related to my newly added web-application identity, having had problems with the search-driven tag cloud and tag profile pages in the past.
The solution is to grant the identity running the SharePoint web-applicaiton the correct connection permissions to the two service applications. My new web-application lacked permissions on the Managed Metadata Service application. Go to "Central Administration > Manage Service Applications", select the MMS application row in the list, and click "Permissions" in the ribbon to configure the connection permissions.

Add the managed account used as the service account for the web-application, and assign it permissions to read and add new terms to the MMS term store. Write access is required to allow users to apply tags never used before. Full access is not required. This will show and enable the "I Like It" button and the "Tags" tab in the popup dialog for "Tags & Notes" as expected.
Revoking the service application connection permissions for a web-application identity can be used to remove the social tagging and note board tools from contained sites. However, while the "I Like It" button is hidden when revoking access to MMS, the "Tags & Notes" button is not hidden when revoking access to UPA, rather a non-functional popup dialog is shown - not the best user experience. The following figure shows the effect of having access to MMS but not to UPA:

So, if there is something strange with the social tagging and related web-parts in your SharePoint 2010 solution, always make sure that web-applications identities and content crawler identity have applicable MMS and UPA service application connection permissions.
If you use the Note Board web-part, and it suddenly stopped working by not showing any existing notes and you cannot even add new ones - and only the web-part title is shown, then make sure that your Search Service Application (SSA) indexing is crawling properly. This can happen after applying e.g. a cumulative update. Remember that you can always check if the tags and notes database is operational using the UPA.
Friday, August 27, 2010
SharePoint 2010 My Tasks Web Part using Search Driven Cross-Site Query with Muenchian Grouping
There always seems to be a requirement for rolling up data from all sites in one or more SharePoint solutions, such as getting a list of my tasks, a list of new documents this week, or creating a searchable news archive for publishing sites; or such as creating a site map or dynamic site directory based on metadata collected in your site provisioning workflow, that are later maintained by site owners.
SharePoint has several web-parts that can do cross-list and cross-subsite queries, such as the Content Query web-part, but all restricted to a single site-collection. In addition, there are the classic Data View web-part and the new XSLT List View web-parts that can be configured using SharePoint Designer. These web-parts can connect to a diverse set of data sources, from internal SharePoint lists to external REST and OData services.
Still, the simplest solution for cross-site/cross-solution rollups is to customize the ootb search web-parts against custom search scopes in the Search Service application. In most cases, no coding will be required, pure configuration of SharePoint will go a long way. This post will show how to configure a search driven "My Tasks" web-part that will show all tasks assigned to the user across all SharePoint sites across all indexed SharePoint solutions. The unstyled cross-site task rollup web-part looks like this, included some debug info:

First you need to configure the results scope behind the search driven web-part in Central Admin. Start by adding a new scope in 'Search Service Application>Scopes' called TaskRollup using the rules as shown here:

If you can't see ContentType when adding a rule, then go to 'Search Service Application>Metadata Properties' and edit the managed property to set Allow this property to be used in scopes.
As the TaskStatus site column is not mapped to any managed property by default, you must map the crawled property ows_Status to one before it can be used. Go to 'Search Service Application>Metadata Properties' and create a managed property called TaskStatus using the mapping as shown here:

Do not go creative with the naming, stay away from spaces and special characters such as ÆØÅ - a SharePoint best practice for any artifact name used as an identifier or an URL fragment. For example, a name like "Contoso Web Ingress" first gets encoded as "Contoso_x0020_Web_x0020_Ingress" when stored, and then once more encoded as "Contoso_x005F_x0020_Web_x005F_x0020_Ingress" in a search result XML.
A full crawl is required after adding or changing crawled or managed properties. Do a full crawl of the content source you used in the TaskRollup scope. Note that there must be some matching content stored in SharePoint for these properties to be added to the property database in the first place. Thus after provisioning new site content types or site columns, you must add some sample content and then do a full recrawl of the applicable content source.
Verifying that the full crawl of the SharePoint sites content source finished without errors completes the Central Admin configuration. Now it's time to configure the ootb Search Core Results web-part to become the customized My Tasks web-part.
Open a team-site and add the Search Core Results web-part to a page. Switch to page edit mode and select 'Edit Web Part' to open the Search Core Results settings panel. Rename the web-part 'Title' to Task Rollup (cross-site) and set the 'Cross Web-Part Query ID' to User query and 'Fixed Keyword Query' to scope: "TaskRollup" as shown here:

The Search Core Results web-part requires a user query, or a configured fixed or appended query, to actually perform a search. No configured or no user query will just show a message asking for query input. The cross-page query ID setting User query is chosen here for reasons explained later.
If you want to further limit what tasks are shown in the My Tasks web-part, just add more query keywords to the 'Append Text to Query' setting as shown here:

The My Tasks web-part will show the two task fields 'Status' and 'Assigned to' in the task list. Any managed crawled property can be added to the search results by configuring the 'Fetched Properties' setting. Add the following XML <Column Name="AssignedTo"/> <Column Name="TaskStatus"/> as shown here:

You need to uncheck the 'Use Location Visualization' setting to enable the controls for customizing the result set and XSL formatting. See A quick guide to CoreResultsWebPart configuration changes in SharePoint 2010 by Corey Roth to learn more about the new search location concept in SharePoint 2010. Read all his Enterprise Search posts for an excellent introduction to the improved SharePoint 2010 search services and web-parts.
After adding 'TaskStatus' and 'AssignedTo' to the fetched properties, you will also need to customize the XSL used to format and show the search results to also include your extra task fields. Click the 'XSL Editor' button in the 'Display Properties' section of the web-part settings panel, and add the fields to the match="Result" xsl:template according to your design. Note that the property names must be entered in lower case in the XSL.
The astute reader will have noticed the nice grouping of the search results. This is done using the Muenchian method as SharePoint 2010 still uses XLST 1.0, thus no simple XSLT 2.0 xsl:for-each-group. The customized "My Tasks" results XSL creates a key called 'tasks-by-status' that selects 'Result' elements and groups them on the 'taskstatus' field as shown here:

Again, note the requirement for lower case names for the fetched properties when used in the XSL. Use the <xmp> trick to see the actual result XML.
The final part of the puzzle is how to turn the cross-site task list into a personal task list. Unfortunately, the [Me] and [Today] filter tokens cannot be used in the enterprise search query syntax, so some coding is required to add such dynamic filter tokens. Export the customized Search Core Results web-part to disk to start packaging into a WSP solution.
Create a new TaskRollupWebPart web-part SPI in your web-parts feature in Visual Studio 2010. Make the new web-part class inherit from CoreResultsWebPart in the Microsoft.Office.Server.Search assembly. Override the methods shown here to add dynamic filtering of the query through the SharedQueryManager for the web-part page:
The code in GetXPathNavigator is what adds the current user to the QueryManager.UserQuery to filter tasks based on the assigned user by [me]. There are five query objects available on a search web-part page, where QueryId.Query1 is the default. This is also what is exposed in the web-part settings as the 'User Query' option. Use the GetInstance(Page, QueryId) overload in SharedQueryManager to get at a specific cross-page query object.
Replace the content of the TaskRollupWebPart.webpart file with the exported Search Core Results configuration. This will ensure that all the configuration done to customize the ootb web-part into the My Tasks web-part is applied to the new TaskRollupWebPart. A small change is needed in the metadata type element to load the new TaskRollupWebPart code rather than the CoreResultsWebPart code:
Build the feature and deploy the package to your test site from Visual Studio 2010. Add the web-part to a page and verify that you get only your tasks as expected.
I know that this seems like a lot of work, but a search-driven web-part is easily created and tested before lunch. The inevitable styling & layout using XSL and CSS is what will burn hours, as usual.
A drawback of search driven web-parts or code is the delay before new/updated content is shown due to the periodical crawling schedule, typically five or ten minutes. On the positive side, the results will be automatically security trimmed for you based on the logged on user - no authentication hassles or stored username password required as with the XSL List View.
Note that most enterprise search classes are still sealed in SharePoint 2010 as in SharePoint 2007, except the CoreResultsWebPart and some new classes, so you're limited to what customizations can be achieved with configuration or the SharedQueryManager. Search driven web-parts works equally well in SharePoint 2007, except that there is no SharedQueryManager, but rather the infamous search results hidden object (SRHO) which is unsupported.
Recommended: SharePoint Search XSL Samples and the Search Community Toolkit at CodePlex.
SharePoint has several web-parts that can do cross-list and cross-subsite queries, such as the Content Query web-part, but all restricted to a single site-collection. In addition, there are the classic Data View web-part and the new XSLT List View web-parts that can be configured using SharePoint Designer. These web-parts can connect to a diverse set of data sources, from internal SharePoint lists to external REST and OData services.
Still, the simplest solution for cross-site/cross-solution rollups is to customize the ootb search web-parts against custom search scopes in the Search Service application. In most cases, no coding will be required, pure configuration of SharePoint will go a long way. This post will show how to configure a search driven "My Tasks" web-part that will show all tasks assigned to the user across all SharePoint sites across all indexed SharePoint solutions. The unstyled cross-site task rollup web-part looks like this, included some debug info:

First you need to configure the results scope behind the search driven web-part in Central Admin. Start by adding a new scope in 'Search Service Application>Scopes' called TaskRollup using the rules as shown here:

If you can't see ContentType when adding a rule, then go to 'Search Service Application>Metadata Properties' and edit the managed property to set Allow this property to be used in scopes.
As the TaskStatus site column is not mapped to any managed property by default, you must map the crawled property ows_Status to one before it can be used. Go to 'Search Service Application>Metadata Properties' and create a managed property called TaskStatus using the mapping as shown here:

Do not go creative with the naming, stay away from spaces and special characters such as ÆØÅ - a SharePoint best practice for any artifact name used as an identifier or an URL fragment. For example, a name like "Contoso Web Ingress" first gets encoded as "Contoso_x0020_Web_x0020_Ingress" when stored, and then once more encoded as "Contoso_x005F_x0020_Web_x005F_x0020_Ingress" in a search result XML.
A full crawl is required after adding or changing crawled or managed properties. Do a full crawl of the content source you used in the TaskRollup scope. Note that there must be some matching content stored in SharePoint for these properties to be added to the property database in the first place. Thus after provisioning new site content types or site columns, you must add some sample content and then do a full recrawl of the applicable content source.
Verifying that the full crawl of the SharePoint sites content source finished without errors completes the Central Admin configuration. Now it's time to configure the ootb Search Core Results web-part to become the customized My Tasks web-part.
Open a team-site and add the Search Core Results web-part to a page. Switch to page edit mode and select 'Edit Web Part' to open the Search Core Results settings panel. Rename the web-part 'Title' to Task Rollup (cross-site) and set the 'Cross Web-Part Query ID' to User query and 'Fixed Keyword Query' to scope: "TaskRollup" as shown here:

The Search Core Results web-part requires a user query, or a configured fixed or appended query, to actually perform a search. No configured or no user query will just show a message asking for query input. The cross-page query ID setting User query is chosen here for reasons explained later.
If you want to further limit what tasks are shown in the My Tasks web-part, just add more query keywords to the 'Append Text to Query' setting as shown here:

The My Tasks web-part will show the two task fields 'Status' and 'Assigned to' in the task list. Any managed crawled property can be added to the search results by configuring the 'Fetched Properties' setting. Add the following XML <Column Name="AssignedTo"/> <Column Name="TaskStatus"/> as shown here:

You need to uncheck the 'Use Location Visualization' setting to enable the controls for customizing the result set and XSL formatting. See A quick guide to CoreResultsWebPart configuration changes in SharePoint 2010 by Corey Roth to learn more about the new search location concept in SharePoint 2010. Read all his Enterprise Search posts for an excellent introduction to the improved SharePoint 2010 search services and web-parts.
After adding 'TaskStatus' and 'AssignedTo' to the fetched properties, you will also need to customize the XSL used to format and show the search results to also include your extra task fields. Click the 'XSL Editor' button in the 'Display Properties' section of the web-part settings panel, and add the fields to the match="Result" xsl:template according to your design. Note that the property names must be entered in lower case in the XSL.
The astute reader will have noticed the nice grouping of the search results. This is done using the Muenchian method as SharePoint 2010 still uses XLST 1.0, thus no simple XSLT 2.0 xsl:for-each-group. The customized "My Tasks" results XSL creates a key called 'tasks-by-status' that selects 'Result' elements and groups them on the 'taskstatus' field as shown here:
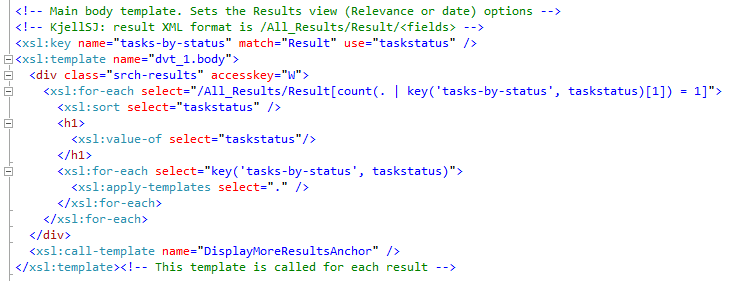
Again, note the requirement for lower case names for the fetched properties when used in the XSL. Use the <xmp> trick to see the actual result XML.
The final part of the puzzle is how to turn the cross-site task list into a personal task list. Unfortunately, the [Me] and [Today] filter tokens cannot be used in the enterprise search query syntax, so some coding is required to add such dynamic filter tokens. Export the customized Search Core Results web-part to disk to start packaging into a WSP solution.
Create a new TaskRollupWebPart web-part SPI in your web-parts feature in Visual Studio 2010. Make the new web-part class inherit from CoreResultsWebPart in the Microsoft.Office.Server.Search assembly. Override the methods shown here to add dynamic filtering of the query through the SharedQueryManager for the web-part page:
namespace PuzzlepartTaskRollup.WebParts
{
[ToolboxItemAttribute(false)]
public class TaskRollupWebPart :
Microsoft.Office.Server.Search.WebControls.CoreResultsWebPart
{
QueryManager _queryManager;
protected override void OnInit(EventArgs e) {
base.OnInit(e);
_queryManager = SharedQueryManager.GetInstance(this.Page).QueryManager;
}
protected override System.Xml.XPath.XPathNavigator GetXPathNavigator(string viewPath)
{
SPUser user = SPContext.Current.Web.CurrentUser;
_queryManager.UserQuery = string.Format("scope:\"TaskRollup\" AssignedTo:\"{0}\"",
user.Name);
return base.GetXPathNavigator(viewPath);
}
protected override void CreateChildControls()
{
base.CreateChildControls();
//debug info
//Controls.Add(new Label { Text = string.Format("FixedQuery: {0}<br/>
AppendedQuery: {1}<br/>UserQuery: {2}",
FixedQuery, AppendedQuery, _queryManager.UserQuery) });
}
}
}
The code in GetXPathNavigator is what adds the current user to the QueryManager.UserQuery to filter tasks based on the assigned user by [me]. There are five query objects available on a search web-part page, where QueryId.Query1 is the default. This is also what is exposed in the web-part settings as the 'User Query' option. Use the GetInstance(Page, QueryId) overload in SharedQueryManager to get at a specific cross-page query object.
Replace the content of the TaskRollupWebPart.webpart file with the exported Search Core Results configuration. This will ensure that all the configuration done to customize the ootb web-part into the My Tasks web-part is applied to the new TaskRollupWebPart. A small change is needed in the metadata type element to load the new TaskRollupWebPart code rather than the CoreResultsWebPart code:
<webParts>
<webPart xmlns="http://schemas.microsoft.com/WebPart/v3">
<metaData>
<type name="PuzzlepartTaskRollup.WebParts.TaskRollupWebPart,
$SharePoint.Project.AssemblyFullName$" />
<importErrorMessage>$Resources:core,ImportErrorMessage;</importErrorMessage>
</metaData>
Build the feature and deploy the package to your test site from Visual Studio 2010. Add the web-part to a page and verify that you get only your tasks as expected.
I know that this seems like a lot of work, but a search-driven web-part is easily created and tested before lunch. The inevitable styling & layout using XSL and CSS is what will burn hours, as usual.
A drawback of search driven web-parts or code is the delay before new/updated content is shown due to the periodical crawling schedule, typically five or ten minutes. On the positive side, the results will be automatically security trimmed for you based on the logged on user - no authentication hassles or stored username password required as with the XSL List View.
Note that most enterprise search classes are still sealed in SharePoint 2010 as in SharePoint 2007, except the CoreResultsWebPart and some new classes, so you're limited to what customizations can be achieved with configuration or the SharedQueryManager. Search driven web-parts works equally well in SharePoint 2007, except that there is no SharedQueryManager, but rather the infamous search results hidden object (SRHO) which is unsupported.
Recommended: SharePoint Search XSL Samples and the Search Community Toolkit at CodePlex.
Wednesday, August 04, 2010
Five Steps to Structure Your SharePoint Sites (Part III)
At every SharePoint customer and in every SharePoint project, the issue of how to realize a future-proof, working site structure arise. I've written a few blog posts on classification and structuring of SharePoint sites before (part 1 and part 2), focusing on scalable site structure design within the SharePoint system boundaries. This post is about getting from a classic site map based approach to a methodology driven by Information Architecture and the site classification pyramid, combined with the SharePoint containment hierarchy and SharePoint governance best practices. The latter is important as the management and usage of a site, and the service level agreement for the site, strongly influence how the overall SharePoint solution should be partitioned to adhere to architecture best practices.
Most information architects come up with a content organization model like a site map with hierarchical URL scheme. "This is the draft model, and we want the URL structure to be like this in our SharePoint solution" they say. "That's a very useful mental model of the site" I respond, "but what you really want is a good, intuitive navigation concept, helping users find what they need - like an invisible guiding hand; not that specific URL structure". Having a simple and easy mental model for the site structure is important, as it makes it easy to both contribute and find content, driving findability when the amount of information stored and managed in SharePoint grows.
Alas, that is not the primary issue with the site map approach for designing SharePoint site structures. The site map is closer to define statical IA structure than navigation, still it is only good for logical IA structure and cannot be expected to be used directly as the physical IA structure in SharePoint.

Using a site map approach to design a SharePoint site structure will only work in simple scenarios with homogenous solution domains, such as a publishing portal or a collaboration solution with limited document storage and versioning. It will fail when the SharePoint solution domains and their usage, governance and service level agreements differ, not to forget when the overall amount of data stored in SharePoint surpasses the 100GB limit per content database. The wanted URL structure might not be possible to realize in most cases anyhow when adhering to SharePoint architecture best practices.

A more structured approach is needed to design a SharePoint site structure according to architectural and governance best practices. My methodology involves a process with these five steps:

To successfully design a working and scalable SharePoint site structure, you need a site classification scheme. I recommend the classic site classification pyramid as it outlines typical solution domains with governance and site types, helping you classify sites and draw domain boundaries in your site model.

Then, after identifying the different solution domains that make up your overall SharePoint solution, you must map the identified solution domains to the SharePoint containment hierarchy. It is imperative that you understand the containment hierarchy and its boundaries, otherwise your solution will slowly stop working as more and more users create more and more sites and fill them with more and more information.

Site-collections is the main architectural component of SharePoint, in combination with the content database that stores the site-collection's content and documents. A web-application always have a single root (1st tier) site-collection, which is the home site of the web-application. A 2nd tier of site-collections can be added to the web-application as needed to scale the application, using SharePoint managed paths. A typical scenario is to add a new solution domain. Another typical scenario is to add room for more content and documents; because a site-collection cannot span content databases and adding more space thus requires a new site-collection. Use subsites for anything that is just a section of an existing solution domain or site. See the golf and car communities in the example, which functionally are "sites" in their own right. Read my post Classification and Structuring of SharePoint Sites (Part I) to learn more.

It's easy to choose what solution goes into the root site-collection of a web-application, typically this is the portal to the overall solution. As there is a limited set of explicit site-collections per SharePoint web-application, these should be reserved for a planned, wellknown small number of predefined sites. Use the limited set of available explicit site-collections for the top two types in the site classification pyramid. Note that root and explicit site-collection storage cannot be scaled as you cannot add another content database to a site collection. Use as few explicit site-collection as possible, stay well below the limit of 20 managed paths. Expect everybody to require vanity URLs such as ://puzzlepart/HR/ for their site, so a strict governance policy for 'explicit' is required.
Use wildcard site-collections when the predictable number of sites is too large for explicit, typically for the bottom three types in the site classification pyramid. Also use wildcard site-collections even for central portals and division areas when there is no absolute requirement for an 'explicit' 2nd tier top-level site. See Puzzlepart TV in the example; even if the channel sites are classified as 'division area' (yellow color code) they do not need to be 'explicit'. In fact, due to their massive storage requirements for rich media content, best practices dictate the use of 'wildcard'. Always use wildcard site-collections for solutions have a limited life span such as projects.

Finally, after composing your scalable site structure design from root, explicit and wildcard site-collections, define the URL scheme that underlies the site structure. Use short descriptive URL elements for web-applications, managed paths and site-collections. The combination of these elements become the URL of the top-level sites that are what the users actually interacts with when using SharePoint. Note how the URL structure is affected by the SharePoint containment hierarchy. Compare ://puzzlepart/pzl-tv/ and ://puzzlepart/pzltv/ in the example, the latter contains child sites of the former in the overall navigation concept. In addition, I recommend defining and enforcing policies for all URL elements that users can provision, such as subsites, lists and libraries, to avoid non-friendly URLs with anything from spaces to special characters.
It is very likely that you will need to customize the ootb SharePoint navigation provider and menu rendering to have a consistent navigation experience across sites, sections and pages. Users get very confused and annoyed when the content of the top menu changes as they navigate from site to site, which is very understandable. There are several ways to implement common menu and navigation across site-collections, but that's left as an exercise for my readers.
The capacity and planning boundaries are mostly the same in SharePoint 2010 as in SharePoint 2007 for web-applications, site-collections and content databases. The most significant change is that SharePoint 2010 now supports max 250 000 site-collections per web-application, five times the limit for 2007. The max number of content databases per web-application has increased from 100 to 300, on the other hand the max number of site-collections per content database have been reduced from 50 000 to max 5000 with a recommendation of 2000 site-collections per content database. None of these numbers are hard limits, these are numbers for acceptable SharePoint performance.
Most information architects come up with a content organization model like a site map with hierarchical URL scheme. "This is the draft model, and we want the URL structure to be like this in our SharePoint solution" they say. "That's a very useful mental model of the site" I respond, "but what you really want is a good, intuitive navigation concept, helping users find what they need - like an invisible guiding hand; not that specific URL structure". Having a simple and easy mental model for the site structure is important, as it makes it easy to both contribute and find content, driving findability when the amount of information stored and managed in SharePoint grows.
Alas, that is not the primary issue with the site map approach for designing SharePoint site structures. The site map is closer to define statical IA structure than navigation, still it is only good for logical IA structure and cannot be expected to be used directly as the physical IA structure in SharePoint.

Using a site map approach to design a SharePoint site structure will only work in simple scenarios with homogenous solution domains, such as a publishing portal or a collaboration solution with limited document storage and versioning. It will fail when the SharePoint solution domains and their usage, governance and service level agreements differ, not to forget when the overall amount of data stored in SharePoint surpasses the 100GB limit per content database. The wanted URL structure might not be possible to realize in most cases anyhow when adhering to SharePoint architecture best practices.
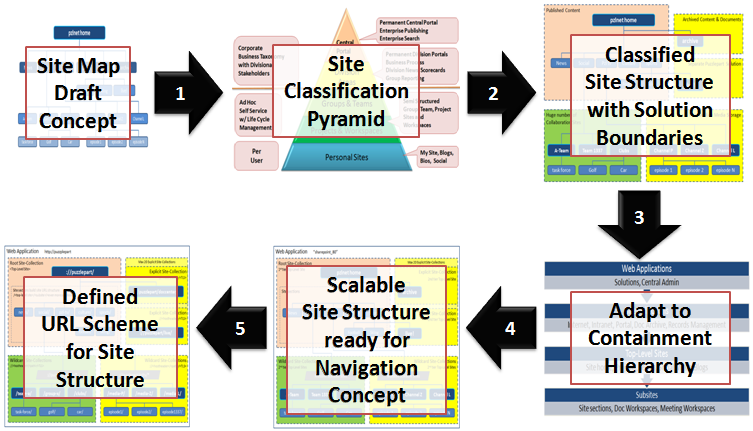
A more structured approach is needed to design a SharePoint site structure according to architectural and governance best practices. My methodology involves a process with these five steps:
- Review your site map draft model against the SharePoint site classification pyramid and your governance plan for each of your identified site types.
- Partition your sites into solution domains based on site type and governance policies aspects such as business purpose, usage patterns, storage requirements, management boundaries, information security and isolation, operations and service level agreements.
- Adapt the site structure to the SharePoint containment hierarchy, adhering to limits and best practices based on the partitioned solution domains.
- Use the main SharePoint architectural components explicit and wildcard site-collections to ensure a scalable design that allows for future growth and expansion into new business domains. Use wildcard site-collections by default as these are super scalable. Adapt or customize SharePoint global menu and current menu to your navigation concept, to hide the solution partitioning.
- Define your URL scheme using host headers, manage paths and site provisioning policies.

To successfully design a working and scalable SharePoint site structure, you need a site classification scheme. I recommend the classic site classification pyramid as it outlines typical solution domains with governance and site types, helping you classify sites and draw domain boundaries in your site model.

Then, after identifying the different solution domains that make up your overall SharePoint solution, you must map the identified solution domains to the SharePoint containment hierarchy. It is imperative that you understand the containment hierarchy and its boundaries, otherwise your solution will slowly stop working as more and more users create more and more sites and fill them with more and more information.

Site-collections is the main architectural component of SharePoint, in combination with the content database that stores the site-collection's content and documents. A web-application always have a single root (1st tier) site-collection, which is the home site of the web-application. A 2nd tier of site-collections can be added to the web-application as needed to scale the application, using SharePoint managed paths. A typical scenario is to add a new solution domain. Another typical scenario is to add room for more content and documents; because a site-collection cannot span content databases and adding more space thus requires a new site-collection. Use subsites for anything that is just a section of an existing solution domain or site. See the golf and car communities in the example, which functionally are "sites" in their own right. Read my post Classification and Structuring of SharePoint Sites (Part I) to learn more.

It's easy to choose what solution goes into the root site-collection of a web-application, typically this is the portal to the overall solution. As there is a limited set of explicit site-collections per SharePoint web-application, these should be reserved for a planned, wellknown small number of predefined sites. Use the limited set of available explicit site-collections for the top two types in the site classification pyramid. Note that root and explicit site-collection storage cannot be scaled as you cannot add another content database to a site collection. Use as few explicit site-collection as possible, stay well below the limit of 20 managed paths. Expect everybody to require vanity URLs such as ://puzzlepart/HR/ for their site, so a strict governance policy for 'explicit' is required.
Use wildcard site-collections when the predictable number of sites is too large for explicit, typically for the bottom three types in the site classification pyramid. Also use wildcard site-collections even for central portals and division areas when there is no absolute requirement for an 'explicit' 2nd tier top-level site. See Puzzlepart TV in the example; even if the channel sites are classified as 'division area' (yellow color code) they do not need to be 'explicit'. In fact, due to their massive storage requirements for rich media content, best practices dictate the use of 'wildcard'. Always use wildcard site-collections for solutions have a limited life span such as projects.

Finally, after composing your scalable site structure design from root, explicit and wildcard site-collections, define the URL scheme that underlies the site structure. Use short descriptive URL elements for web-applications, managed paths and site-collections. The combination of these elements become the URL of the top-level sites that are what the users actually interacts with when using SharePoint. Note how the URL structure is affected by the SharePoint containment hierarchy. Compare ://puzzlepart/pzl-tv/ and ://puzzlepart/pzltv/ in the example, the latter contains child sites of the former in the overall navigation concept. In addition, I recommend defining and enforcing policies for all URL elements that users can provision, such as subsites, lists and libraries, to avoid non-friendly URLs with anything from spaces to special characters.
It is very likely that you will need to customize the ootb SharePoint navigation provider and menu rendering to have a consistent navigation experience across sites, sections and pages. Users get very confused and annoyed when the content of the top menu changes as they navigate from site to site, which is very understandable. There are several ways to implement common menu and navigation across site-collections, but that's left as an exercise for my readers.
The capacity and planning boundaries are mostly the same in SharePoint 2010 as in SharePoint 2007 for web-applications, site-collections and content databases. The most significant change is that SharePoint 2010 now supports max 250 000 site-collections per web-application, five times the limit for 2007. The max number of content databases per web-application has increased from 100 to 300, on the other hand the max number of site-collections per content database have been reduced from 50 000 to max 5000 with a recommendation of 2000 site-collections per content database. None of these numbers are hard limits, these are numbers for acceptable SharePoint performance.
Wednesday, July 28, 2010
Using a Page Specific Master Page in SharePoint 2010
It is a common misunderstanding that you cannot have page specific masterpages in SharePoint. The standard configuration of the MasterPageFile setting in the Page directive is to use the well known ~masterurl/default.master and ~masterurl/custom.master dynamic tokens that at run-time are replaced with the site-wide 'Site Master Page' and 'System Master Page' settings. So using these tokens don't allow for having page specific masterpages in SharePoint.
There are, however, two additional tokens, the site-collection and site relative ~sitecollection/<central master page> and ~site/<local master page> static tokens from Windows SharePoint Services 3.
You can still use these static tokens in SharePoint 2010 as shown in this example:
Note how you must specify the site-collection or site relative path of the master page file location in addition to the name of the master page file.
So using the static tokens works like a breeze for web part pages in SharePoint 2010 also. I haven't tested if the Publishing feature's page layouts still are limited to the dynamic tokens. For application pages the ability to use a customized master page is new in SharePoint 2010.
There are, however, two additional tokens, the site-collection and site relative ~sitecollection/<central master page> and ~site/<local master page> static tokens from Windows SharePoint Services 3.
You can still use these static tokens in SharePoint 2010 as shown in this example:
<%@ Page language="C#" MasterPageFile="~site/_catalogs/masterpage/JBV/SiteCenterMasterPage.master" Inherits="Microsoft.SharePoint.WebPartPages.WebPartPage, Microsoft.SharePoint,Version=14.0.0.0,Culture=neutral,PublicKeyToken=71e9bce111e9429c" %>
Note how you must specify the site-collection or site relative path of the master page file location in addition to the name of the master page file.
So using the static tokens works like a breeze for web part pages in SharePoint 2010 also. I haven't tested if the Publishing feature's page layouts still are limited to the dynamic tokens. For application pages the ability to use a customized master page is new in SharePoint 2010.
Friday, July 02, 2010
Scalable SharePoint 2010 Farm & Services Architecture
This post describes a proposed solution design for providing an intranet collaboration farm capable to scale out to support a publishing portal and extranet collaboration with partners and suppliers. The design is based on a set of diverese sites types identified in an Information Architecture analysis, and the general planning recommendations for these types. In addition, several non-functional requirements is accounted for in the design, such as farm security, robustness and availability.
The SharePoint 2010 farm is designed with scale out support for different future solution areas. The initial farm architecture will be designed to support collaboration for internal users only, with an option to also add an intranet publishing solution. The long term goal of the farm is to eventually support collaboration with external users also, such as partners an suppliers.
All SharePoint 2010 solutions are built from a set of elements ranging from the farm hosting the solutions down to sites that contains the actual functionality and information of the solutions.

SharePoint solutions are deployed into SharePoint web-applications in a SharePoint farm. Web-applications are management containers for site collections. SharePoint uses site collections to structure the sites and subsites that implements the actual functionality of SharePoint solutions.
Site collections bridge logical architecture and information architecture (IA). The design goals for site collections in the model are to create logical divisions of content and functionality, in addition to satisfy requirements for URL design. To satisfy the requirements for URL design, each web application includes a single root-level site collection, such as ://portal/. In addition, a set of managed paths are used to incorporate a second tier of site collections, such as ://portal/HR/ and ://portal/sites/***.
All web-applications in a farm share a group of common SharePoint 2010 service applications that provide shared services such as indexing & search to the farm. I use the term “shared services provider” (SSP) in this post for such a group of service applications. A farm can contain multiple groups of shared services, such as an intranet SSP and an extranet SSP.
The overall SharePoint farm architecture for internal collaboration can be summarized like this (click to enlarge):

The initial SharePoint 2010 farm will be configured to support two solutions: providing team-sites for internal collaboration in groups or projects, and for providing My Sites for employees. These two web-applications will share a group of shared service applications (“default group”) for search, user profiles and enterprise taxonomy.
The User Profile service is required to provide My Sites. In addition, this service application is what provides all social features such as tagging, rating and social bookmarking.
Note that a search service application is needed for more than just crawling and queries, the social tagging functionality in SP2010 also requires search. The reason is that several web-parts such as Note Board, Tag Cloud and Tagged Items in some modes depends on the search service to do security trimming to provide their content. This includes the tag profile page, which use such web-parts. You can also use the search service and the content search, people search and social search capabilities when customizing the user experience of your solutions. A typical example is creating a tag cloud web-part for managed metadata and enterprise keywords columns for lists and libraries, not just for social bookmarking (it is not really social tagging that is implemented in SP2010) with the standard "Tags & Notes" ribbon.
If you use FAST Search for SharePoint 2010 (FS4SP) then the FAST Content SSA will provide the content sources that are crawled for search results, except for people search. The FAST Query SSA has a different set of content sources, including the one feeding the people scope. Only one Search Service Application (SSA) should be associated with your web-application, either FAST or standard SharePoint 2010 Server search. Note that FAST doesn't index the social tags, which affects those social tagging web-parts that depends on search (see above).
The intranet will use Active Directory as the identity provider for authentication in classic mode. The web-application authentication mode can later on be switched from classic to claims-based as needed. Note that it is not recommended to switch the mode from claims-based to classic.
The farm is also designed to scale-out to support future SharePoint 2010 solutions such as a publishing intranet (://puzzlepart). Note that other service applications not shown here might be required to support the functional solution design and future solutions.
The different web-applications in the farm runs in separate application pools to achieve process isolation. This way an error or crash in one application will be isolated and not affect the other web-applications in the farm.
Anywhere access for mobile employees to the intranet sites is provided using Forefront Unified Access Gateway (UAG). This supports a wide range of locations such as at home or on the road, and a wide range of devices from laptops to smart phones.
The overall SharePoint farm architecture target for collaboration with external partners and suppliers can be summarized like this (click to enlarge):

The extended 2011+ version of the farm is scaled-out to support two new solutions; one is the ://puzzlepart web-application for intranet publishing, the other is an extranet web-application for collaboration with external users such as partners and suppliers. The former connects to the intranet shared services provider (“default group”) and will as such reuse and share search, user profiles, and the enterprise taxonomy (metadata and content types) with the existing solutions for team-sites and my sites.
The extranet collaboration solution must not be connected to the intranet SSP for information security reasons. Using a separate group of shared services for all service applications that may contain or expose confidential information is strongly recommended – an extranet SSP (“custom group”). A typical service application of this kind is search. Using separate service applications prevents accidental information exposure due to e.g. misconfiguration of a service application.
The User Profile service application is included in the extranet SSP even if the extranet will not provide My Sites at all. This service is what enables user to do social tagging and bookmarking, and must thus be part of the extranet SSP to provide social features. It is not recommended to connect the extranet to the intranet User Profile service for the same reasons as for the Search service.
Still, some service applications are typically shared across both the intranet and the extranet web-applications. This includes the enterprise taxonomy – you need to provide for consistent classification and tagging of content across all solutions to drive findability. The managed metadata service, including content type hubs, is specifically built for the purpose of being both shared and syndicated across multiple solutions.
Another security aspect is access control; the extranet must use a separate claims-based authentication provider, that can be federated with external identity providers. The intranet and extranet web-applications must trust different providers for authorization. Using separate providers prevents accidental information exposure due to e.g. misconfiguration of site access control and group memberships. Note that multi-mode authentication is preferred over mixed mode for extranet collaboration.
A final aspect of the extended farm design is that the extranet web-application and shared services are run in separate application pools from the intranet. This ensures process isolation to prevent errors and crashes in the extranet processes to affect the intranet solutions. It also isolates malicious use of the extranet process resources from affecting the intranet processes, such as denial of service attacks.
Remote access for external users to the extranet collaboration web-application is provided using Forefront Unified Access Gateway (UAG) combined with ADFS for federated identity and access management (IAM). Using UAG saves you from setting up and managing a separate extranet farm in a DMZ perimeter zone; instead you give a controlled set of external users secure anywhere access to a controlled set of internal applications hosted on the intranet farm.
Friday, June 18, 2010
Open-Closed Term Sets & Terms in SharePoint 2010
The 'Move Term Set' action for term store management, in combination with Restricted and Full permissions settings for the Managed Metadata Service, can be used to enforce the Open-Closed principle for adding new term sets to your taxonomy. Allow local taxonomy managers to add column specific term sets (open for extension) in local site-collections, but do not give them full permissions on the core term store (closed for modification). Then have a policy for periodically reviewing local site-collection term sets to incorporate useful new ones into the shared core term store.

Note that each term set also have an open-closed setting for controlling if new terms can be added to the term set or not. Users with restricted or full permissions are allowed to add new terms to open term sets, users with read permissions are not. Use the combination of open + restricted to enforce the "open for extension, closed for modification" policy for term set terms.
Note that access to the term store is granted per web-application using the app-pool account, not per user or group. In addition, you can control permissions on each term group using the "contribute" and "manage" settings for granting rights to users and groups. If users are not granted contribute rights, they will be restricted to read even if the web-application's MMS connection permissions allows for more than just read.
Tuesday, June 15, 2010
Content Type Hub Publishing and Column Specific Term Sets in SharePoint 2010
In SharePoint 2010, you realize your taxonomy using the content type hub and term store provided by the Managed Metadata Service (MMS). The hub contains site content types built from site columns, and the "Managed Metadata" column type is what you use to connect term sets to a field. When adding a managed metadata column, you must choose between "Use a managed term set" defined in the MMS using Central Admin, or "Customize your term set" which allows you to create a new column specific term set on the fly.
Column specific term sets that you create will by default be assigned to the site-collection hosting the site content type gallery in which you create the site column. Such term sets will not be visible in the Term Store Management Tool in Central Admin, even if the MMS connection is set as the default storage location for column specific term sets. This also applies to column specific term sets created in the content type hub.
Do not create column specific term sets in a content type hub, this will break the content type publishing. If you click "Manage publishing for this content type" you will get this error:

Move the term set, then verify that the content type publishing setting is Republish in the content type hub. In Central Admin, run the "Content Type Hub" job first, then all applicable "Content Type Subscriber" jobs to execute the actual publish-subscribe process. Finally, open the site content types inventory in a subscriber site-collection and verify the subscribed content type, site column and term set.
I also recommend updating the site column definition to use the "use a managed term set" setting after moving the term set into the core term store.
Column specific term sets that you create will by default be assigned to the site-collection hosting the site content type gallery in which you create the site column. Such term sets will not be visible in the Term Store Management Tool in Central Admin, even if the MMS connection is set as the default storage location for column specific term sets. This also applies to column specific term sets created in the content type hub.
Do not create column specific term sets in a content type hub, this will break the content type publishing. If you click "Manage publishing for this content type" you will get this error:
The current content type contains a managed metadata column that uses a customized term set that is not available outside the current site collection. Please change the column setting or remove the column and publish the content type again.There is, however, a third option in addition to the two suggestions; moving the term set from the site collection term group to a shared term set group in the managed metadata service term store.

Move the term set, then verify that the content type publishing setting is Republish in the content type hub. In Central Admin, run the "Content Type Hub" job first, then all applicable "Content Type Subscriber" jobs to execute the actual publish-subscribe process. Finally, open the site content types inventory in a subscriber site-collection and verify the subscribed content type, site column and term set.
I also recommend updating the site column definition to use the "use a managed term set" setting after moving the term set into the core term store.
Saturday, June 12, 2010
SharePoint 2010 Intra-Farm Term Store Syndication
The managed metadata service in SharePoint 2010 makes it simple to realize an enterprise taxonomy across all site-collections in a farm, or even across farms. In addition, the managed metadata service (MMS) application can be syndicated, that is, you can have multiple instances of the MMS and they can all be consumed in combination as one by web-applications. You can have multiple instances of the other service application types, but only one of them can be the active default association in a consuming web-application.
The Managed metadata service application overview on Technet used to have a nice example scenario of managed metadata term store and content type syndication across multiple departments in a company, in the page published on April 16th. As the example scenario has been removed in the page published on May 12th, the following figure shows the MMS syndication example:

For those of you who speak Spanish, or want to run it through Google translate, the managed metadata syndication example is still available here: http://technet.microsoft.com/es-es/library/ee424403.aspx
The salient point of the example is that the HR, IT, Products and Legal departments all share a common base term store and content type hub, allowing for the Products department to extend the base with its own term store and content types, and allowing the Legal department to have its own private term store while syndicating both the Global and Products managed metadata services.
An important detail in the example is that the Legal department uses term sets to represent confidential information. Therefore, it requires its own term store that prohibits other departments from seeing the confidential terms, even as new terms and term sets are added. Thus, the Legal department requires its own default term set location to prevent new confidential terms being added to the Global and Products managed metadata services.

This scenario is quite possible to realize as the two managed metadata service connection setting Default keyword location and Default term set location allows for specifying per MMS connection if this is the MMS term store where new keywords and column specific term sets will be added. However, as these options are set on the "Managed Metadata Service Connection" proxy itself rather than on the web-application "Service Application Associations" settings, there is a problem for the example scenario.
All web-applications in a farm share all service applications, connection proxies and proxy groups defined in the farm. The example scenario requires the IT, HR, Products and Legal web-applications to all be connected to the "Global Managed Metadata" service. As indicated by the red markup in the above figure, the web-apps require a different setting for default term set location - Legal requires "no", the others "yes". Thus, they cannot use the same MMS connection, a second connection is needed. However, you cannot add another local service application connection from Manage Service Applications, only cross-farm connections can be created from Central Admin .
The solution is to use PowerShell to add a new Managed Metadata Service Connection with the command New-SPMetadataServiceApplicationProxy using the -ServiceApplication parameter, rather than the -Uri parameter used for cross-farm connections.
New-SPMetadataServiceApplicationProxy -Name "MMS_PX001" -ServiceApplication "MMS2"
Some other parameters are:
-DefaultKeywordTaxonomy: This service application is the default storage location for keywords.
-DefaultSiteCollectionTaxonomy: This service application is the default storage location for column specific term sets.
-ContentTypeSyndicationEnabled: Publish content types from the content type hub.
-ContentTypePushdownEnabled: Push-down updates from the content type hub to subscribers.
-DefaultProxyGroup: Add this connection to the service application associations [default] proxy group.
Don't add your custom MMS syndication connections to the default proxy group as you will need to configure the service application associations per web-application that subscribes to a syndicated set of managed metadata services, typically using the [custom] proxy group. Additional custom proxy groups can be created in the farm using the New-SPServiceApplicationProxyGroup PowerShell cmdlet.

Note that as there are two term set "default" settings, there are four possible combination of MMS connection configurations for terms. Thus, four MMS connection variants must be created to cover all possible scenarios per managed metadata service instance. Then, each web-application can use its own service application associations [custom] proxy group to pick the applicable set of MMS connections.
Make sure that each proxy group has only zero or one default keyword location and default term set location. Having zero for either will prevent users from adding new keywords or new term sets. Having multiple defaults for either will cause an error as SharePoint cannot know in which of the locations to add new keywords and new term sets.
A final note about term store permissions: Access to the term store is granted per web-application using the app-pool account, not per user or group. In addition, you can control permissions on each term group using the "contribute" and "manage" settings for granting rights to users and groups. If users are not granted contribute rights, they will be restricted to read even if the web-application's MMS connection permissions allows for more than just read.
[UPDATE] This scenario will make incremental crawl of friendly URLs (FURL) fail in SP2013; and if you contact Microsoft Support you will get help from people who don't understand proxy groups, default proxy/MMS connection, default keyword location and default column-specific term set location settings, who will tell you that the product group confirms that the documented scenario on Technet is in fact not supported. Stay away from using SharePoint for anything else than a single department collaboration scenario, SP2013 is not built for real-life enterprise usage.
Wednesday, June 09, 2010
Customizing SharePoint 2010 My Sites
A nice improvement on My Sites in SharePoint 2010 is that all of the My Site content and pages except "My Content" is now provided by the My Site Host site-collection, and not as in SharePoint 2007 where all except the public profile page UserDisp.aspx was provided by each user's personal site-collection.

This makes it much simpler to customize the content, links, web-parts, and look and feel of My Sites in 2010. Just customize the shared pages in the My Site Host such as "My Profile" and "My Newsfeed", save/deploy and the changes will immediately affect all My Sites. No more hassle of pushing the profile customizations to thousands of personal site-collections. Note that the "Tags and Notes", "Colleagues" and "Memberships" are stored in the /_layouts/ folder and are application pages, not web-part pages, and as such are not easily customized.
Any customization needed for "My Content" will still depend on e.g. feature stapling or master page delegate controls to push the changes to each personal site.
See Customizing My Sites in Microsoft SharePoint 2010 on the SharePoint Social Computing team blog for an overview of My Site customization options. See also the 1h42m web-cast Customizing My Sites and Social Features in SharePoint 2010.
Wednesday, May 12, 2010
Minimal SharePoint Governance Plan - Part III
This is part III in a mini-series about the Minimal SharePoint Governance Plan needed to get you started with your SharePoint governance efforts.This part gives a more detailed overview of the mininal governance plan. The overview comprises operational and functional areas from SharePoint architecture, via site, user and information lifecycle management, to realization of SharePoint solutions. As you will see, there is a multitude of governance aspects, even if just focusing on the technical aspects. Executing on all governance aspects from day one is not viable, that is why I recommend to start with simple governance.
The is no one governance plan to rule them all. Governance is too multi-faceted for a single set of policies to fit all the different site types across diverse business areas. Governance for controlled publishing sites will be very different from Enterprise 2.0 pull-style situational solutions, as will it differ for management of project sites and team sites, and as for community, social and personal sites. Adapt your governance plan according to the targeted solution.

The site classification scheme shown here is from the Technet SharePoint Governance Checklist Guide, refer to page 20 for more details.
Architectural Governance
The governance plan for the SharePoint solution must define a logical architecture model based on your Information Architecture analysis, adhering to architectural components, farm deployment, capacity and planning recommendations on Technet.
• Farm design policies for a robust and flexible platform
• Sharing and isolation policies for applications and information
• Site-collection structure policies to drive overall solution architecture & governance
• Information asset structure policies to ensure classification, management and findability
The objective of having architectural policies is to create a workable farm and solution design considering hard and soft SharePoint limits.
Site Lifecycle Management
The governance plan for site lifecycle management (SLM) must specify policies for managing sites from creation to disposition. Define a classification scheme for site types and adapt your governance plan to each site type. It is recommended to develop timer jobs to automate and enforce SLM policies.
You need a site sweeper job that disposes expired, abandoned and useless sites from your solution to ensure that the overall effect produces useful business results. Make sure that knowledge captured in obsolete sites are retained through information management tasks before permanently disposing the sites. Alas, don't be afraid of self-service provisioning, after all more is different.
• SLM policies must be defined and enforced
• Site Provisioning
o Implement custom provisioning if ootb functionality is not sufficient
o Provisioning policy per site type defines level of automation and self-service
o Use provisioning wizard to collection data related to SLM
o Store SLM data in site properties or a site inventory list
• Site Retention
o Do not rely on database backup for retention, backup retention might be shorter than site retention
o Prepare to restore sites deleted by users
• Site Disposition
o Implement custom site sweeper if ootb functionality is not sufficient
o Standard site sweeper is only for site-collections (site use confirmation)
o Define a procedure for information management when disposing a site
Note that there is no ootb site directory in SharePoint 2010. Still, just create a shared custom list and use it for inventory management of sites as part of your SLM implementation.
DocAve Backup & Recovery a recommended 3rd-party tool, it provides capabilities beyond ootb SharePoint 2010, such as item-level recovery. For site retention, the CodePlex MSIT Site Delete Capture tool is an option.
User Lifecycle Management / Identity & Access Management
The governance plan for user lifecycle management (ULM) must specify policies for managing users from onboarding to termination. ULM is directly related to information security (access and auditing), information management, and Identity & Access Management (IAM). Employees come and go, resulting in SharePoint data that nobody manages, or in worst case, lost knowledge.
Implementing good site disposition policies and good information management policies will reduce the efforts required for user lifecycle management, as obsolete sites and information then will be disposed of in a timely manner - keeping the quantity of orphaned data down.
• ULM policies must be defined and enforced
• Site memberships and permissions must be assigned for new users
• Site and information asset permissions & ownership must be handled when
o Account is terminated
o User transfers to another business role or department
• A policy for reassignment of ownership must be defined
Having tools for management of user permissions, ownership and lifespan is nice, but no prerequisite. LigthningTools DeliverPoint or Axceler ControlPoint are recommended partner solutions for user management.
Content Type Governance / Information Management
The governance plan must specify policies for content management according to your Information Architecture analysis and taxonomy. A taxonomy is realized in SharePoint using Site Content Types for information asset types and Term Sets for coherent tagging of information. Content types combined with metadata tagging is essential for information classification and for driving findability.
Content types defines the static classification hierarchy of the information managed in SharePoint. A content type is built from a set of fields defining the metadata of the content type, further detailing the classification of the information. Some metadata fields require the use of a controlled vocabulary for content tagging.
Information management policies can be assigned to content types. The most important are for retention and disposition of content, helping you manage e.g. outdated content to ensure the relevance and timeliness of your information.
• Reuse the Open-Closed Enterprise Taxonomy across web-applications and site-collections
• Always use a core Content Type Hub store for the enterprise taxonomy
• The core content type store defines company specific immutable base content types
• Ensure that all additional content types derives from the core content types, by extending the immutable base
• Use few required metadata fields, max 3-5 per content type
• Use sensible default values where possible
• Define polices for
o Reusable content (document repository)
o Retention of outdated content / historical archive (document repository)
o Retention of expired content (records repository or disposition)
o Regulatory compliance records (records management)
o Disposition of content
• Retention policies are important for driving findability, use them to prevent irrelevant search results
• Define and enforce behavior using
o Information Management policies
o Workflows / Event receivers
• Use Information Management policies for
o Retention, disposition, auditing, labeling / barcodes
• Ensure that content types are evolved according to best practices
The new SharePoint 2010 multi-stage retention support, combined with workflow and document /records repositories allows for implementing and enforcing sophisticated content management policies. Note that the new SharePoint 2010 Content Organizer only supports Document-based content types, in addition to e-mail messages.
Managed Metadata Governance
The governance plan must specify policies for management of the managed metadata used when tagging content in SharePoint. Managed metadata is a controlled vocabulary defined in the corporate taxonomy, realized in SharePoint 2010 as term sets defined in the Managed Metadata Service.
• Reuse the Open-Closed Enterprise Taxonomy across web-applications and site-collections
• Always use a core Managed Metadata Service term store for the enterprise taxonomy
• Allow local Managed Metadata Services for isolated, locally managed term stores
• Always use synonyms when defining terms, consistent content tagging is essential for content management and for driving findability
• Use term translation to support other languages for the term
• Avoid random or haphazard tagging due to unintelligible terms
• Enable managed keywords for user-driven freeform tagging of content
• Ensure that term sets are evolved according to best practices
• Define and enforce a policy for reviewing open term sets for improper usage
Note that search do not comprise term synonyms or translations when searching, it only finds the stored key term. The same applies to faceted search – or 'refinement panels' as they are called.
You can have multiple Term Set stores and Content Type Hub inventories in SharePoint 2010. This allows for combining both enterprise definitions and local definitions to support both shared and isolated taxonomy configurations. See Plan to share terminology and content types on Technet.
Social Tagging Governance
The governance plan must specify policies for management of the social tagging features
• Use managed keywords to enable folksonomy for content (list items)
• Use social tagging to enable folksonomy for "anything with an URL"
• Allow for managed metadata and managed keywords to be included in social tags
• Define and enforce a policy for reviewing the folksonomy tags for improper usage
Note that the social tagging of "anything with an URL" is provided by the SharePoint2010 User Profile Service application, not the Managed Metadata Service application. Thus, social tags have no explicit relation to the term store at all. The same applies to other SharePoint2010 social features such as ranking and social bookmarking.
Document Template Governance
The governance plan must specify policies for using Office templates in content types.
• Use a shared set of enterprise Office templates
• Manage and store templates in a SharePoint document library at a central location
• Do not store templates directly in content types, always reference the central shared templates
• Make use of the Office 2010 Backstage or the document information panel for managing metadata directly in Office
Office 2010 now has support for storing templates in a SharePoint repository. Use AD group policies to populate 'File > Save As' and to lock down storage locations such as file shares and local disk.
List & Library Definition Governance
The governance plan must specify policies for managing content in lists and libraries. It is strongly recommended to use only lists based on site content types, rather than directly customizing list definitions. Enforcement of consistent classification and information management policies depends on using site content types.
• List content
o Use only a few content types per list
o Content types in a list must be cohesive
o Prefer list views over "dumb" folders
o Use SharePoint 2010 folders when appropriate
• List permissions
o Prefer using inherited permissions
o Avoid user item level permissions
• Enforce content management policies using
o Versioning, check-in/out, workflows / event receivers
• Information Rights Management (IRM)
o Policies for document access and usage restrictions
o Applies IRM policies when document is downloaded from library
o Enable by installing Active Directory Rights Management Services (AD RMS)
• Information management policies
o Prefer implementing IM policies on content types rather than on lists or libraries
Note that some of the new SharePoint 2010 features work only for document libraries, such as the Unique Document ID, Document Set and Content Organizer features.
Permissions Governance
The governance plan must specify policies for how to manage access to sites and information assets, including which permissions users and groups have. All experience shows that simple permission policies are more secure. The more intricate and fine-grained permissions assignments you have, the harder it is to know who has access to what – and the more likely it is that there will be information security breaches exposing confidential information.
• Use SP groups to manage user group memberships
• Build your SP groups from AD security groups
o Management of AD group members is typically a bottleneck, thus avoid it
• Do not assign permissions to single users, always assign to SP groups
• Prefer inherited groups (role assignments)
• Prefer inherited permission levels (role definitions)
• Use unique permissions at site level (favored) or list/library level only when absolutely required
• Avoid assigning item level permissions
• Site-collections are preferred security management boundaries
The visibility into what a user has access to has improved a bit in SharePoint 2010, so has the usage reporting capabilities. Still, 3rd-party tools such as LigthningTools DeliverPoint or Axceler ControlPoint might be required for professional permissions management beyond the built-in SharePoint 2010 Permissions Tool.
Search Governance
The governance plan must specify policies for driving findability through indexing and search. The Information Architecture analysis defines the information taxonomy and organization blueprint realized in a SharePoint site structure capable of storing and managing your content. The site structure combined with content types enables findability through consistent classification and tagging of content.
• Ensure ease of adding information assets to correct location
o Users should not have to enter a lot of required metadata
o Users should not have to browse/navigate extensively to store content
o Task context should deduce location, e.g. CRM client document store
• Metadata tagging through content types for all findable assets
• Use content type retention policies to prevent irrelevant, outdated search results
• Use search scopes to provide search context: people, tasks, articles, project, archive, etc.
• Use faceted search (refinement panel)
• Ensure and enforce information isolation
o Farm design must prevent configuration mistakes from exposing confidential information by accident
o Use separate service application groups or even separate shared services farms
The most valuable search is the one that connects a user to other people, as people are often the best sources of information and knowledge, especially tacit knowledge – know-how relating to new better business performance or to novel information that generate flow of new knowledge – in short, that ignites innovation. A former CEO of Hewlett Packard famously observed: "If HP knew what HP knows, we would be three times as profitable".
Findability is more than just search capabilities, it also includes the SharePoint 2010 social computing features such as “Tags & Notes” for tagging and social bookmarking. Tag clouds, metadata-based navigation and filtering, and even the My Site activity feed are all enablers of driving findability.
Note how I say "driving findability"; findability is not something you just enable, you have to actively manage and adapt the Search Service application settings according to your business needs. Just enabling search is just as bad as not managing your user's expectations for what to expect from enterprise search.
All parts of this mini-series:
Part I - SharePoint Governance - Eating an Elephant
Part II - Start with Simple Governance
Part III - Minimal Governance Plan (this post)
Subscribe to:
Posts (Atom)