Normally I wouldn't post just some links, but the release of the WCF web-service software factory version 2 merits an aggregation post.
Read about WSSF v2 details such as contract first supprt (WSCF), versioning guidance, etc, at Don Smith's blog; and download it from MSDN (not GotDotNet). The complete web-service versioning emerging guidance article is a must-read for anyone implementing "published" services.
Boy am I excited to check out the WSCF stuff, I just loved the WSCF tool provided by Christian Weyer/thinktecture a few years ago.
Note that the data contract wizard still assigns order attribute values incrementally, and not according to the best practices recommended by Microsoft:
"The Order property on the DataMemberAttribute should be used to make sure that all of the newly added data members appear after the existing data members. The recommended way of doing this is as follows: None of the data members in the first version of the data contract should have their Order property set. All of the data members added in version 2 of the data contract should have their Order property set to 2. All of the data members added in version 3 of the data contract should have their Order set to 3, and so on. It is okay to have more than one data member set to the same Order number."
Read Aaron Skonnard's Service Station article 'The Service Station for WCF' at MSDN for an introduction to the WCF WSSF.
Note that if you do not use VSTS, some of the new features such as the "WCF semantic code analysis" tool will not work (not even if you have VS2005 Pro + FxCop 1.35).
Thursday, January 11, 2007

Wednesday, January 10, 2007
MSCRM 3: Filtered view of SharePoint document library
It has been a long time since my last Microsoft Dynamics CRM related post, so I thought I should share a litte JavaScript tip for filtering a SharePoint document library from MSCRM. The simplest way to add a document archive to MSCRM is to use a single, shared SharePoint document library for all MSCRM accounts and then use filtered views from MSCRM to make it look like each account have their own document library. This technique of course imply that you have no need for applying access control to the doc-libs on an account-by-account basis.
Add this JavaScript to the 'OnLoad' event of the account form to add a new button to the account toolbar:
var baseUrl = "http://companyweb/General%20Documents/Forms/AllItems.aspx?";
var urlSuffix = "";
var fieldMapping = new Array();
fieldMapping[0] = new Array();
fieldMapping[0][0] = "AccountName";
fieldMapping[0][1] = "name";
fieldMapping[1] = new Array();
fieldMapping[1][0] = "AccountPhone";
fieldMapping[1][1] = "telephone1";
fieldMapping[2] = new Array();
fieldMapping[2][0] = "AccountNumber";
fieldMapping[2][1] = "accountnumber";
for (i=0; i<3; i++)
{
var idx = i+1;
var value = crmForm.all.item(fieldMapping[i][1]).DataValue;
urlSuffix += "&FilterField" + idx + "=" + fieldMapping[i][0];
urlSuffix += "&FilterValue" + idx + "=" + value;
}
var url = baseUrl + urlSuffix.substring(1);
//alert(url);
var button = document.getElementById('New_1_315_Web Only');
if(button != null)
{
button.outerHTML = button.outerHTML +
'<SPAN class=menu id=_btnAccountDocs hideFocus title="Click to view account documents" style="PADDING-RIGHT: 3px; PADDING-LEFT:3px; PADDING-BOTTOM: 0px; PADDING-TOP: 3px" onclick=window.execScript(action) action="window.open(\'' + url + '\');" tabIndex=0 pr="3" pl="3"><DIV class=mnuBtn><IMG class=mnuBtn src="/_imgs/ico_18_1.gif">Account Documents</DIV></SPAN>';
}
The script is based on using the MSCRM 3 demo VPC, and adds the new button next to the "Web only" button added in the demo ISV.config file. Note: the filter string added to the outerHTML must be a single line, then linebeaks in the script shown here is just for readability.
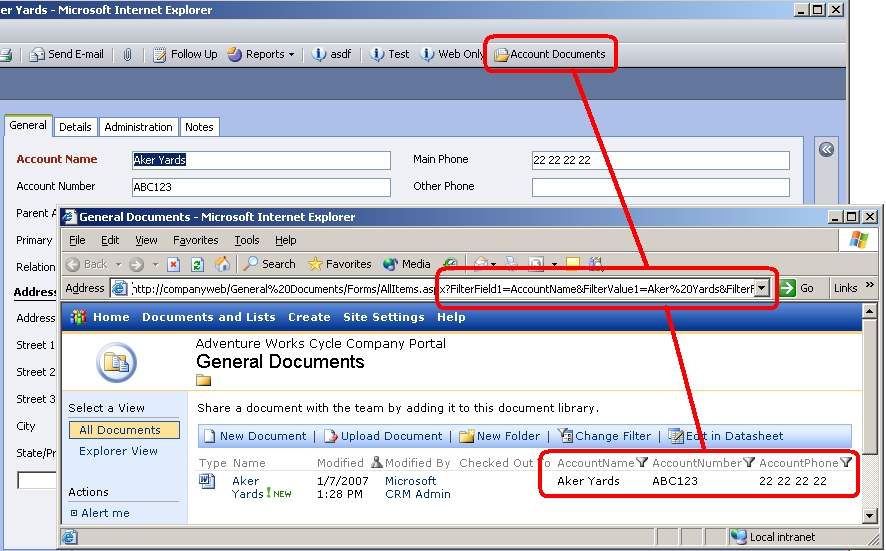
The added "Account Documents" button will open a filtered view of the SharePoint doc-lib in a new window as shown in the figure (click to enlarge):

You can add the button (or any other HTML stuff you like) next to any HTML element in the MSCRM web-page, all you need to do is to find the ID of the element you want to use as the injection point. Search through the DHTML source to find the applicable location and look for the nearest HTML element containing an ID attribute. This is your injection point.
Using "View-Source" to view the HTML behind the page will not show changes made to the page after it has loaded in the browser. Use this litte JavaScript directly in the MSIE address field (after using CTRL-N to make the full browser appear) to view the actual, current HTML of the MSCRM web-page:
javascript:'<xmp>' + window.document.documentElement.outerHTML + '</xmp>';
By modifying the action script, it is quite easy to view the filtered SharePoint doc-lib in an IFRAME inside the account form (using the .location of the .form[] collection in the DHTML DOM). You will then need to make a customized view of the doc-lib suitable for inlining in the MSCRM form, see my post about removing the SharePoint chrome, controlling navigation, etc, for further details.
Add this JavaScript to the 'OnLoad' event of the account form to add a new button to the account toolbar:
var baseUrl = "http://companyweb/General%20Documents/Forms/AllItems.aspx?";
var urlSuffix = "";
var fieldMapping = new Array();
fieldMapping[0] = new Array();
fieldMapping[0][0] = "AccountName";
fieldMapping[0][1] = "name";
fieldMapping[1] = new Array();
fieldMapping[1][0] = "AccountPhone";
fieldMapping[1][1] = "telephone1";
fieldMapping[2] = new Array();
fieldMapping[2][0] = "AccountNumber";
fieldMapping[2][1] = "accountnumber";
for (i=0; i<3; i++)
{
var idx = i+1;
var value = crmForm.all.item(fieldMapping[i][1]).DataValue;
urlSuffix += "&FilterField" + idx + "=" + fieldMapping[i][0];
urlSuffix += "&FilterValue" + idx + "=" + value;
}
var url = baseUrl + urlSuffix.substring(1);
//alert(url);
var button = document.getElementById('New_1_315_Web Only');
if(button != null)
{
button.outerHTML = button.outerHTML +
'<SPAN class=menu id=_btnAccountDocs hideFocus title="Click to view account documents" style="PADDING-RIGHT: 3px; PADDING-LEFT:3px; PADDING-BOTTOM: 0px; PADDING-TOP: 3px" onclick=window.execScript(action) action="window.open(\'' + url + '\');" tabIndex=0 pr="3" pl="3"><DIV class=mnuBtn><IMG class=mnuBtn src="/_imgs/ico_18_1.gif">Account Documents</DIV></SPAN>';
}
The script is based on using the MSCRM 3 demo VPC, and adds the new button next to the "Web only" button added in the demo ISV.config file. Note: the filter string added to the outerHTML must be a single line, then linebeaks in the script shown here is just for readability.
The added "Account Documents" button will open a filtered view of the SharePoint doc-lib in a new window as shown in the figure (click to enlarge):
You can add the button (or any other HTML stuff you like) next to any HTML element in the MSCRM web-page, all you need to do is to find the ID of the element you want to use as the injection point. Search through the DHTML source to find the applicable location and look for the nearest HTML element containing an ID attribute. This is your injection point.
Using "View-Source" to view the HTML behind the page will not show changes made to the page after it has loaded in the browser. Use this litte JavaScript directly in the MSIE address field (after using CTRL-N to make the full browser appear) to view the actual, current HTML of the MSCRM web-page:
javascript:'<xmp>' + window.document.documentElement.outerHTML + '</xmp>';
By modifying the action script, it is quite easy to view the filtered SharePoint doc-lib in an IFRAME inside the account form (using the .location of the .form[] collection in the DHTML DOM). You will then need to make a customized view of the doc-lib suitable for inlining in the MSCRM form, see my post about removing the SharePoint chrome, controlling navigation, etc, for further details.
Tuesday, January 09, 2007
NUnit: deployment items with ReSharper/TestDriven.NET
I like my solutions to be self-contained, that is - by just checking out all files from the solution root in the source control management (SCM) system, the solution should be able to compile and run. This includes storing the referenced assemblies and their dependencies in the SCM: "everything you need to do a build should in there including: test scripts, properties files, database schema, install scripts, and third party libraries" [Fowler: Continuous Integration].
And as the unit tests should be treated as first class citizens in a solution, the SCM best practices must apply to the test project also. Adding the referenced assemblies to a NUnit test project is straightforward, but how do you add the dependencies of the references (i.e. the assemblies referenced by the referenced assemblies, and so on) ? For those using a native NUnit project this can be configured using the "Assemblies" tab in the "Project Editor".
For those using ReSharper and/or TestDriven.NET, just adding both the referenced assemblies and all their dependencies to the Visual Studio class library "NUnit" project will work. The downside of this is that you will get more object models/namespaces to choose from when coding your tests, and even if ReSharper somewhat helps you pick and create "using" statements, it can be confusing and thus a source of errors.
VSTS has a nice solution to this "extra binaries" problem, the deployment item mechanism, which I have used in other projects. So this is how I implemented support for using a \DeploymentItems\ folder in my NUnit test project (note that my build output folder is just \bin\ without debug or release):
[TestFixtureSetUp]
public void TestFixtureSetup()
{
foreach (string file in Directory.GetFiles(@"..\DeploymentItems\", "*.dll"))
{
string newFile = Path.Combine(@"..\bin\", Path.GetFileName(file));
if (File.Exists(newFile)) File.Delete(newFile);
File.Copy(file, newFile);
File.SetAttributes(newFile, FileAttributes.Normal);
}
}
Note that the file attribute is set to normal after copying it, this is to remove any read-only attribute on the assembly to ensure that it can be overwritten the next time the tests are run. Afterall, the deployment items must also be source controlled and will thus be read-only when you do a "get latest version" from your SCM.
The DeploymentItems folder is not limited to assemblies, just change the GetFiles filter to copy other items to the test execution location as well.
The solution is inspired by Scott Hanselman's post about unit testing with Cassini.
And as the unit tests should be treated as first class citizens in a solution, the SCM best practices must apply to the test project also. Adding the referenced assemblies to a NUnit test project is straightforward, but how do you add the dependencies of the references (i.e. the assemblies referenced by the referenced assemblies, and so on) ? For those using a native NUnit project this can be configured using the "Assemblies" tab in the "Project Editor".
For those using ReSharper and/or TestDriven.NET, just adding both the referenced assemblies and all their dependencies to the Visual Studio class library "NUnit" project will work. The downside of this is that you will get more object models/namespaces to choose from when coding your tests, and even if ReSharper somewhat helps you pick and create "using" statements, it can be confusing and thus a source of errors.
VSTS has a nice solution to this "extra binaries" problem, the deployment item mechanism, which I have used in other projects. So this is how I implemented support for using a \DeploymentItems\ folder in my NUnit test project (note that my build output folder is just \bin\ without debug or release):
[TestFixtureSetUp]
public void TestFixtureSetup()
{
foreach (string file in Directory.GetFiles(@"..\DeploymentItems\", "*.dll"))
{
string newFile = Path.Combine(@"..\bin\", Path.GetFileName(file));
if (File.Exists(newFile)) File.Delete(newFile);
File.Copy(file, newFile);
File.SetAttributes(newFile, FileAttributes.Normal);
}
}
Note that the file attribute is set to normal after copying it, this is to remove any read-only attribute on the assembly to ensure that it can be overwritten the next time the tests are run. Afterall, the deployment items must also be source controlled and will thus be read-only when you do a "get latest version" from your SCM.
The DeploymentItems folder is not limited to assemblies, just change the GetFiles filter to copy other items to the test execution location as well.
The solution is inspired by Scott Hanselman's post about unit testing with Cassini.
Thursday, January 04, 2007
ClickOnce deployment of WCF client (.NET 3)
Setting up ClickOnce deployment of a WCF client application is quite easy with Visual Studio 2005 and .NET 2 SmartClient functionality. The only configuration of the publish mechanism that is needed is to add the .NET 3 run-time to the prerequisites and make it available for installation by your users.
Download the signed .NET 3 redistributables (not only the bootstrapper):
Note that the .NET 3 packages must be copied to this directory on the developer PC:
\Program Files\Microsoft Visual Studio 8 \SDK\v2.0\BootStrapper\Packages\NETFX30
Then change the 'Publish' configuration of your WCF client (menu: Project > Properties > Publish > Prerequisites) to include the ".NET Framework 3.0" as a prerequiste and check the "Create setup program to install prerequisite components" as shown in the figure:
Download the signed .NET 3 redistributables (not only the bootstrapper):
Note that the .NET 3 packages must be copied to this directory on the developer PC:
\Program Files\Microsoft Visual Studio 8 \SDK\v2.0\BootStrapper\Packages\NETFX30
Then change the 'Publish' configuration of your WCF client (menu: Project > Properties > Publish > Prerequisites) to include the ".NET Framework 3.0" as a prerequiste and check the "Create setup program to install prerequisite components" as shown in the figure:

Note that ClickOnce will download and install the .NET 3 run-time when added as a prerequisite as shown in the figure, provided that you have a recent version of ClickOnce. Note also that the user must be 'local admin' on the target PC to be able to install the .NET 3 run-time.
Set the applicable check-for-updates options using the 'Application Updates' dialog before you publish the WCF client.
Finally, set the publish location and installation mode to "offline" and click the 'Publish Now' button. Alternatively, use the publish wizard, which is also accessible from the Build menu or by right-clicking the project and selecting 'Publish'. Wait for the publish build process to complete, then test the ClickOnce deployment from the installation page that was generated at the selected publish location.
The WCF client must have "full trust" to run. Configure this using the 'Security' tab in the project properties as shown in the figure:
Read more about ClickOnce 'Deployment Prerequisites' at MSDN.
[UPDATE] Read troubleshooting details at Joe Wirtley's blog.
Subscribe to:
Posts (Atom)