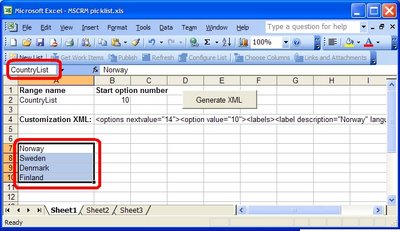
 The range name is entered into A2 ("CountryList" in the example) and this defines the set of picklist item values. The option offset number to start with is entered into B2 ("10" in the example), it becomes the value of the first generated option. Use one as the 'Start option number' when adding items to an empty picklist.
I have added a button control to run the GenerateCustomizationXml method that generates the customization XML:
Sub GenerateCustomizationXml()
Dim namedRange As range
Dim outputCell As range
Dim listName As String
Dim xml As String
Dim ctr As Integer
listName = range("A2").Text
ctr = range("B2").Text
Set namedRange = range(listName)
xml = "<options nextvalue=""" & ctr + namedRange.Cells.count & """>"
For Each listItem In namedRange.Cells
xml = xml & "<option value=""" & ctr & """><labels><label description=""" & listItem.Text & """ languagecode=""1033"" /></labels></option>"
ctr = ctr + 1
Next
xml = xml & "</options>"
Set outputCell = range("B4")
outputCell.Value = xml
End Sub
The macro generates the XML with the correct option value numbers, calculates the nextvalue number, and puts the result into B4. Mark the B4 cell and click CTRL-C to copy it to the clipboard. Follow the steps outlined in Mitch's blog to import the new picklist values into MSCRM. Refer to the SDK for more details.
The macro is generic and can be used for any named range of cells in the worksheet. Just enter the range name in A2 and run the macro. Naming a range of cells is as easy as selecting the range of cells and typing in the name in the 'name box' in the upper left corner of the worksheet.