Wednesday, October 06, 2010

Secure Store Service: Create Site-Collections avoiding UnauthorizedAccessException

The MSDN forums is full of questions on how to create a new site-collection from code, especially on what permissions are required to avoid the UnauthorizedAccessException "Access is denied" HRESULT: 0x80070005 error. Your code might work fine when running as you on your development server, and of course under the identity of the SharePoint farm account; but not when running under another application pool identity, or as a normal end-user or even as the SHAREPOINT\System account in workflows or event receivers using SPSecurity.RunWithElevatedPrivileges.

The simple answer is that CreateSite requires the same permissions as the SharePoint farm account. You certainly do not want to give all your end-users those permissions, so typically you would do a revert-to-self using RunWithElevatedPrivileges and run the site provisioning code as your SharePoint web-application application pool identity. Alas, adding the app-pool identity to the farm administrator group, giving it "full control" and "run as system" in web-app User Permission Policy, adding it to server local groups such as WSS_WPG or even to SQL Server db_owner and WSS_Content_Application_Pools database roles in the config and content databases, will not provide a configuration that works across all scenarios from web-parts to event receivers, workflows and integration tests.

Always try to assign a managed service account for the SP web-app application pool identity using Central Admin first or run GrantAccessToProcessIdentity in PowerShell. Still, getting access to the content database might not be enough for creating new site-collections, access to the configuration database is also needed for the process account.

The simple solution to this problem is to run all SharePoint web-applications using the farm account. This is definitely not recommended, and the Central Admin Health Analyzer will report the "The server farm account should not be used for other services" error in the security category.

A better alternative is to do a real RevertToSelf using WindowsImpersonationContext rather than the SharePoint RunWithElevatedPrivileges abstraction. This will require that your code knows the login name and password of the farm account. It is not best practice to store these in clear text in your code or config files, so I recommend using the SharePoint 2010 Secure Store Service to provide the farm account credentials to your code. Here's the code to implement impersonation in ASP.NET and the code to get credentials from the default secure store provider to get you started.


Use a Secure Store target application of type "Group" to store the Windows credentials of the farm account. Add only the required app-pool identities as target application "Members" when setting the target application access permissions, and then use RunWithElevatedPrivileges when retrieving the farm account credentials from the Secure Store Service.

So the final solution is this: retrieve the farm account credentials in your code using the app-pool identity, impersonate the farm account using those credentials, and then create a new site-collection from your code.

Note that there are also issues with claims-based authentication (CBA) when adding sites from code. The known workaround is to enable self-service site creation (SSSC) and use SelfServiceCreateSite from code.

Need to provision lists, pages and other stuff to your new site? Check out the SharePoint Site Configurator Feature over at CodePlex. Its a great resource for learning how to configure SharePoint sites.

Tuesday, September 28, 2010

Customizing the Search Action Links in SharePoint 2010

The SharePoint 2010 Search Action Links web-part is really just the Search Core Results web-part with the 'Show search results' settings set to false. Some of the action links have configurable captions such as the 'Show more results' link, while the 'Alert me' and 'RSS feed' link captions are not exposed in the web-part settings. However, it is quite easy to customize the layout, styling, links and content of the Search Action Links web-part - you can even add custom action links.

This example shows a searchable site directory built from customized standard SharePoint 2010 search web-parts:


Customizing the Search Action Links web-part is done exactly like for the Search Core Results web-part: you customize the embedded XSL or provide a custom XSL file using the hidden XslLink setting in the .webpart file. The following example shows how to customize the caption of the alerts and RSS links:


The example XSL shows how to set an <xsl:variable> field based on different conditions using <xsl:choose>. XSL don't have variables like in programming languages; they behave like C# const or read-only fields, they cannot be changed when first set.

The example XSL also shows how to fix an error with the RSS feed link when using a 'Fixed query' in your search page, or when using a specific search 'Scope' and no user query keyword by default, to show all results from that scope. The RSS link do not pick up these settings from the web-part, and the query RSS feed will generate the "Search RSS feed generation failed" error message. This error is caused by there being no keyword, which is fixed by adding a keyword to the URL using the k= querystring key. Just add the fixed query or the scope as the keyword:

/_layouts/srchrss.aspx?k=scope:"Puzzlepart"

Note that the 'Alert me' link don't have the k= RSS feed issue, rather it uses JavaScript and the hidden <input name="P_Query"> field on the page. This field is emitted by the Search Core Result web-part and contains the complete keyword query including the user query and the Scope, FixedQuery and AppendedQuery property settings.

Add custom parameters to the XSL when you need to have extra web-part configuration options beyond the provided standard parameters. For example, to simulate the P_Query mechanism, pass the query keywords as custom parameters. The example XSL shows how to use the custom parameter, along with the standard parameters. Use the 'Parameters Editor' in the web-part tool pane to configure your custom web-part setting:

<ParameterBinding Name="AppendedFilter" Location="None" DefaultValue="scope:&qout;Puzzlepart&qout;" />

Pass your configuration value using the DefaultValue attribute, using "None" as the Location. You can of course also set the 'alert me' and 'RSS feed' link captions using parameters.

I use code like this in a FeatureActivated event receiver to configure and add the customized web-part to our custom web part pages:

private static void AddWebPartResultsActionLinks(SPLimitedWebPartManager lwpm, string title, string siteTemplate)
{
    string xslParams = "";
    if(!String.IsNullOrEmpty(siteTemplate))
        xslParams = String.Format("<ParameterBinding Name='AppendedFilter' Location='None' DefaultValue='SiteInfoSiteTemplate:\"{0}\"' />", siteTemplate);

    CoreResultsWebPart ralwp = new CoreResultsWebPart()
    {
        Title = title,
        ChromeType = PartChromeType.None,
        QueryNumber = QueryId.Query1, //must be UserQuery because user can search the SiteInfoScope
        ShowActionLinks = true,
        ShowSearchResults = false, //this makes it an "action links" web-part
        ShowWindowsSearch = false,
        DisplayRSSLink = true,
        DisplayAlertMeLink = true,
        XslLink = "/CenterPages/XSL/SearchActionLinks.xsl",
        ParameterBindings = xslParams,
        UseLocationVisualization = false,
        ShowMessages = false
    };
    lwpm.AddWebPart(ralwp, "MiddleRightZone", 1);
}


You can of course export the customized Search Action Links web-part and use <AllUsersWebPart> in a file module to provision the web-part to a page, but the elements.xml file quickly gets huge and unmanageable. In addition, you'll have to encode any CDATA sections embedded in the exported web-part XML, as CDATA sections cannot be nested. That's why I recommend using XslLink rather than embedded XSL, and then code to provision the customized web-parts.

Wednesday, September 22, 2010

Missing "I Like It" in SharePoint 2010

The social tagging capability in SharePoint 2010 takes several dependencies on different service applications: the Managed Metadata Service application (MMS) for storing and providing tag definitions, the User Profile Service application (UPA) for storing the actual tagging and notes, and the Search Service for several tag-based web-parts to show tagging information such as those on the tag profile page. The identity used to run your SharePoint 2010 solutions and the content crawler identity needs to have access to the service applications that manage and store your social tagging data.

I recently added a new web-application to my development farm, and today to my surprise I noticed that the "I Like It" button in the global area was missing. In addition, the button was disabled in the item "Tags and Notes" ribbon.


The Tags & Notes buttons worked as expected in other sites in the farm, so the "Social Tags and Note Board Ribbon Controls" farm feature was activated, enabling these buttons for all sites in the farm.

I first verified that I had the "Use Social Feaures" permissions in the User Profile Service application, and did some tagging in another SharePoint site in the farm, ruling out that this had something to do with my SharePoint user. So I knew it had to be something related to my newly added web-application identity, having had problems with the search-driven tag cloud and tag profile pages in the past.

The solution is to grant the identity running the SharePoint web-applicaiton the correct connection permissions to the two service applications. My new web-application lacked permissions on the Managed Metadata Service application. Go to "Central Administration > Manage Service Applications", select the MMS application row in the list, and click "Permissions" in the ribbon to configure the connection permissions.


Add the managed account used as the service account for the web-application, and assign it permissions to read and add new terms to the MMS term store. Write access is required to allow users to apply tags never used before. Full access is not required. This will show and enable the "I Like It" button and the "Tags" tab in the popup dialog for "Tags & Notes" as expected.

Revoking the service application connection permissions for a web-application identity can be used to remove the social tagging and note board tools from contained sites. However, while the "I Like It" button is hidden when revoking access to MMS, the "Tags & Notes" button is not hidden when revoking access to UPA, rather a non-functional popup dialog is shown - not the best user experience. The following figure shows the effect of having access to MMS but not to UPA:


So, if there is something strange with the social tagging and related web-parts in your SharePoint 2010 solution, always make sure that web-applications identities and content crawler identity have applicable MMS and UPA service application connection permissions.

If you use the Note Board web-part, and it suddenly stopped working by not showing any existing notes and you cannot even add new ones - and only the web-part title is shown, then make sure that your Search Service Application (SSA) indexing is crawling properly. This can happen after applying e.g. a cumulative update. Remember that you can always check if the tags and notes database is operational using the UPA.

Friday, August 27, 2010

SharePoint 2010 My Tasks Web Part using Search Driven Cross-Site Query with Muenchian Grouping

There always seems to be a requirement for rolling up data from all sites in one or more SharePoint solutions, such as getting a list of my tasks, a list of new documents this week, or creating a searchable news archive for publishing sites; or such as creating a site map or dynamic site directory based on metadata collected in your site provisioning workflow, that are later maintained by site owners.

SharePoint has several web-parts that can do cross-list and cross-subsite queries, such as the Content Query web-part, but all restricted to a single site-collection. In addition, there are the classic Data View web-part and the new XSLT List View web-parts that can be configured using SharePoint Designer. These web-parts can connect to a diverse set of data sources, from internal SharePoint lists to external REST and OData services.

Still, the simplest solution for cross-site/cross-solution rollups is to customize the ootb search web-parts against custom search scopes in the Search Service application. In most cases, no coding will be required, pure configuration of SharePoint will go a long way. This post will show how to configure a search driven "My Tasks" web-part that will show all tasks assigned to the user across all SharePoint sites across all indexed SharePoint solutions. The unstyled cross-site task rollup web-part looks like this, included some debug info:


First you need to configure the results scope behind the search driven web-part in Central Admin. Start by adding a new scope in 'Search Service Application>Scopes' called TaskRollup using the rules as shown here:


If you can't see ContentType when adding a rule, then go to 'Search Service Application>Metadata Properties' and edit the managed property to set Allow this property to be used in scopes.

As the TaskStatus site column is not mapped to any managed property by default, you must map the crawled property ows_Status to one before it can be used. Go to 'Search Service Application>Metadata Properties' and create a managed property called TaskStatus using the mapping as shown here:


Do not go creative with the naming, stay away from spaces and special characters such as ÆØÅ - a SharePoint best practice for any artifact name used as an identifier or an URL fragment. For example, a name like "Contoso Web Ingress" first gets encoded as "Contoso_x0020_Web_x0020_Ingress" when stored, and then once more encoded as "Contoso_x005F_x0020_Web_x005F_x0020_Ingress" in a search result XML.

A full crawl is required after adding or changing crawled or managed properties. Do a full crawl of the content source you used in the TaskRollup scope. Note that there must be some matching content stored in SharePoint for these properties to be added to the property database in the first place. Thus after provisioning new site content types or site columns, you must add some sample content and then do a full recrawl of the applicable content source.

Verifying that the full crawl of the SharePoint sites content source finished without errors completes the Central Admin configuration. Now it's time to configure the ootb Search Core Results web-part to become the customized My Tasks web-part.

Open a team-site and add the Search Core Results web-part to a page. Switch to page edit mode and select 'Edit Web Part' to open the Search Core Results settings panel. Rename the web-part 'Title' to Task Rollup (cross-site) and set the 'Cross Web-Part Query ID' to User query and 'Fixed Keyword Query' to scope: "TaskRollup" as shown here:


The Search Core Results web-part requires a user query, or a configured fixed or appended query, to actually perform a search. No configured or no user query will just show a message asking for query input. The cross-page query ID setting User query is chosen here for reasons explained later.

If you want to further limit what tasks are shown in the My Tasks web-part, just add more query keywords to the 'Append Text to Query' setting as shown here:


The My Tasks web-part will show the two task fields 'Status' and 'Assigned to' in the task list. Any managed crawled property can be added to the search results by configuring the 'Fetched Properties' setting. Add the following XML <Column Name="AssignedTo"/> <Column Name="TaskStatus"/> as shown here:


You need to uncheck the 'Use Location Visualization' setting to enable the controls for customizing the result set and XSL formatting. See A quick guide to CoreResultsWebPart configuration changes in SharePoint 2010 by Corey Roth to learn more about the new search location concept in SharePoint 2010. Read all his Enterprise Search posts for an excellent introduction to the improved SharePoint 2010 search services and web-parts.

After adding 'TaskStatus' and 'AssignedTo' to the fetched properties, you will also need to customize the XSL used to format and show the search results to also include your extra task fields. Click the 'XSL Editor' button in the 'Display Properties' section of the web-part settings panel, and add the fields to the match="Result" xsl:template according to your design. Note that the property names must be entered in lower case in the XSL.

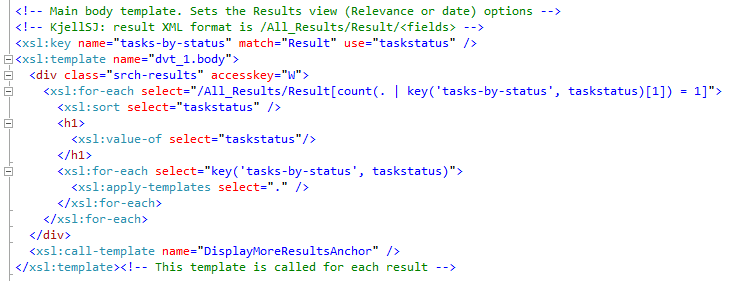
The astute reader will have noticed the nice grouping of the search results. This is done using the Muenchian method as SharePoint 2010 still uses XLST 1.0, thus no simple XSLT 2.0 xsl:for-each-group. The customized "My Tasks" results XSL creates a key called 'tasks-by-status' that selects 'Result' elements and groups them on the 'taskstatus' field as shown here:


Again, note the requirement for lower case names for the fetched properties when used in the XSL. Use the <xmp> trick to see the actual result XML.

The final part of the puzzle is how to turn the cross-site task list into a personal task list. Unfortunately, the [Me] and [Today] filter tokens cannot be used in the enterprise search query syntax, so some coding is required to add such dynamic filter tokens. Export the customized Search Core Results web-part to disk to start packaging into a WSP solution.

Create a new TaskRollupWebPart web-part SPI in your web-parts feature in Visual Studio 2010. Make the new web-part class inherit from CoreResultsWebPart in the Microsoft.Office.Server.Search assembly. Override the methods shown here to add dynamic filtering of the query through the SharedQueryManager for the web-part page:

namespace PuzzlepartTaskRollup.WebParts
{
[ToolboxItemAttribute(false)]
public class TaskRollupWebPart : 
Microsoft.Office.Server.Search.WebControls.CoreResultsWebPart
{
QueryManager _queryManager;
protected override void OnInit(EventArgs e) {
  base.OnInit(e);
  _queryManager = SharedQueryManager.GetInstance(this.Page).QueryManager;
}
 
protected override System.Xml.XPath.XPathNavigator GetXPathNavigator(string viewPath)
{
  SPUser user = SPContext.Current.Web.CurrentUser;
  _queryManager.UserQuery = string.Format("scope:\"TaskRollup\" AssignedTo:\"{0}\""
user.Name);
  return base.GetXPathNavigator(viewPath);
}
 
protected override void CreateChildControls()
{
  base.CreateChildControls();
  //debug info
  //Controls.Add(new Label { Text = string.Format("FixedQuery: {0}<br/>
AppendedQuery: {1}<br/>UserQuery: {2}", 
FixedQuery, AppendedQuery, _queryManager.UserQuery) });
}
}
}

The code in GetXPathNavigator is what adds the current user to the QueryManager.UserQuery to filter tasks based on the assigned user by [me]. There are five query objects available on a search web-part page, where QueryId.Query1 is the default. This is also what is exposed in the web-part settings as the 'User Query' option. Use the GetInstance(Page, QueryId) overload in SharedQueryManager to get at a specific cross-page query object.

Replace the content of the TaskRollupWebPart.webpart file with the exported Search Core Results configuration. This will ensure that all the configuration done to customize the ootb web-part into the My Tasks web-part is applied to the new TaskRollupWebPart. A small change is needed in the metadata type element to load the new TaskRollupWebPart code rather than the CoreResultsWebPart code:

<webParts>
<webPart xmlns="http://schemas.microsoft.com/WebPart/v3">
<metaData>
<type name="PuzzlepartTaskRollup.WebParts.TaskRollupWebPart, 
$SharePoint.Project.AssemblyFullName$" />
<importErrorMessage>$Resources:core,ImportErrorMessage;</importErrorMessage>
</metaData>

Build the feature and deploy the package to your test site from Visual Studio 2010. Add the web-part to a page and verify that you get only your tasks as expected.

I know that this seems like a lot of work, but a search-driven web-part is easily created and tested before lunch. The inevitable styling & layout using XSL and CSS is what will burn hours, as usual.
 
A drawback of search driven web-parts or code is the delay before new/updated content is shown due to the periodical crawling schedule, typically five or ten minutes. On the positive side, the results will be automatically security trimmed for you based on the logged on user - no authentication hassles or stored username password required as with the XSL List View.

Note that most enterprise search classes are still sealed in SharePoint 2010 as in SharePoint 2007, except the CoreResultsWebPart and some new classes, so you're limited to what customizations can be achieved with configuration or the SharedQueryManager. Search driven web-parts works equally well in SharePoint 2007, except that there is no SharedQueryManager, but rather the infamous search results hidden object (SRHO) which is unsupported.

Recommended: SharePoint Search XSL Samples and the Search Community Toolkit at CodePlex.