Showing posts with label Publishing. Show all posts

Thursday, May 08, 2014

Getting SSL Termination to work for HNSC in SP2013

We have been struggling a bit with getting off-box SSL termination to work properly for SharePoint 2013 host-named site collections (HNSC). We had issues with the ribbon, with admin pages like "manage content and structure", and with the term picker. Sure signs that some JavaScript files did not load. Users could not edit the terms in managed metadata fields, that is, terms could be selected, but clicking "ok" to save would just hang forever. A lot of scripts and links would not load, showing mixed content warnings in IE9 - and nothing at all in Chrome and Firefox, which both just blocks HTTP content on secure HTTPS pages.

To cut to the chase, this setup for SSL offloading is what worked for us:
  • create the web-app on port 80 (not 443), do not use the -SecureSocetsLayer switch
  • do not use the server name as the web-app name, you have a farm - don't you?
  • always extend the web-app to other zones before starting to create HNSC sites; leave one zone unextended, e.g. the "custom" zone
  • create a classic root site-collection with the same HTTP name as the web-app, do not use a HNSC for this
  • a site template is not required for the root site-collection
  • alternate access mapping (AAM) is used for load balancing even for HNSC, but HNSCs can't use AAM for host name aliases
  • create the HNSC using an internal HTTP URL in New-SPSite for the default zone, remember that crawling must always use the default zone
  • create a public URL alias for the default zone by mapping an unextended zone using a HTTPS URL in Set-SPSiteUrl, such as the "custom" zone
  • create public HNSC mappings using HTTPS URL in Set-SPSiteUrl for the other zones
  • ensure that your gateway adds the custom header "front-end-https: on" for all your public URLs secured using SSL
  • note that using just "front-end-https: on" and HTTP in the public URL will not correctly rewrite all links in the returned pages

In short, the salient point is to use HTTPS in the public URLs even if the web-app zone does not use the SecureSocetsLayer switch nor any SSL certificates. The default zone of the web-application must be configured for crawling - either no SSL or full SSL with certificates assigned in IIS. With no SSL you have to simulate AAM by mapping two URLs to the HNSC default zone. Using Set-SPSiteUrl on an unextended zone is like creating an alias for the default zone.

We had to use HTTP on the default zone to crawl the content of the published pages. It seems that if the web-application does not use SSL and your site default zone uses a HTTPS host header, then only the friendly URLs (FURL) will be crawled while the content will generate a lot of "This item comprises multiple parts and/or may have attachments. Not all of these parts were indexed." warnings. The result of the warning is no metadata being indexed, thus no search results - not good for a search-driven solution.

Note that SSL is recommended for all web-applications in SP2013 also inside the firewall, especially if you use apps - as the OAuth tokens otherwise will be exposed in the HTTP traffic, just as classic IIS basic authentication is not recommended without SSL. We wanted to do SSL bridging with BigIP due to this, but could not get SSL server name indication (SNI) configured successfully in BigIP v11 to allow us to have SSL certificates bound to two different IIS web-sites, even if IIS8 supports SNI.

SNI is required when the shared wildcard certificate or SAN certificate approach cannot be used for your SP2013 web-application setup, i.e. when binding to host names in multiple IIS web-sites at the web-application level. SNI is required when you need to use more than one web-application or more than one zone (extended web-app), even if you could bind your one-SAN-to-rule-them-all certificate to multiple IIS web-sites. IIS cannot route the request based on the host header until the request has been decrypted - SNI allows the request to be routed to the correct IIS web-site.

Remember that this is the path the HTTP(S) request travels from the browser:

 browser >
  host header >
   DNS A-record >
    virtual IP-address (VIP) in gateway > SSL off-box termination here
     load balancing >
      IIS server configured with IP-address >
       IIS web-site bound to IP-address (or host header) > normal SSL termination here
        SP web-application >
         site-collection bound to host header (HNSC)

Keeping tabs on this will help you understand the Technet guide to HNSC, which has some room for improvements. See this article by jasonth for a step-by-step guide for HNSC and SSL. Note that binding to host names in IIS rather than to IP-addresses for HNSCs at the SP2013 web-application level is supported, just as it was for SP2010.

Thursday, May 01, 2014

Managed Metadata Navigation, Anonymous Users in SP2013

The new term-driven navigation in SP2013 has some gotchas for anonymous users, resulting in them not seeing a full navigation menu. These are some things to check:
Finally, remember that you have to publish a major version for each page that you link to from the navigation node, otherwise anonymous users won't see the page, and neither the term. This includes all items on the page that also requires approval, such as images. An easy thing to forget, if you've been so stupid as not to use the simple publishing configuration for your site. If you as an admin or logged in user can see terms and view a page, while visitors can not - you forgot to publish. An empty page or no term is a sure sign.

Related to the managed navigation is the friendly URL (FURL) mechanism, which uses the term set structure to build the FURL from the linked-to term. To prevent broken links when moving a term, SP2013 stores links using the FIXUPREDIRECT.ASPX page, with params such as the termID, which will be resolved server-side into a friendly URL when rendered (see navigation term GetResolvedDisplayUrl). Do not render RichHtmlField using the simple "SPWC:FieldValue" web-control, as this will not resolve the fixup-links. In addition, having the same control both in an edit mode panel and in a display mode panel might cause problems.

This all applies to author-in-place (AIP) usage of term-driven navigation and friendly URLs; cross-site publishing (XSP) have different kind of issues.

Note that the managed navigation term set is stored in the default MMS of the hosting web-application. It uses the local term store for the site-collection it belongs to (IsSiteCollectionGroup). This will affect your backup/restore procedure as not only the content database or the site-collection backup will be needed for a restore, the MMS database or tenant backup is also needed. As all host-named site-collections (HNSC) share a web-application, restoring the MMS with it's term stores will affect the navigation term set of all site-collections. Take care.

Wednesday, October 23, 2013

Roadmap for Responsive Design and Dynamic Content in SharePoint 2013

Responsive design combined with dynamic user-driven content and mobile first seems to be the main focus everywhere these days. The approach outlined in Optimizing SharePoint 2013 websites for mobile devices by Waldek Mastykarz and his How we did it series show how it can be achieved using SharePoint 2013.

But what if you have thousands of pages with good content that you want make resposive? What approach will you use to adapt all those articles after migrating the content over from SharePoint 2010? This post suggests a roadmap for gradually transforming your static content to become dynamic content.

First of all, the metadata of your content types must be classified so that you know the ranking of the metadata within a content type, so that it can be used in combination with device channel panels and resposive web design (RWD) techniques to prioritize what to show on what devices. This will most likely introduce more specialized content types with more granular metadata fields. All your content will need to be edited to fit the new content classification, at least the most important content you have. By edited, I mean that the content type of articles must be changed and the content adapted to the new metadata; in addition, selecting a new content type will also cause a new RWD page layout to be used for the content. These new RWD page layouts and master pages are also something you need to design and implement, as part of your new user experience (UX) concept.

While editing all the (most important) existing content, it is also a good time to ensure that the content gets high quality tagging according to your information architecture (IA), as tagging is the cornerstone of a good, dynamic user experience provided by term-driven navigation and search-driven content. Editing the content is the most important job here, tagging the content is not required to enable RWD for your pages.

Doing all of this at once as part of migrating to SP2013 is by experience too much to be realistic, so this is my recommended roadmap:

Phase 1
- Focus on RWD based on the new content types and their new prioritized metadata and new responsive master pages and page layouts
- Quick win: revise the search center to exploit the new search features, even if tagging is postponed to a later phase (IA: findability and search experience)
- Keep the existing information architecture structure, and thus the navigation as-is
- Keep the page content as-is, do not add search-driven content to the pages yet, focus on making the articles responsive
- Most time-consuming effort: adapting the content type of all articles, cutting and pasting content within each article to fit the new prioritized metadata structure

Phase 2
- Focus on your new concept for structure and navigation in SP2013 (IA: content classification and structure, browse and navigate UX)
- Tagging of the articles according to the new IA-concept for dynamic structuring of the content (IA: term sets for taxonomy)
- Keep the page content as-is, no new search-driven UX in this phase, just term-driven navigation
- Most time-consuming effort: tagging all of your articles, try scripting some auto-tagging based on the existing structure of the content

Phase 3
- Focus on search-driven content in the pages according to the new concept  (IA: discover and explore UX)
- New routines and processes for authors, approvers and publishers based on new SP2013 capabilities (IA: content contributor experience)
- Most time-consuming effort: tune and tag the content of all your articles to drive the ranking of the search-driven content according to the new concept

Phase 4
- Content targeting in the pages based on visitor profile segmentation, this kind of user-driven content is also search-driven content realized using query rules (and some code)

The IA aspects in the roadmap are taken from my SharePoint Information Architecture from the Field article.

Thursday, October 04, 2012

Dynamically Assign Approver for the Content Approval Workflow in SP2010

This post is a how-to guide for customizing the ootb SharePoint 2010 content approval workflow to automatically pick a user from the current list item such as the 'content resposible' field, and assign that user as the approver of the content, using SharePoint Designer. The customization of the content approval using SPD is quite straightforwards except for some less intuitive and misleading options for editing the workflow task process. It also involves publishing and editing the XML config of the workflow to enable using the "Start this workflow to approve publishing a major version of an item" option for automatically starting the approval workflow when the author check-in (submits) the page or document for approval.

To get started, follow the SharePoint Designer Walkthrough: Copy & Modify Publishing Workflow steps 1-4 to make a copy of the "Approval - SharePoint 2010" workflow in the site-collection root. Edit the workflow name to suit your needs and make sure to pick the content type that contains the user field that you will use to auto-assign as the approver in "Pick a base content type to limit this workflow to". Otherwise you won't be able to add a lookup for that content type field. Click OK and save.


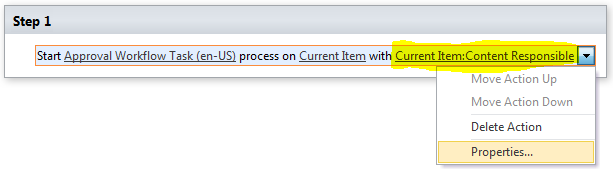
Open the saved custom approval workflow and click "edit workflow". Change the name of the "Start Approval Workflow Task" action as you like. Then click on "Parameter: Approvers" to change the "with [these users]" for the workflow action into using an user from the current item that is pending approval. Now, to dynamically assign an approver, you need to click the "Enter participants manually" button.


Then in "Select task participants" click the address book button to open the "Select users" dialog box. Now select "Workflow lookup for a user", which will trigger the "Lookup for person or group" dialog.


Click OK three times, and the start approval workflow action should now look like this:

Now, as a side-effect the comments for the task has been unbound, so you need to click on properties for the workflow action and bind the comments to the "Parameters: Request" again. This will ensure that the text entered in the request field when starting the approval workflow will not be missing when the approver opens the workflow task to approve or reject the pending content.


Click OK two times, and your customized approval workflow with a dynamic approver is almost ready. There are a couple of workflow parameters that are not needed when automatically assigning the approver, these can be hidden from the workflow initiation form so that the author is not confused when the workflow starting form is shown on check-in. Click "Initiation form parameter" in the ribbon and make sure that the "Approvers" and "Expand groups" parameters are not shown during workflow initiation.


Removing the parameters is also an option, it just feels safer to just hide them rather than deleting them. Save and publish your custom content approval workflow as a globally reusable workflow as shown in step 13-15. You can now follow the Configuring Approval in SharePoint steps to use your workflow on a document library that requires content approval, and it will work for the content types that the custom approval workflow is associated with for the selected list.


However, the "Start this workflow to approve publishing a major version of an item" option will be missing when associating the workflow with the document library, even if it is a bonafide approval workflow and even if the list has "Require content approval for submitted items" turned on. This is caused by the workflow being a content type rather than a list workflow, and only list workflows can be configured to start content approval on check-in. Luckily, it is rather simple to change this by editing the XML config file for the published workflow XOML definition using SPD, as shown in Writing Your Own SharePoint Publishing Approval Workflow. I made these changes to the file:
  • changed the Category attribute to "List;Language:1033;#ContentType;Language:1033" 
  • changed the AllowStartOnMajorCheckin attribute to "true"
  • removed the ContentTypeId attribute completely
After directly editing and saving the workflow config file using SPD, the workflow designer will be somewhat out of sync with the XOML definition, due to the removal of the content type and changing of the association category. Still, the actual workflow logic is still working as expected.

You can now associate and test the custom approval workflow on your document library. These are the typical "Version settings" used for the "Pages" list in publishing sites:


Note that the users that are assigned as the approver must be members of the "Approvers" group in publishing sites, or have the right to edit draft items in the document library, otherwise they cannot open the  workflow task to approve or reject the content, even if the user is the owner of the task.

Wednesday, September 12, 2012

Migrated Content Database gives Unexpected Error for all Publishing Pages

Today I migrated a SharePoint 2010 publishing site content database to our Azure staging farm. All went smooth after using sp_changedbowner on the restored database before adding the content database to the web-application using Central Admin. However, when I tried to browse the publishing site, I got the "an unexpected error has occurred" message. Browsing /_layouts/settings.aspx worked fine and so did browsing "all site content" and the /pages/ list settings.

Using the correlation ID in combination with the ULS viewer lead me to this infamous portal sitemap provider exception:

DelegateControl: Exception thrown while adding control 'ASP._controltemplates_publishingconsole_ascx': Object reference not set to an instance of an object.

PortalSiteMapProvider was unable to fetch current node, request URL: /Pages/Forsiden.aspx, message: Object reference not set to an instance of an object., stack trace:   
 at Microsoft.SharePoint.SPField.GetTypeOrBaseTypeIfTypeIsInvalid(SPFieldCollection fields, String strType)    
 at Microsoft.SharePoint.SPFieldCollection.GetViewFieldsForContextualListItem()    
 at Microsoft.SharePoint.SPContext.get_Item()    
 at Microsoft.SharePoint.SPContext.get_ListItem()    
 at Microsoft.SharePoint.Publishing.Navigation.PortalSiteMapProvider.get_CurrentNode()

Googling a "PortalSiteMapProvider was unable to fetch current node" exception is no fun. You will typically get it in relation to top navigation and related site map providers. I've chased the cause of that error before, and sometimes had to resort to iisreset each night due to the publishing cache going corrupt over time.

This time, luckily, the exception details indicated a problem with the /pages/ list item definition, which led me to How to fix "System.NullReferenceException: Object reference not set to an instance of an object. at Microsoft.SharePoint.SPField.GetTypeOrBaseTypeIfTypeIsInvalid" that helped me solve my problem. By looking closer at the list settings for the pages list, I could see that a list column was flagged as invalid (look for the text "Delete this invalid field").

Trying to browse to Site Settings > Site Columns didn't work, but it gave me the enough information to find out what caused the issue and helped me solve it:

Field type AdvancedCalculated is not installed properly. Go to the list settings page to delete this field.

Deploying the missing feature to the staging farm solved the problem. Now it only remains to fix all those absolute URLs entered by the content authors.

Thursday, March 08, 2012

SharePoint 'Approve on behalf of' for Publishing Pages

Using require approval and the approval workflow in SharePoint 2010 publishing, or just approval on the pages library in the simple publishing configuration, is straight forwards when using the browser as you're only logged in as one person with a limited set of roles and thus set of rights. Typically a page author can edit a page and submit it for approval, but not actually approve the page to be published on the site. When you need to approve, you have to log on as a user with approval rights.

Sometimes you need to extend the user experience to allow an author to make simple changes to an already published page, such as extending the publishing end date, and republish it directly without having to do all the approval procedures all over again. So you create a custom "extend expiry date" ribbon button, elevate the privileges from code and call the Page ListItem File Approve method, only to get an access denied error.

In SharePoint 2010, it is not sufficient to be the app-pool identity (SHAREPOINT\System) or even a site-collection admin, you have to run the approval procedures as a user with approval privileges. So your code needs to impersonate a user in the "Approvers" group to be able to approve an item on behalf of the current user.

public static void ApproveOnBehalfOfUser(
SPListItem item, string approversGroupName, string userName, string comment)
{
    Guid siteId = item.ParentList.ParentWeb.Site.ID;
    Guid webId = item.ParentList.ParentWeb.ID;
    Guid listId = item.ParentList.ID;
    Guid itemId = item.UniqueId;
 
    SPUserToken approveUser = GetApproverUserToken(siteId, webId, approversGroupName);
    if (approveUser == null)
        throw new ApplicationException(String.Format(
"The group '{0}' has no members of type user, cannot approve item on behalf of '{1}'"
approversGroupName, userName));
 
    using (SPSite site = new SPSite(siteId, approveUser))
    {
        using (SPWeb web = site.OpenWeb(webId))
        {
            var approveItem = web.Lists[listId].Items[itemId];
            approveItem.File.Approve(comment);
        }
    }
}
 
private static SPUserToken GetApproverUserToken(
Guid siteId, Guid webId, string approversGroupName)
{
    SPUserToken token = null;
    SPSecurity.RunWithElevatedPrivileges(() =>
    {
        using (SPSite site = new SPSite(siteId))
        {
            using (SPWeb web = site.OpenWeb(webId))
            {
                var group = web.SiteGroups[approversGroupName];
                if (group != null)
                {
                    foreach (SPUser user in group.Users)
                    {
                        if (!user.IsDomainGroup && !user.IsSiteAdmin)
                        {
                            token = web.GetUserToken(user.LoginName);
                            break;
                        }
                    }
                }
            }
        }
    });
    return token;
}

The code picks a user from the approvers group, and then impersonates that user using a SPUserToken object. From within the impersonated user token scope, the given page list item is opened again with the permissions of an approver, and finally the page is approved on behalf of the given page author.

Tuesday, January 17, 2012

Simple Feature Files Cleanup using Extension Methods

As every seasoned SharePoint developer knows, deactivating a feature does not remove the files deployed by that feature. The deployed masterpages, web part pages, wiki pages, page layouts, web-part definitions, styling artifacts, etc files will stay in the target libraries - and they will not be overwritten on feature activation. Don't let Visual Studio 2010 trick you into believing otherwise.

You have to delete those deployed files yourself in the FeatureDeactivating event. The classic approach is to delete the files one-by-one, but this is tedious and error-prone. The following is a set of extension methods that allows you to simply do this:

public override void FeatureDeactivating(SPFeatureReceiverProperties properties)
{
     SPSite site = (SPSite) properties.Feature.Parent;
     properties.Definition.DeleteFeatureFiles("MasterPages", site.RootWeb);
     properties.Definition.DeleteFeatureWebPartFiles(site.RootWeb);
}

The code is an adaptation of Corey Roth's LINQ to XML and Deleting Files on Feature Deactivation, using extension methods and supporting cleanup of specific feature modules and all feature web-parts.

namespace Puzzlepart.SharePoint.Core.SPExtentions
{
    public static class SPFeatureDefinitionExtentions
    {
        public class Module
        {
            public string Name { get; set; }
            public string Path { get; set; }
            public List<string> Files { get; set; }
        }
 
 
        public static void DeleteFeatureFiles
(this SPFeatureDefinition spFeatureDefinition, string moduleName, SPWeb web)
        {
            List<Module> modules = GetModuleFiles(spFeatureDefinition, moduleName);
            foreach (Module module in modules)
            {
                DeleteModuleFiles(module, web);
            }
        }
 
 
        public static void DeleteFeatureWebPartFiles
(this SPFeatureDefinition spFeatureDefinition, SPWeb web)
        {
            List<Module> modules = GetAllModuleFiles(spFeatureDefinition);
            foreach (Module module in modules)
            {
                if (string.Compare(module.Path, "_catalogs/wp"
StringComparison.CurrentCultureIgnoreCase) == 0)
                    DeleteModuleFiles(module, web);
            }
        }
 
 
        private static List<Module> GetModuleFiles
(SPFeatureDefinition spFeatureDefinition, string moduleName)
        {
            string elementsPath = string.Format(@"{0}\FEATURES\{1}\{2}\Elements.xml"
SPUtility.GetGenericSetupPath("Template"), 
spFeatureDefinition.DisplayName, moduleName);
            XDocument elementsXml = XDocument.Load(elementsPath);
            XNamespace sharePointNamespace = "http://schemas.microsoft.com/sharepoint/";
 
            // get each module name and the files in it
            var moduleList =
                from module in elementsXml.Root.Elements(sharePointNamespace + "Module")
                select new
                {
                    Name = (module.Attributes("Name").Any()) 
? module.Attribute("Name").Value : null,
                    ModuleUrl = (module.Attributes("Url").Any()) 
? module.Attribute("Url").Value : null,
                    Files = module.Elements(sharePointNamespace + "File")
                };
 
            List<Module> modules = new List<Module>();
            // iterate through each module with files
            foreach (var module in moduleList)
            {
                Module m = new Module()
                               {
                                   Name = module.Name,
                                   Path = module.ModuleUrl
                               };
                List<string> files = new List<string>();
                foreach (var fileElement in module.Files)
                {
                    string filename = (fileElement.Attributes("Name").Any()) 
? fileElement.Attribute("Name").Value : fileElement.Attribute("Url").Value;
                    files.Add(filename);
                }
                m.Files = files;
                modules.Add(m);
            }
            return modules;
        }
 
        private static void DeleteModuleFiles(Module module, SPWeb web)
        {
            foreach (string filename in module.Files)
            {
                if (!string.IsNullOrEmpty(module.Path))
                    web.GetFile(string.Format("{0}/{1}", module.Path, filename)).Delete();
                else
                    web.Files.Delete(filename);
            }
        }
 
        private static List<Module> GetAllModuleFiles
(SPFeatureDefinition spFeatureDefinition)
        {
            var moduleList = new List<Module>();
 
            string modulesPath = string.Format(@"{0}\FEATURES\{1}\", 
SPUtility.GetGenericSetupPath("Template"), 
spFeatureDefinition.DisplayName);
            DirectoryInfo folder = new DirectoryInfo(modulesPath);
            foreach (DirectoryInfo moduleFolder in folder.GetDirectories())
            {
                moduleList.AddRange(GetModuleFiles(spFeatureDefinition, moduleFolder.Name));
            }
 
            return moduleList;
        }
 
    }
}

Note that page layouts cannot simply be deleted if they are in use. Use code to revert the "GhostableInLibrary" files to the uncustomized (ghosted) feature files on disk in the SharePoint root [14].

Tuesday, January 03, 2012

SharePoint 2010 Localized Publishing Web Template

When you try to create a new localized publishing site based on a minimal SharePoint 2010 publishing web template (or a similar minimal site definition), it might fail with a "CreateWelcomePage" error such as this:

System.Runtime.InteropServices.COMException (0x80070001): 0x80070001 at 
Microsoft.SharePoint.Library.SPRequestInternalClass.GetMetadataForUrl
(String bstrUrl, Int32 METADATAFLAGS, Guid& pgListId, Int32& plItemId, 
Int32& plType, Object& pvarFileOrFolder) at 
Microsoft.SharePoint.Library.SPRequest.GetMetadataForUrl
(String bstrUrl, Int32 METADATAFLAGS, Guid& pgListId, Int32& plItemId, 
Int32& plType, Object& pvarFileOrFolder) - 
-- End of inner exception stack trace --- at 
Microsoft.SharePoint.SPGlobal.HandleComException(COMException comEx)
  at 
Microsoft.SharePoint.Library.SPRequest.GetMetadataForUrl
(String bstrUrl, Int32 METADATAFLAGS, Guid& pgListId, Int32& plItemId, 
Int32& plType, Object& pvarFileOrFolder) at 
Microsoft.SharePoint.SPWeb.GetListItem
(String strUrl, Boolean bFields, String[] fields) at 
Microsoft.SharePoint.Publishing.PublishingWeb.GetPublishingPage(String strUrl) at 
Microsoft.SharePoint.Publishing.Internal.AreaProvisioner.CreateWelcomePage
(PublishingWeb area, PageLayout pageLayout) at 
Microsoft.SharePoint.Publishing.Internal.AreaProvisioner.SetDefaultPageProperties
(PublishingWeb area, Boolean& updateRequired) at 
Microsoft.SharePoint.Publishing.Internal.AreaProvisioner.
InitializePublishingWebDefaults() 
- -- End of inner exception stack trace --- at 
Microsoft.SharePoint.Publishing.Internal.AreaProvisioner.
InitializePublishingWebDefaults() at 
Microsoft.SharePoint.Publishing.Internal.AreaProvisioner.Provision()
  at 
Microsoft.SharePoint.Publishing.PublishingFeatureHandler.<>c_DisplayClass3.b_0() at 
Microsoft.Office.Server.Utilities.CultureUtility.RunWithCultureScope
(CodeToRunWithCultureScope code) at 
Microsoft.SharePoint.Publishing.CmsSecurityUtilities.RunWithWebCulture
(SPWeb web, CodeToRun webCultureDependentCode) at 
Microsoft.SharePoint.Publishing.PublishingFeatureHandler.FeatureActivated
(SPFeatureReceiverProperties receiverProperties).

The typical cause is that your web template/site definition is a bit too minimal. The "Publishing" feature needs some initial configuration property data during feature activation. Don't strip these properties away completely. Also, activating the "Publishing" feature from code or a feature stapler will not work for localized sites if you don't pass in this configuration. It is not standard, but you can pass property XML data from code to feature activation as shown in Specifying Properties When Activating Features Through Code.

You must pass in the publishing feature property configuration for the "WelcomePageUrl" to ensure that is reference the localized pages library during activation, which is /sider/ for LCID 1044. The fallback for when this property is not set or is empty seems to be hardcoded to /pages/. Note that using "osrvcore" as the resource file is needed for some languages if you don't have SP1 of the language pack installed.

<!-- Feature: Publishing -->        
<Feature ID="22A9EF51-737B-4ff2-9346-694633FE4416">  
      <Properties xmlns="http://schemas.microsoft.com/sharepoint/">
            <Property Key="ChromeMasterUrl" 
              Value="~SiteCollection/_catalogs/masterpage/puzzlepart.master" />
            <Property Key="WelcomePageUrl" 
              Value="$Resources:cmscore,List_Pages_UrlName;/default.aspx"/>

It is important to reference an existing page in an existing library as the welcome page (home page). Deploy a page using a module if needed. Note that not all of these properties need to be specified as they have working default settings as fallback.