Showing posts with label MSCRM. Show all posts

Tuesday, May 08, 2007

MSCRM: viewing DHTML source of 'related entity' frames

Michael Höhne has an good post on how to change the default view of related entities in MSCRM v3, in which he shows how to gather the info necessary for creating the OnLoad javascript. One of the needed elements is the ID of a combobox inside the <iframe id="areaActivityHistoryFrame">. However, getting at the source of frames is not that easy in MSIE as Michael has discovered. The same goes for seeing the actual content of a modified dynamic HTML page.

Viewing the 'history' source is actually rather simple, follow these steps:
  • Open the view account form
  • Press CTRL-N on the keyboard to show the browser chrome including the address bar
  • Select the 'History' folder to view the related activities
  • Enter this javascript in the address bar and press enter to view the frame source:
javascript: '<xmp>' + document.frames("areaActivityHistoryFrame").document .body.outerHTML + '</xmp>';


Change the name of the <iframe> in the javascript to view the source of other related entity folders. Remember to select the folder first to make the frame source available for the script.

The above script is a slight modification of this script to view the dynamic source of the window.document:

javascript: '<xmp>' + window.document.documentElement.outerHTML + '</xmp>';

The MSIE Developer Toolbar is also useful, except for the issues with frames as described by Michael.

While you're in javascript mode, check out the impressive list of useful javascript snippets for MSCRM at Michael's Stunnware site.

Wednesday, January 10, 2007

MSCRM 3: Filtered view of SharePoint document library

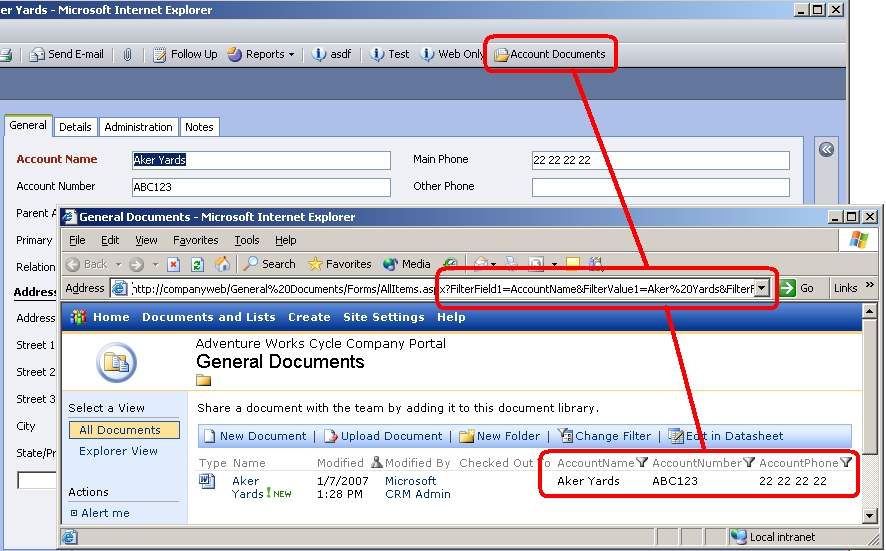
It has been a long time since my last Microsoft Dynamics CRM related post, so I thought I should share a litte JavaScript tip for filtering a SharePoint document library from MSCRM. The simplest way to add a document archive to MSCRM is to use a single, shared SharePoint document library for all MSCRM accounts and then use filtered views from MSCRM to make it look like each account have their own document library. This technique of course imply that you have no need for applying access control to the doc-libs on an account-by-account basis.

Add this JavaScript to the 'OnLoad' event of the account form to add a new button to the account toolbar:

var baseUrl = "http://companyweb/General%20Documents/Forms/AllItems.aspx?";
var urlSuffix = "";

var fieldMapping = new Array();
fieldMapping[0] = new Array();
fieldMapping[0][0] = "AccountName";
fieldMapping[0][1] = "name";
fieldMapping[1] = new Array();
fieldMapping[1][0] = "AccountPhone";
fieldMapping[1][1] = "telephone1";
fieldMapping[2] = new Array();
fieldMapping[2][0] = "AccountNumber";
fieldMapping[2][1] = "accountnumber";

for (i=0; i<3; i++)
{
var idx = i+1;
var value = crmForm.all.item(fieldMapping[i][1]).DataValue;
urlSuffix += "&FilterField" + idx + "=" + fieldMapping[i][0];
urlSuffix += "&FilterValue" + idx + "=" + value;
}

var url = baseUrl + urlSuffix.substring(1);
//alert(url);

var button = document.getElementById('New_1_315_Web Only');
if(button != null)
{
button.outerHTML = button.outerHTML +
'<SPAN class=menu id=_btnAccountDocs hideFocus title="Click to view account documents" style="PADDING-RIGHT: 3px; PADDING-LEFT:3px; PADDING-BOTTOM: 0px; PADDING-TOP: 3px" onclick=window.execScript(action) action="window.open(\'' + url + '\');" tabIndex=0 pr="3" pl="3"><DIV class=mnuBtn><IMG class=mnuBtn src="/_imgs/ico_18_1.gif">Account Documents</DIV></SPAN>';
}


The script is based on using the MSCRM 3 demo VPC, and adds the new button next to the "Web only" button added in the demo ISV.config file. Note: the filter string added to the outerHTML must be a single line, then linebeaks in the script shown here is just for readability.

The added "Account Documents" button will open a filtered view of the SharePoint doc-lib in a new window as shown in the figure (click to enlarge):


You can add the button (or any other HTML stuff you like) next to any HTML element in the MSCRM web-page, all you need to do is to find the ID of the element you want to use as the injection point. Search through the DHTML source to find the applicable location and look for the nearest HTML element containing an ID attribute. This is your injection point.

Using "View-Source" to view the HTML behind the page will not show changes made to the page after it has loaded in the browser. Use this litte JavaScript directly in the MSIE address field (after using CTRL-N to make the full browser appear) to view the actual, current HTML of the MSCRM web-page:


javascript:'<xmp>' + window.document.documentElement.outerHTML + '</xmp>';

By modifying the action script, it is quite easy to view the filtered SharePoint doc-lib in an IFRAME inside the account form (using the .location of the .form[] collection in the DHTML DOM). You will then need to make a customized view of the doc-lib suitable for inlining in the MSCRM form, see my post about removing the SharePoint chrome, controlling navigation, etc, for further details.

Monday, September 25, 2006

MSCRM 3: Move contact, retain history

My Objectware colleage Bjarne Gram has published an article that shows how to implement a pure client-side solution to move a contact to a new company while retaining all historical info by linking back to the former employer and a deactivated version of the contact.

Read the article over at Barney's blog.

Monday, August 28, 2006

Using Excel to generate picklist XML for MSCRM

In a recent post, Mitch Milam asked me to provide an Excel based solution to generating the customization XML for MSCRM picklist values. So, here it is: it uses a small VBA macro to loop through a named range of cells to generate the XML (see figure).

The range name is entered into A2 ("CountryList" in the example) and this defines the set of picklist item values. The option offset number to start with is entered into B2 ("10" in the example), it becomes the value of the first generated option. Use one as the 'Start option number' when adding items to an empty picklist.

I have added a button control to run the GenerateCustomizationXml method that generates the customization XML:

Sub GenerateCustomizationXml()

Dim namedRange As range
Dim outputCell As range
Dim listName As String
Dim xml As String
Dim ctr As Integer

listName = range("A2").Text
ctr = range("B2").Text

Set namedRange = range(listName)

xml = "<options nextvalue=""" & ctr + namedRange.Cells.count & """>"

For Each listItem In namedRange.Cells

xml = xml & "<option value=""" & ctr & """><labels><label description=""" & listItem.Text & """ languagecode=""1033"" /></labels></option>"

ctr = ctr + 1

Next

xml = xml & "</options>"

Set outputCell = range("B4")
outputCell.Value = xml

End Sub

The macro generates the XML with the correct option value numbers, calculates the nextvalue number, and puts the result into B4. Mark the B4 cell and click CTRL-C to copy it to the clipboard. Follow the steps outlined in Mitch's blog to import the new picklist values into MSCRM. Refer to the SDK for more details.

The macro is generic and can be used for any named range of cells in the worksheet. Just enter the range name in A2 and run the macro. Naming a range of cells is as easy as selecting the range of cells and typing in the name in the 'name box' in the upper left corner of the worksheet.

Tuesday, August 15, 2006

MSCRM 3 country field: apply a standard picklist

In a previous post, I referred to the DHTML solution by Michael Höhne that uses JavaScript to convert the country field from a text box to a picklist. The drawback of that solution is that the list of countries is provided by an inline JavaScript array, and is thus not very easily maintained.

I prefer that a MSCRM super user can maintain the content of the country picklist like any other picklist in the system. This is, actually, easy to achive by modifying the script a little bit: instead of using an array, just copy it from a hidden custom picklist field that contains all countries. In addition, I will show how to make it work with 'quick create'.

Start by adding a new field (attribute) of type 'picklist' to e.g. the account entity. Give the new field the name 'adminCountry' and add the list of countries. Save and close the added field.

Then open the account form and add the new 'adminCountry' field to the 'Address' section. Make the field read-only and hide the label.


Then click on 'Form Properties', and select 'OnLoad' in the 'Event list' and click 'Edit'. Turn on 'Event is enabled' and use this JavaScript to copy the values from the 'new_adminCountry' picklist:

//************************************************************
//Original author: Michael Höhne
//source: http://www.stunnware.com/crm2/topic.aspx?id=JS1
//************************************************************
//The lookup field to change. You can use this code for any field you like.
var fieldName = "address1_country";

//I'm saving the current field value to set it as the default in the created combobox.
var defaultValue = crmForm.all.item(fieldName).DataValue;

//This is the TD element containing the text box control. We will replace the entire innerHTML to replace
//the input type="text" element with a select element.
//KJELLSJ: replace the INPUT itself

//var table = crmForm.all.item(fieldName + "_d");
var input = crmForm.all.item(fieldName);

//This is the beginning of our new combobox. It's a standard HTML declaration and all we need to do is to
//fill the appropriate options. You should check the original HTML code to get the appropriate values for
//req (field required level) and the tab index.
var select = "<select req='0' id='" + fieldName + "' name='" + fieldName + "' defaultSelected='' class='selectBox' tabindex='1170'>";
//KJELLSJ: build options separately
var options = "";

//KJELLSJ: hide the 'new_adminCountry' picklist
var picklist = crmForm.all.item("new_adminCountry");
picklist.style.display = "none";
//KJELLSJ: inject countries from hidden 'new_adminCountry' picklist
options = picklist.innerHTML;
options = options.replace(/selected/i, ""); //remove selection

options = options.replace(/value=\d+>/g, ">"); //remove numeric values
options = options.replace(/>([\w ]+)</g, "value='$1'>$1<"); //use name as value
var defaultValueFound = false;


//Here's the part that ensures that an existing entity will always display the stored value of the
//country field, no matter if it is included in the option list or not. If it is set and it was not found
//in the previous loop, then defaultValueFound will still be false and we have to add it as a separate
//option, which is also SELECTED.
if ((defaultValue != null) && (defaultValue.length > 0) && !defaultValueFound) {
//KJELLSJ: add selected country as first option
options = "<option value='" + defaultValue + "' SELECTED>" + defaultValue + "</option>" + options;
}

//Close the open select element.
//KJELLSJ: concatenate the select and options
select = select + options + "</select>";

//Finally, I replace the entire definition of the text box with the newly constructed combobox. IE is very
//smart and will instantly update the window. You now have a combobox with a list of all available countries
//in the world and it will be saved directly to the address1_country field.
//KJELLSJ: replace the INPUT itself
//table.innerHTML = select;
input.outerHTML = select;


I have changed the script to use .outerHTML on the <INPUT> element as the 'quick create' form mode does not have a named <TD> element.
Note also the use of regex to transform the standard list of options into a picklist that will store the name of the country instead of the picklist value number.

Save the modified account form and publish the customizations (Actions-Publish). Test the script by opening an existing account and by creating a new account. Also remember to test that the customization works correctly in 'quick create' form mode for the entity. Use Fiddler to see the source of a 'quick create' web-dialog.

I have made a simplification to the 'selected country' logic by just adding the existing country as the first item in the picklist. I prefer that the current value is the top value in a picklist, the same way I prefer that the most used values are at the top of the list.

It is rather simple to extend the script to find the correct country in the options string: use .indexOf() to find the correct option element, then use .replace() to inject the "SELECTED" text into the options string.

This solution combines the best of the DHTML approach with the ease of the replacement-country-picklist approach, while avoiding the need for an OnSave/OnLoad script to keep the standard country field in sync with the selected item in the picklist.

Manually entering all countries in the world to the picklist is not fun, but this tool at Mitch Milam's blog should make things simpler. Alternatively, it should be rather trivial to use Excel to generate the XML from a range of cells. Most customers provides the set of picklists as Excel worksheets, afterall.

Wednesday, July 05, 2006

MSCRM 3: Convert text boxes to picklists using DHTML

All of our MSCRM customers are quite annoyed that the address country field is just a text box and not a drop down list with all existing countries. This makes e.g. reporting by country hard to do. There are several suggested workarounds out there, but Michael Höhne has come up with a very neat tick using DHTML and JavaScript in the OnLoad event of the MSCRM form.

The script replaces the country field with a picklist with the same name/id as the standard text field. This technique can of course be applied to any text field that you would rather see as a picklist.

A nice extension to Michael's script would be to remove the hardcoding of the picklist values with dynamic fetching of the values using a web-service AJAX style. This would make maintenance of the picklist content simpler, providing the super user with a centralized location for picklist management. After all, the country field is used several places in MSCRM; and the lists of countries seems to change every week these days.

Arash Ghanaie-Sichanie's excellent article "Accessing Web Services From CRM Forms" shows how to implement dynamic lookup of values. Note that using a web-service might not be feasible for the MSCRM laptop client (offline).

The full ISO 3166 country list can be found here.

Monday, June 26, 2006

MSCRM 3 Laptop Client – Delete Contact Synchronization/Tracking

The laptop client of MSCRM 3 synchronizes a user’s MSCRM contacts with the default Outlook contacts. By default this comprises the local data group ‘My contacts’, i.e. all contacts owned by the user.

This synchronization works fine and allows a tracked CRM contact to be modified either through the MSCRM contact form or through the Outlook contact form. However, when deleting a contact in either location, users can get confused by the result as the synchronization mechanism results vary, and a contact might continue to exist either in Outlook or in MSCRM, but never in both places.

Central to the synchronization mechanism is the Outlook-MSCRM link. This link is what relates a MSCRM contact with an Outlook contact, and defines that a contact shall be updated during synchronization. This link can be OK or broken, and this is what defines if an Outlook contact is tracked or not. It is the user's synchronization data groups that defines which contacts will be synced (created, updated).

[UPDATE] This article on the MS CRM Team Blog shows the complete set of rules regarding deleted item synchronization.

The result of a contact deletion vary dependent of the owner of the contact and whether it was deleted in MSCRM or in Outlook; and the result might be a deletion of the contact one or both places:


All testing behind these rules have been run using ‘CRM-Synchronize Outlook with CRM’ after each create/delete/change owner action. Remember the “My Active Contact” filter when testing these rules.

The term “tracking removed” means that the Outlook-MSCRM link is broken. The term “syncing removed” means that not only is the link broken, it is removed and the contact is not longer comprised by the synchronization. The latter means that you can create a new Outlook contact with the same data as the deleted one and apply tracking, causing a duplicate MSCRM contact to be created at the next synchronization. The lack of a (broken) tracking link deters the syncing mechanism from detecting the contact duplication.

The easiest way to check whether an Outlook contact is tracked or not, is to open the contact and see if the CRM toolbar says “Track in CRM” (not tracked, no link or broken link) or “View in CRM” (tracked, link is OK). Note that if the ownership changes after a contact have been synced to Outlook, then the Outlook contact will behave like an untracked contact with a broken link.


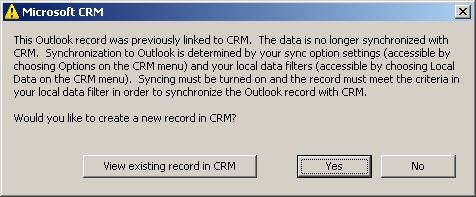
The second thing about CRM contact deletion that confuses users, is the behavior of the tracking mechanism when one of their contacts was deleted in MSCRM and then recreated, but fails to synchronize again. The MSCRM laptop client will give you a warning if you try to re-apply tracking of an Outlook contact that has been deleted in MSCRM (i.e. was previously linked); telling you that it is no longer synchronized, and asking if you want to create a new record in MSCRM. Note that if you delete and recreate in Outlook, there will be no warning.

At this point in the synchronization/tracking adventure, the user will try to re-link Outlook and MSCRM as best they can. It is now very likely that duplication of a re-created contact will happen.

When an owned contact was deleted in MSCRM (will exist in Outlook), this is what typically happens when users try to re-apply tracking:

  1. Create the contact again in MSCRM and synchronize
  2. You now will have two versions of the contact in the Outlook contact folder; a new tracked/synced contact, and the old Outlook contact

When an owned contact was deleted in Outlook (will exist in MSCRM), this is what typically happens when users try to re-apply tracking:
  1. Create the contact again in Outlook, track it and synchronize
  2. You will now have two versions of the contact in MSCRM; a new tracked/synced contact, and the old MSCRM contact

So, do not apply any of the above steps to fix the broken links and re-enable tracking and synchronization for deleted MSCRM contacts. This is the correct routine to re-apply synchronization tracking:
  1. Open the ‘Set Personal Options’ dialog using the ‘CRM-Options’ menu
  2. Turn off syncing of contacts and click OK
  3. Use ‘CRM-Synchronize Outlook with CRM’ to run the sync, this clears the deletion tracking (broken link tracking)
  4. Turn syncing back on and rerun the sync, this will automatically re-create Outlook contacts for the existing MSCRM contacts (as the deletion tracking is gone)

Re-creating MSCRM contacts for the existing Outlook contacts require that you apply these steps to each of the contacts:
  1. Open the Outlook contact and click “Track in CRM”
  2. Click save to get the warning question “Would you like to create a new record in CRM?”, optionally use “View existing record in CRM” to verify that the contact does not exist
  3. Answer ‘yes’ and this will create new, tracked MSCRM contact
  4. Repeat the steps for all deleted MSCRM contacts
NOTE: it is better to recreate the deleted MSCRM contacts first, as you then will have fewer Outlook contacts to process. After all, recreating the deleted Outlook contacts is an automatic process.

In addition, I recommend that you create a new contact folder in Outlook for your private contacts, as this makes it really simple to keep the biz contacts separate from your wife and grandmom.

The delete synchronization and the tracking confusion is one of the top issues at the MSCRM news group. Read this deletion tracking explanation at the MSCRM team blog.


Note that the MSCRM desktop client is always online, and therefore no synchronization is needed.

Thursday, June 22, 2006

Integrating team-sites into MSCRM (part II)

The MSCRM team has published a step-by-step guide for removing the chrome from SharePoint team-sites integrated into MSCRM. This was one of the three tasks that I outlined in my previous post on this topic. Note that I recommend hiding the chrome rather than deleting it from the web-part-page. I will add some details about the other tasks regarding the view columns and the view toolbar in this post.

What you will soon find out when integrating a team-site into a MSCRM <iframe>, is that in order to keep the integrated appearance, you need to control all navigation options in the team-site. This applies to both standard hyperlinks and to JavaScript onclick links. The navigation options
allows a user to open other web-pages inside the <iframe>. As you cannot easily control navigation options in these other pages, navigating away from the tailored view can lead to a less integrated appearance.

I recommend that you tailor the MSCRM view of the WSS team-site to show only the
necessary information to the user and provide only a few action options in the view, plus links to open the standard SharePoint team-site or doc-lib in a new browser for full access to the collaboration features of WSS. This method is similar to the view/actions functionality of the new MOSS 2007 Business Data Connector (not to mention IBF...). Check out the video about MOSS 2007 including BDC at Channel 9.

You need to review the navigation options in the team-site web-page to ensure that users will not be able to stray off-limits. As I explained in part I, you will not be able to customize all navigation options this way, as most of the content of the team-site is dynamically emitted by the web-parts on the page. Thus, you need to control the navigation dynamically after the page has completed loading using JavaScript and DHTML. I use a script that modifies all applicable hyperlinks to open a new browser; and that removes all onclick link actions, except on list sorting links.

This script was left to you as an exercise in part I, but for those of you that prefer copy-paste coding, here it is:

<script language="javascript">

function OnLoadSetHyperlinkTarget()

{
var links = document.getElementsByTagName('a');
//alert('Number of hyperlinks: ' + links.length);

for(i=0; i<links.length; i++)

{
var link = links[i];
if(link.id == 'EXCLUDE') continue;

link.target = '_blank';


if(link.onclick != '' && link.href != 'javascript:')

{
//alert('<A> onlick, id: ' + link.id);
link.onclick = '';
}

if(link.href != '')

{
if(link.href == 'javascript:')
{
//leave sorting links as-is
}
else if(link.href.substring(0,10) == 'javascript')
{
//alert('<A> href javascript, id: ' + link.id);
link.href = '';
link.onclick = '';
}
}
}
}
</script>


As you can see by examining the script, you can preserve hyperlinks by setting their id = 'EXCLUDE'. This is useful when adding your own hyperlinks that should not navigate out of the <iframe>. Note that the script removes all onclick handlers, thus it should not be used in combination with the full toolbar of lists and doc-libs.

Add this to the very bottom of the page to run the script:

</body>
<script language="javascript">

OnLoadSetHyperlinkTarget();
</script>
</html>


Note that the running of the script at the end of page load can be refined by using a onload JavaScript to wait for the page readyState to become "complete" before running it. Just running the script from after the <body> tag should work well enough in MSIE.

You must also review which column types you include in the MSCRM view of the document library. The reason for this is that the some of the column types provides options that causes navigation. I.e. use the "Name (linked to document)" as the document link column, rather than the column type that provides the drop down edit menu. Use "Modify settings and columns-Views-Edit view" to customize the MSCRM view to contain only the most basic meta-data and options; and provide a link to open the standard SharePoint view in a new browser with full doc-lib features.


Regarding the document library toolbar type, it is safer to use the 'Summary' toolbar in the new view, rather than the full toolbar. Alas, the functionality of the full toolbar might be more important than controlling the navigation options. If this applies to you, then use the full toolbar - just remeber to modify the above script accordingly.

At last, I want to refresh your memory on these two WSS tips from part I:

Do not hesitate to remove the SharePoint "Modify shared page" menu link. The toolbox can always be summoned using this querystring: ?mode=edit&PageView=Shared
&toolpaneview=2 (see
SharePoint tweaks).

Also try this nifty little SharePoint querystring trick: ?contents=1

Thursday, March 09, 2006

Archiving Office documents and e-mails to MSCRM team-sites

In a previous post, I described how we integrate SharePoint team-sites into MSCRM to provide collaboration features and to provide document archive functionality to our MSCRM customers. We typically give the users the ability to create WSS team-sites for each account, each opportunity or for each custom entity such as 'project'. If the customer also uses SharePoint Portal Server (SPS), we register the team-sites in the site directory and include them in SPS search scopes to ensure that e.g. documents are indexed by the SPS search engine.

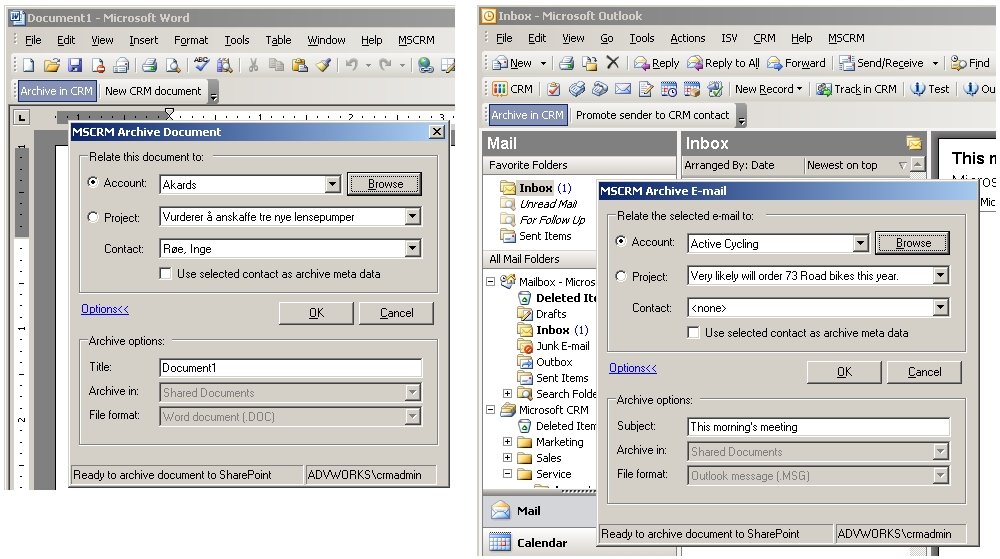
In addition, we provide an Office add-in that allows users to directly archive Word documents and Outlook e-mail messages into the MSCRM team-sites (much like the "snap"). MSCRM has poor support for storing documents (only as attachments to notes), and the support for creating new documents from templates and merging data from the database is not very much better. The rather lackluster support for document production in MSCRM is something potential customers always react negative to in sales meetings.

This screenshot collage shows how the add-in is used in Word and Outlook (click to enlarge):
E-mails are archived using the .MSG format. The SPS search engine can be configured to index .MSG files, thus making it easier to find archived messages. Documents are readily indexed by SPS out-of-the-box.

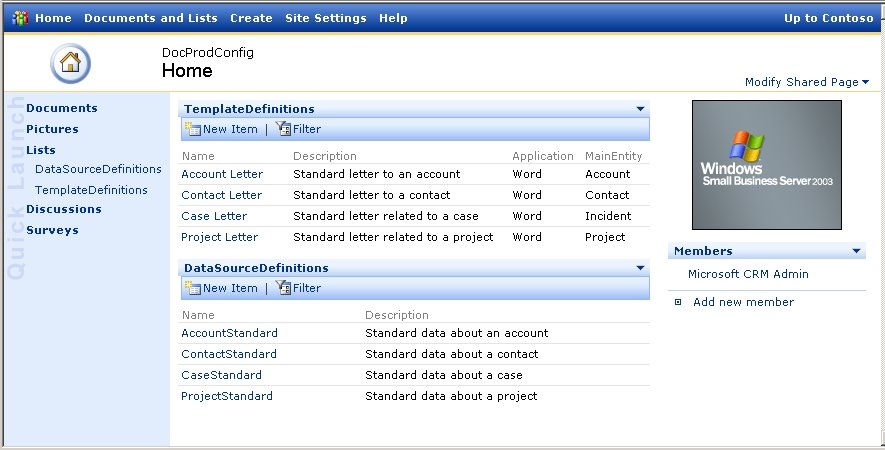
The templates and the datasets that they use, are configured using a 'document production admin' team-site, and the add-in uses the standard WSS web-services to get the list of templates:
The templates support merging in data from the datasets into placeholders in the document (bookmarks, document variables, [xml element name] literal text). The merge engine is simple and requires no scripting of each template: it just loops through the dataset and looks for all placeholders with the same name as the dataset column names:
The produced document is of course automatically archived to the correct team-site when the merging has finished (screenshot). Optionally, a post merge Word macro can be run should a template require some scripting, e.g. to create an table listing the details of a quote.

The merge data used in the templates are provided through custom web-services. Stored procedures using FOR XML AUTO, ELEMENTS are used to return the dataset to the add-in as XML. A stored procedure takes some MSCRM entity IDs as input, and then retrieve data from the MSCRM database, and possibly other datasources, to provide one or more resulting datasets. This allows for returning data about e.g. both an account, its primary contact, a quote and quote details in one go.

The Office add-in (.NET1.1, non-VSTO) currently supports Office 2000, XP, and 2003. It might be made available to other Microsoft partners this spring, keep an eye on this blog for further details.

Sunday, March 05, 2006

A snap while waiting for VSTO MSCRM

Microsoft has released an Office Word 2003 add-in that lets you insert data from MSCRM into documents and archive documents as MSCRM note attachments. Read more at Johnz blog.

The source code is available at GotDotNet in this workspace.

Thursday, February 16, 2006

Integrating Team-Sites into MSCRM

We usually implement SharePoint (both WSS and SPS) at our MSCRM customers to provide collaboration and document archive functionality. We use the iframe-style presentation layer integration mechanism that MSCRM provides through the ISV.CONFIG.XML file (ISV.CONFIG in v1.2). Microsoft has even provided an XSD schema for this configuration file in v3.0. You will find these files in the \_Resources\ folder underneath the install directory of MSCRM.

I will explain what you need to do to integrate WSS team-sites into MSCRM, and which modifications you should make to the web-part pages (WPP) and document libraries (doc-libs) of a team-site to make them well-behaved parts of MSCRM.

Our MSCRM-WSS integration is based on using some intermediate "staging" .ASPX pages that are the targets for e.g. the MSCRM <NavBarItem> element's URL attribute. We typically used two pages, one for doc-libs and one for other collaboration features of SharePoint:

<!-- The Account Left Nav Bar -->
<NavBar ValidForCreate="0" ValidForUpdate="1">
<NavBarItem Icon="/_imgs/ico_18_1.gif" Title="Document Archive" Url="http://london/Objectware.Mscrm.SharePoint/TeamSiteSharedDocuments.aspx" Id="Account.SharedDocs"/>
<NavBarItem Icon="/_imgs/ico_18_9.gif" Title="Collaboration" Url="http://london/Objectware.Mscrm.SharePoint/TeamSiteSummary.aspx" Id="Account.ViewTeamSite"/>
<NavBarItem Icon="/_imgs/ico_18_9.gif" Title="Links" Url="http://london/Objectware.Mscrm.SharePoint/TeamSiteSummary.aspx" Id="Account.ViewLinks"/>
</NavBar>

Note that the PassParams attribute of v1.2 is now obsolete, and that the object type and guid now always get passed to the target page. Note the Id attribute; it is central in making the integration flexible. Use the attribute to pass different "tokens" to the staging-page to allow the page to provide different parts of the SharePoint team-site as the response. The parameters are passed as a querystring. Get the passed data in the Page_Load event of your .ASPX page:

string guid = Request.QueryString["oId"];
string type = Request.QueryString["oType"];
string tabSet = Request.QueryString["tabSet"];


Note that
the Id attribute has the key tabSet in the URL querystring. Note also that the tabSet value gets the suffix "area", e.g. Account.ViewLinks becomes Account.ViewLinksarea. The oId value is the entity record GUID and the oType value is the type of the entity. Some of the most used types are:
  • Account = 1
  • Contact = 2
  • Opportunity = 3
  • Incident (case) = 112
Now that you know exactly which entity that requested your staging-page to show which specific WPP of a team-site, all you need to determine is which team-site it is, whether it exists, and whether the requesting user has access to the page (i.e. is a team-site member). Deducing the team-site URL from the parameters is left as an exercise for you, but a simple approach is to use the entity GUID a the only varying part of the team site URL, for example:
http://wss-server/sites/GUID/default.aspx

We also use a team-site generator made by Mads Nissen to allow a user to create new team-sites directly from inside MSCRM should the team-site not exists. The method shown below is used to check whether a team-site exists or not for e.g. a specific account. Lately, we have started using K2.net workflow to get more flexibility and power in the team-site creation process.

Your staging-page should use <identity impersonate="true"> in the relevant WEB.CONFIG file to ensure that you assert team-site access as the logged on MSCRM user. You could use the SharePoint object model to check if the site exists and if the user is a member. I have chosen the simpler method of using the HttpWebRequest of the System.Net namespace and checking for exceptions, making some simple assumptions:

public static void CheckTeamSiteUrl(string url)
{
string response = "";
HttpWebResponse httpResponse = null;

//assert: user have access to URL
try
{
HttpWebRequest httpRequest = (HttpWebRequest)WebRequest.Create(url);
httpRequest.Credentials = System.Net.CredentialCache.DefaultCredentials;
httpResponse = (HttpWebResponse)httpRequest.GetResponse();
}
catch(Exception ex)
{
throw new ApplicationException("HTTP 403 Access denied, URL: " + url, ex);
}

//if here, the URL is correct and the user has access
try
{
StreamReader stream = new StreamReader(httpResponse.GetResponseStream());
response = stream.ReadLine(); // .ReadToEnd();
stream.Close();
httpResponse.Close();
}
catch(Exception ex)
{
throw new ApplicationException("HTTP 404 Page not found, URL: " + url, ex);
}

if(response.ToLower() == "<html><body>the web site that is referenced here is not in the configuration database.</body></html>")
{
throw new ApplicationException("HTTP 404 Team-site not found, URL: " + url, null);
}
}


Note that WSS won't respond with a proper HTTP 404 error when the team-site does not exist. Rather, WSS responds with a valid page with a single line of text explaining that there is no such team-site in the SharePoint database.

If the CheckTeamSiteUrl method returns failure, a new team-site is generated from a WSS template (.STP) using the standard SharePoint web-services. The WSS template contains one or more web-part-pages (WPP) tailored for integration into MSCRM (see below).

If the
CheckTeamSiteUrl method returns success, do a simple redirect to the actual target page within the WSS team-site.

You should tailor the WPPs that you integrate into MSCRM for these reasons:
  • To remove the SharePoint "chrome": i.e. the page header, top menu, search, left menu, etc
  • To configure the custom MSCRM view(s) of the doc-lib to use only basic column types rather than the "edit" column types, to keep the navigation options simple and controllable
  • To configure doc-lib toolbars to be suitable for inline navigation in MSCRM
  • To ensure that all hyperlinks are suitable for navigation within the MSCRM frame: if a link is not suitable for inline navigation, apply a target="_blank" attribute to it
How you create a new WPP depends on wether it is a new custom team-site page or a new custom view for an existing document library. To create a new team-site page, open the WPP you want to integrate into MSCRM in FrontPage2003 and save it as a new web-page for use in MSCRM. To create a custom view for a doc-lib, I recommend using the standard 'Modify settings and columns-Views-Create a new view' tool. Tailor the new view to be suitable for inline navigation in MSCRM. It is better to do all customizations before hiding the SharePoint "chrome", as hiding the chrome also hides access to the customization tools.

I prefer to use the prefix MsCrmView_ on all web-part-pages tailored for integration into MSCRM. Use the 'split' view of the WPP to select the parts to remove, and apply a style="display: none;" attribute to the <TR> and <TD> elements to hide them. Do not delete them from the page, some SharePoint JavaScript might depend on the elements being part of the HTML DOM.

As a web-part-part page is built at run-time from the web-parts residing in the web-part-zones of the page, you need to device a JavaScript that runs on page load 'complete' event to modify their navigation behavior (the target attribute). This script
is left as an exercise for you.
[UPDATE] The hyperlink modification JavaScript can be found here, including further details.

Do not hesitate to remove the SharePoint "Modify shared page" menu link. The toolbox can always be summoned using this querystring:
?mode=edit&PageView=Shared&toolpaneview=2 (see SharePoint tweaks).

Also try this nifty little SharePoint querystring trick: ?contents=1


Monday, January 02, 2006

Outlook recipient autocomplete, AD contacts sharing SMTP address

We have implemented an extension to MSCRM that replicates accounts and contacts to Active Directory as AD contacts for use as an Outlook address book (see this post). It is not very common, but some accounts and contacts do actually share the same SMTP mail address. E.g. several departments of a large corporation might share the same mailbox, and your user expects to find each department in the MSCRM address book in Outlook as separate contacts.

A few days ago, the operations department at one of our customers raised a concern about the support in Exchange Server 2003 for resolving mail recipients against the set of AD contacts when some of them share the same SMTP address. "This is not allowed in AD, and you should fix your code to not add the same SMTP address multiple times to AD" he stated. What ? As "proof" he sent me a screenshot of an error he got when trying to add a new contact with a duplicate SMTP address using the AD Users and Computers admin tool:

This e-mail address already exists in this organization (c10312e7)

This is a known limitation in the Active Directory Users and Computers snap-in. To resolve this, do not create the contact with AD Users and Computers, but use the ADSI-edit MMC snap-in or the ADSI component from your code to add multiple AD contacts that must share the same SMTP address. The AD attributes to set are "mail", "mailNickname", "proxyAddress", and "targetAddress". Those fields can be modified to enter a SMTP address that exist for other contacts without error (more info at MSDN).

Note that you should not create Exchange mailboxes for any external AD contact, and never create AD contacts duplicating the mail addresses of internal users. This will lead to NDR errors during Exchange resolving and mail delivery. Also ensure that you use correct settings for the Exchange Recipient Update Service (RUS) on your AD contacts, as RUS will automatically create Exchange entries for your AD contacts when not disabled as applicable. Read more in this post.

A related problem to Exchange NDRs for unreliable AD contact data, is the Outlook 2003 recipient cache. This autocomplete mechanism is heavensent when adding recipients that you send e-mail to often, but it is a p.i.t.a when your favorite recipients change their e-mail address or their data change in AD (the source of Outlook contact groups, a.k.a Exchange Global Address Lists). E.g. removing contacts from AD might lead to errors when Exchange tries to resolve cached recipients.

It is not easy to change the cached recipients list in Outlook using Outlook. The only option you have is to delete cached entries, but not many users have been able to find where to do that or clear the cache. It is actually quite simple, but not very intuitive; just select the entry you want to remove in the autocomplete suggestion list and press 'Delete' on your keyboard. The whole list of cached recipients is stored in a .NK2 file in your application data folder. Delete this file to clear the cache completely.

Read this article at Outlook Exchange for more info about the Outlook recipient autocomplete cache (Outlook .NK2 file). Also check out the Ingressor NK2 Management tool for editing and managing the .NK2 file.

Tuesday, November 29, 2005

MSCRM 3.0 in a multi AD forest infrastructure

MSCRM 3.0 by default supports a single AD domain (really a single AD forest) and a single Exchange 'organization'. The full spectrum of MSCRM functionality will be available to your users when your infrastructure adheres to these requirements. I will call the AD domain into which you install MSCRM, SQL Server 2000/2005 and SRS, the native domain. The same term is used for the Exchange organization of the native AD domain.

These are most likely infrastructure challenges you will encounter outside the native domain:

  • Outlook desktop client: access to MSCRM platform services
  • Outlook laptop client: desktop + go offline and online
  • Exchange: Routing of incoming e-mails to MSCRM users and queues
  • SQL Server Reporting Services: access to SRS services for reporting
First an overview of what sould work and what should not, dependent on some 'unsupported' infrastructure scenarios:

If you have multiple AD forests without explicit trusts, then the users not in the native domain will get only basic MSCRM functionality; the web client over HTTPS with basic authentication. These users will not be able to use neither the online nor the offline Outlook client (MSCRM desktop / laptop client) as they are not logged on to the domain. Note that such users will not get full reporting functionality with SQL Server Reporting Services (SRS) in this scenario.

If you have multiple Exhange organizations without explicit trusts; then the users not in the native organization (forest) will get only basic send e-mail functionality, the 'e-mail router' will not be able to automatically route incoming e-mails as the mailboxes are not in the native organization. In addition, the router cannot access the native AD domain when not explicitly trusted.

If you have users in an NT4 domain with a one-way trust from the native domain, these users will be able to use both the web and desktop client. They will not be able to use the laptop client as they cannot go off/online, incoming e-mail will not be routed to them, and they will not get full reporting functionality.


Then an overview of how can a multi AD forest and Exchange organization be configured to support full MSCRM functionality:

First of all, forget getting full MSCRM functionality for NT4 domains. Microsoft does not support NT4 anymore, so your're on your own.

The good news is that your users across several AD forests will be able to get the full spectrum of functionality available in MSCRM 3.0. This will just require some configuration of your infrastructure.

The most important aspect is that you have to add at least one-way trusts from the native MSCRM domain to the other domains. Trusting requires a LAN, WAN, or VPN connection between your domains. Support for full MSCRM over plain HTTPS is not possible.

The MSCRM Outlook client requires Windows Authentication / Kerberos against the native AD domain and usage of the default security credentials on the client PC. Thus, by adding one-way trusts, your users will be able to use both the MSCRM desktop client and the laptop client. Sending e-mail will of course work, while routing of incoming e-mails to users and queues will require some more configuration (see below).

Note that basic SRS reporting functionality will be available with just one-way trusts. For full reporting functionality, two-way trusts are needed between the AD forests. Alternatively, you need to configure a fixed identity on the clients for accessing the SRS reports (KB article to be published).

MSCRM 3.0 now supports having multiple Exchange servers in your native Exchange 'organization', including Exchange clusters. It is no longer required that you have a single Exchange server handling all incoming internet e-mails for your 'organization', as the functionality of the MSCRM e-mail router has changed in v3.0.

The v1.2 router had this limitation, which made it impossible to have one common MSCRM database in a company with multiple Exchange organizations (mail domains). E.g. I work in a company with several daughter companies and thus mail domains (itera.no, objectware.no, gazette.no, etc). This meant that with v1.2 we could not get full mail functionality in MSCRM. With MSCRM 3.0, we finally can.

The router no longer inspects all incoming mail messages, but rather a specific MSCRM mailbox.

The inspection of all incoming mails have been replaced by Exchange rules that must be deployed to each Exchange server that contain one or more mailboxes of MSCRM users and queues.
Click to enlarge figure

The Exchange rules, the MSCRM mailbox and the E-mail Router by default require mailboxes to be in the native domain and native 'organization', as the router must be able to access the MSCRM platform services to do its work.

You can deploy the mail routing rules and components to other Exchange organizations, provided that you configure the routing service to use an identity that has access to the MSCRM platform services. This will of course require that you have at least a one-way trust between the AD domains.

Wednesday, November 23, 2005

MSCRM 3.0 added fields - row size limitation

MSCRM 1.2 had an undocumented limit to the number of (actually, the combined size of) fields you could add to an entity. At least the MBS marketing department did not know anything but "you can add any number of custom fields as you like". This limit is imposed by the SQL Server 2000 maximum row size of 8KB, minus some overhead for replication. In addition, v1.2 used updatable SQL views with 'before triggers', which further limited the available size. Some of the entities in v1.2 is quite large to begin with, e.g. the Contact entity, and you would soon hit the roof.

In v3.0, they have raised the limit by providing an extra full row for custom fields, i.e. a separate table on each entity for the added fields. In addition, SQL replication is gone, and so are the updatable views. Thus you will be able to exploit the full range of bytes in a row as you please. The new tables are named *ExtensionBase, e.g. AccountExtensionBase. All text is of course still unicode, thus each char will take up two bytes in the database row.

Note that all new custom fields are added to the *ExtensionBase table, custom fields are no longer injected into the native table of an entity.

SharePoint has a similar mechanism for custom metadata on lists; the metadata fields all share the same database table. Although this limitation exists, it rarely imposes practical restrictions in our solutions, and I think that the same will apply to MSCRM custom fields.

Wednesday, November 09, 2005

MSCRM: issues with one-way trusts between domains

At one of our customer we had to setup a new Active Directory domain for MSCRM 1.2 as their existing domain was NT4. Thus, all the users and their mailboxes stayed in the NT4 domain, while MSCRM and SQL Server were installed in the new AD domain. This deployment is "supported" by Microsoft, but beware of the small print and ommisions.

First of all, "go offline" in Sales for Outlook (SFO) does not work when the users recide in a trusted NT4 domain. We never got to test "go online" for obvious reasons. This might be due to v1.2 using SQL Replication, which in v3.0 has been replaced by the good, old BCP tool. Note that v3.0 still uses MSDE as the offline database and not SQL Express. Both SQL Server 2000 and 2005 are supported by MSCRM 3.0 as the master database.

Then the famous "E-mail Router": setting up routing of incoming e-mails as shown in the implementation guide works, sort of. Install a new Exchange Server in the AD domain and use either a CRM subdomain or forwarding of non-CRM e-mails to the original Exchange Server. Beware of the small print, however! Only e-mails to mailboxes registered in the native AD domain of MSCRM will be processed by the router. Thus, mails to a user will not be routed, even when a reply to a MSCRM e-mail, as they are in the NT4 domain. The only AD mailboxes we had were for queues (support@myco.com, etc), and routing of incoming e-mails to these queues works like a breeze.

We are currently deploying MSCRM 3.0 in a simmilar scenario, this time with five customer divisions, each with its own AD domain that are not within a single, common AD forest. Each domain (customer division) has its own Exchange server. I will post our experiences on the limitations with this infrastructure later on.

Note that an Exchange 'organization' cannot span AD forests, and that MSCRM is limited to one Exchange 'organization'. This restricts MSCRM with full Exchange e-mail functionality to a single AD forest.

Tuesday, November 01, 2005

Configuration of c360 "My workplace" add-in

Anyone that implements professional MSCRM solutions will at some point need one or more c360 add-ins. We have used their SearchPak, Email to Case (just love it), and this week the "My Workplace" add-in. The workplace add-in allows users to personalize the view of queues; selecting activity and case columns, specifying sorting, etc. The standard MSCRM queue view sorts alpabetically on subject, while sorting on received/due date is normally requested.

The installation went quite OK. As usual we had to replace our customized isv.config file with our backup copy of the original, otherwise the setup kit will not be able to modify the file. This is a bit annoying, as a diff-merge is then needed to merge the news changes into the working copy of our customized isv.config file. Make sure that every added <NavBarItem>element is on one line only, as linebreaks will prevent MSCRM from running, and lock the config file. Use iisreset.exe to release the file lock if you get syntax problems.

The added "My Workplace" module (QueueManager) would not load, responding with this error message: The request failed with HTTP status 400: Bad Request. The offending code was easily located after adding a new web.config file in the \custom\c360\ folder, then setting <customerrors mode="off" /> and <compilation debug="true" /> to see the actual error. It was the c360 license provider that was not able to call the MSCRM web-service to get details about the authenticated user. The call to .WhoAmI() method of the MSCRM platform proxy object resulted in a SOAP error.

In addition, c360 code is well behaved and writes info to the Windows application event log on the MSCRM server. The event source is "c360.Toolkit" and provides you with data such as the page URL and the URL of the web-service. The web-service URL shown in the event was wrong, using the server name instead of the IIS site name.

This is the "undocumented" way to configure the exact URL of the web-service:

  1. Open the \custom\c360\config\c360.config file
  2. Add this <appSettings> element:
    <add key="WebServicesUrl" value="http://server/MSCRMServices" />
Note that for some reason it is not the c360.QueueManager.config that must be changed.

You might need to use the IP-address of your MSCRM site instead of the host name to get things working. Authentication between IIS sites on the same server can sometimes be hard to diagnose when using e.g. host headers, but using the specific IP-address of a web-service has always worked for me. This MSDN article on IIS authentication and credentials is recommended reading.

The need for some of the c360 add-ins will decrease with MSCRM 3.0, but c360 will no doubt continue to provide products that will complement and enhance the standard MSCRM functionality. They have announced support for v3.0 for all their add-ins within two weeks of MSCRM v3.0 RTM.

Objectware is the Norwegian c360 partner.

Thursday, September 15, 2005

MSCRM case: worldwide customer evidence video!

A lot of the themes that I have blogged about here stems from a MSCRM and Exchange based solution that utilizes SharePoint, Office and Outlook as the front-end. I worked as the lead developer on the project and did a lot of cool MSCRM, AD, Outlook and Exchange stuff, plus some VSTO-O alpha development. Mads Nissen did the SharePoint stuff and lately an extra VSTO-O add-in.

This shipbroker solution was chosen by Microsoft to become one of a few worldwide customer evidence videos! Watch the video
here. I am (unfortunately?) not in the video.

The project would not have succeeded without the effort of a bunch of other people not mentioned here, but then noone gets forgotten.


PS! if the video won't start, download the launcher and start it using MediaPlayer (afterall, it is a Microsoft video).

Friday, August 26, 2005

What's new in MSCRM 3.0

Microsoft has finally made public some white papers that describes the new features and new customization options of MSCRM 3.0, of which:

  • campaigns & marketing
  • creating new business entities; with offline support
  • adding new relationships to entitites (not just new attributes)
  • client-side validators and scripting support
  • customizing activities
  • workflow for activities and custom entities
  • better CRM e-mail integration with Outlook 'inbox' and 'sent items'
  • separate tables for custom entity attributes/relations
are the most needed improvements based on my MSCRM experience at several customers.

The use of a separate custom attribute/relation table for each entity extends the number of fields you can add to an entity in version 3.0, thus improving on the current limitation which is kind of an "official secret". MSCRM 1.2 is limited by the SQL Server 8K row-size restriction because all fields are added to the entity table (actually less because of replication overhead). This is especially hurtful for the contact entity as it is 80% full out-of-the-box in version 1.2.

To make a long story short, Mattew Wittemann has published a nice summary of the white papers, with several sceenshots, which is available here. Recommended reading!

The Microsoft MSCRM 3.0 white papers can be downloaded here (feature overview) and here (discloses new customization options).

Friday, August 12, 2005

Outlook recipients: AD contact postal address data

For our MSCRM customers we have made a small service that monitors the MSCRM database for changes to accounts and contacts, and maintains a specific Active Directory (AD) container that contains AD contacts that shadow the MSCRM accounts and contacts and their e-mail addresses. All these AD contacts are made available to Outlook through a new address book entry configured in Exchange System Manager. This ensures that all users have access to the e-mail information stored in MSCRM, even those that do not use Sales For Outlook. They can use the Outlook address book to pick or search for e-mail addresses and see details about an e-mail address such as contact name, company, postal address, etc.

The AD container is also used to hold AD distribution lists (mailing lists) built from the AD contacts. These distribution lists are also made available to Outlook through Exchange 2003. In addition, we have made a .NET add-in for Outlook that allows the users to preview the members of a list before sending e.g. the weekly newsletter e-mail (using an add-in toolbar in the e-mail Inspector window). The add-in allows the users to see the extra information stored in AD, and remove those members that should not get a mail this time. The users (ship brokers) typically decide that the e-mail should be sent to all members except those in Greece, and use the add-in to sort by country, multi-select the applicable members in a WinForms checkbox ListView and finally remove the selected members. This 'explodes' the mailing list into recipients, in addition to moving them to BCC to ensure that recipients do not see who else got this e-mail.

The code that maintains the AD contacts and the AD distribution lists runs on the Exchange Server 2003 to be able to modify data in both AD and Exchange (details here). Adding and maintaining AD contacts with .NET C# is quite easy, there are just a few pitfalls to be aware of when using AD contacts in combination with Exchange (details here).

The users recently requested the possibility to see the country of the MSCRM account/contact in the Outlook address book and when removing distribution list members. "No problem", I responded quickly and started checking postal address fields in Outlook and AD. I added full address information for an AD contact I knew was in the Outlook address book, waited for the RUS, and found the entered data in Outlook. I was ready to start coding !

First I added a 'country' column to my list view and then inspected the AddressEntry properties for access to postal address data. Unfortunately, Microsoft chose not to expose these properties in the Outlook object model. Fortunately, we were already using Redemption for other purposes in our add-in:

Redemption.MAPIUtils mapiUtils = new Redemption.MAPIUtils();
const int PR_COUNTRY = 0x3A26001E;
const int PR_EMAIL = 0x39FE001E;
foreach (Outlook.AddressEntry entry in list.Members)
{
string country = "";
object mapiCountry = mapiUtils.HrGetOneProp(entry.MAPIOBJECT, PR_COUNTRY);
if (mapiCountry != null) country = mapiCountry.ToString();


string smtp = entry.Address;
//check if Exchange address
if (smtp.StartsWith("/o="))
{
//get SMTP address from MAPI
smtp = mapiUtils.HrGetOneProp(entry.MAPIOBJECT, PR_EMAIL).ToString();
}

//add to listview
string[] items = new string[] { entry.Name, smtp, country };
ListViewItem itemX = new ListViewItem(items);
//keep name and address for later matching against recipients
itemX.Text = entry.Name;
itemX.Tag = entry.Address;
lstRecipients.Items.Add(itemX);
}
mapiUtils.Cleanup();


You will find a list of relevant MAPI property keys at OutlookCode.com.

Then I modified our AD updater service to read the country of each MSCRM account/contact to be able to set it on each AD contact. I used the ADSIEdit MMC snap-in to inspect the properties of my 'guinea pig' AD contact to see which property was used for storing the country. The 'co' property contained the country name, and the property 'countryCode' seemed to have something to do with a contact's country. Some googling lead me to MSDN, which revealed that these three properties must be set according to ISO 3166:

  1. c: two letter country designation
  2. co: country name
  3. countryCode: country code (integer)

You will find the ISO 3166 list here. Copy and save the list to a .TXT file, open it in Excel as a 'fixed width' file to convert the text into a useful .XLS table. Use SQL Server 2000 DTS to import the .XLS to a new table in your database, enabling you to lookup MSCRM country names in the ISO 3166 country list.

The code to set MSCRM data into an AD contact properties looks like this:

//set properties
adContact.Properties["DisplayName"].Value = displayName;
adContact.Properties["mail"].Value = mailAddress;
//NOTE: AD fails on empty string, "invalid attribute syntax"
if(firstName.Length!=0) adContact.Properties["givenName"].Value = firstName;
if(lastName.Length!=0) adContact.Properties["sn"].Value = lastName;
if(company.Length!=0) adContact.Properties["company"].Value = company;
if(department.Length!=0) adContact.Properties["department"].Value = department;

if(country.IndexOf(";")>0)
{
//format: name;code;number
country += ";;;"; //just to be sure
string[] parts = country.Split(new char[]{';'});
string countryName = parts[0];
string countryA2 = parts[1];
string countryCode = parts[2];
if(countryName.Length!=0) adContact.Properties["co"].Value = countryName;
if(countryA2.Length!=0) adContact.Properties["c"].Value = countryA2;
if(countryCode.Length!=0) adContact.Properties["countryCode"].Value = Convert.ToInt32(countryCode);
}

// Flush to the directory
adContact.CommitChanges();

Note that I chose to require the country information to be provided as a semicolon separated string just for "simplicity" as I have not used entity objects (data xfer objects) in my AD service. I think refactoring of my service interface is needed, soon the users will want "just one more field" to be added...

Programming tip: use a reverse for-loop (i--) when removing entries from the Outlook.MailItem.Recipients collection, because the collection changes when a recipient is removed and this messes up the iteration if not performed end-to-beginning.

Tuesday, April 26, 2005

MSCRM ColumnSet XSD: fields, sorting & filtering

Many of the MSCRM .Retrieve*() methods take an optional ColumnSet string parameter that is normally set to an empty string (""). Most of the samples in the SDK never uses or explains what this parameter is used for, and you might easily think that it is used only for specifying which columns (fields) that should be returned in the result set.

It was not until I needed to sort the result set, that I started to look for how to make the MSCRM services perform sorting, to avoid sorting the result set with a DataView connected to our typed DataSet. By chance, I browsed to the schema of the ColumnSet parameter, and found out that it allows you to specify several clauses for the retrieve operation: select fields, specify sorting, apply filters, etc.

This is an example of how to retrieve a light-weight, sorted and filtered list of sub-accounts:

//fields, sorting, filter
string colset = "<columnset>";
colset += "<column>accountid</column>";
colset += "<column>name</column>";
colset += "<column>emailaddress1</column>";
colset += "<column>ownerid</column>";
//sort on name
colset += "<ascend>name</ascend>";
//only active accounts
colset += "<filter column='statecode' operator='eq' value='" + Microsoft.Crm.Platform.Types.ACCOUNT_STATE.AS_ACTIVE + "' />";
colset += "</colset>";

//retrieve sub accounts
_crmAccount.RetrieveSubAccounts(_crmUserAuth, accountId, colset)


Note that you must specify one or more <column> elements to get data back, as the MSCRM services will return no fields if you do not specify any.

The services do, however, behave very nicely when specifying a column that is a relation to e.g. the biz user that owns an account (ownerid), as not only the owner GUID is returned, but it is also annotated with XML attributes containing the full name of the owner, etc. These extra attributes saves you from doing extra lookups in MSCRM to present human-readable data to the user.

Refer to the SDK for more information about the ColumnSet XML Schema.