Monday, June 26, 2006

MSCRM 3 Laptop Client – Delete Contact Synchronization/Tracking

The laptop client of MSCRM 3 synchronizes a user’s MSCRM contacts with the default Outlook contacts. By default this comprises the local data group ‘My contacts’, i.e. all contacts owned by the user.

This synchronization works fine and allows a tracked CRM contact to be modified either through the MSCRM contact form or through the Outlook contact form. However, when deleting a contact in either location, users can get confused by the result as the synchronization mechanism results vary, and a contact might continue to exist either in Outlook or in MSCRM, but never in both places.

Central to the synchronization mechanism is the Outlook-MSCRM link. This link is what relates a MSCRM contact with an Outlook contact, and defines that a contact shall be updated during synchronization. This link can be OK or broken, and this is what defines if an Outlook contact is tracked or not. It is the user's synchronization data groups that defines which contacts will be synced (created, updated).

[UPDATE] This article on the MS CRM Team Blog shows the complete set of rules regarding deleted item synchronization.

The result of a contact deletion vary dependent of the owner of the contact and whether it was deleted in MSCRM or in Outlook; and the result might be a deletion of the contact one or both places:


All testing behind these rules have been run using ‘CRM-Synchronize Outlook with CRM’ after each create/delete/change owner action. Remember the “My Active Contact” filter when testing these rules.

The term “tracking removed” means that the Outlook-MSCRM link is broken. The term “syncing removed” means that not only is the link broken, it is removed and the contact is not longer comprised by the synchronization. The latter means that you can create a new Outlook contact with the same data as the deleted one and apply tracking, causing a duplicate MSCRM contact to be created at the next synchronization. The lack of a (broken) tracking link deters the syncing mechanism from detecting the contact duplication.

The easiest way to check whether an Outlook contact is tracked or not, is to open the contact and see if the CRM toolbar says “Track in CRM” (not tracked, no link or broken link) or “View in CRM” (tracked, link is OK). Note that if the ownership changes after a contact have been synced to Outlook, then the Outlook contact will behave like an untracked contact with a broken link.


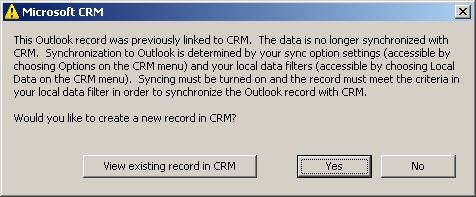
The second thing about CRM contact deletion that confuses users, is the behavior of the tracking mechanism when one of their contacts was deleted in MSCRM and then recreated, but fails to synchronize again. The MSCRM laptop client will give you a warning if you try to re-apply tracking of an Outlook contact that has been deleted in MSCRM (i.e. was previously linked); telling you that it is no longer synchronized, and asking if you want to create a new record in MSCRM. Note that if you delete and recreate in Outlook, there will be no warning.

At this point in the synchronization/tracking adventure, the user will try to re-link Outlook and MSCRM as best they can. It is now very likely that duplication of a re-created contact will happen.

When an owned contact was deleted in MSCRM (will exist in Outlook), this is what typically happens when users try to re-apply tracking:

  1. Create the contact again in MSCRM and synchronize
  2. You now will have two versions of the contact in the Outlook contact folder; a new tracked/synced contact, and the old Outlook contact

When an owned contact was deleted in Outlook (will exist in MSCRM), this is what typically happens when users try to re-apply tracking:
  1. Create the contact again in Outlook, track it and synchronize
  2. You will now have two versions of the contact in MSCRM; a new tracked/synced contact, and the old MSCRM contact

So, do not apply any of the above steps to fix the broken links and re-enable tracking and synchronization for deleted MSCRM contacts. This is the correct routine to re-apply synchronization tracking:
  1. Open the ‘Set Personal Options’ dialog using the ‘CRM-Options’ menu
  2. Turn off syncing of contacts and click OK
  3. Use ‘CRM-Synchronize Outlook with CRM’ to run the sync, this clears the deletion tracking (broken link tracking)
  4. Turn syncing back on and rerun the sync, this will automatically re-create Outlook contacts for the existing MSCRM contacts (as the deletion tracking is gone)

Re-creating MSCRM contacts for the existing Outlook contacts require that you apply these steps to each of the contacts:
  1. Open the Outlook contact and click “Track in CRM”
  2. Click save to get the warning question “Would you like to create a new record in CRM?”, optionally use “View existing record in CRM” to verify that the contact does not exist
  3. Answer ‘yes’ and this will create new, tracked MSCRM contact
  4. Repeat the steps for all deleted MSCRM contacts
NOTE: it is better to recreate the deleted MSCRM contacts first, as you then will have fewer Outlook contacts to process. After all, recreating the deleted Outlook contacts is an automatic process.

In addition, I recommend that you create a new contact folder in Outlook for your private contacts, as this makes it really simple to keep the biz contacts separate from your wife and grandmom.

The delete synchronization and the tracking confusion is one of the top issues at the MSCRM news group. Read this deletion tracking explanation at the MSCRM team blog.


Note that the MSCRM desktop client is always online, and therefore no synchronization is needed.

Thursday, June 22, 2006

Integrating team-sites into MSCRM (part II)

The MSCRM team has published a step-by-step guide for removing the chrome from SharePoint team-sites integrated into MSCRM. This was one of the three tasks that I outlined in my previous post on this topic. Note that I recommend hiding the chrome rather than deleting it from the web-part-page. I will add some details about the other tasks regarding the view columns and the view toolbar in this post.

What you will soon find out when integrating a team-site into a MSCRM <iframe>, is that in order to keep the integrated appearance, you need to control all navigation options in the team-site. This applies to both standard hyperlinks and to JavaScript onclick links. The navigation options
allows a user to open other web-pages inside the <iframe>. As you cannot easily control navigation options in these other pages, navigating away from the tailored view can lead to a less integrated appearance.

I recommend that you tailor the MSCRM view of the WSS team-site to show only the
necessary information to the user and provide only a few action options in the view, plus links to open the standard SharePoint team-site or doc-lib in a new browser for full access to the collaboration features of WSS. This method is similar to the view/actions functionality of the new MOSS 2007 Business Data Connector (not to mention IBF...). Check out the video about MOSS 2007 including BDC at Channel 9.

You need to review the navigation options in the team-site web-page to ensure that users will not be able to stray off-limits. As I explained in part I, you will not be able to customize all navigation options this way, as most of the content of the team-site is dynamically emitted by the web-parts on the page. Thus, you need to control the navigation dynamically after the page has completed loading using JavaScript and DHTML. I use a script that modifies all applicable hyperlinks to open a new browser; and that removes all onclick link actions, except on list sorting links.

This script was left to you as an exercise in part I, but for those of you that prefer copy-paste coding, here it is:

<script language="javascript">

function OnLoadSetHyperlinkTarget()

{
var links = document.getElementsByTagName('a');
//alert('Number of hyperlinks: ' + links.length);

for(i=0; i<links.length; i++)

{
var link = links[i];
if(link.id == 'EXCLUDE') continue;

link.target = '_blank';


if(link.onclick != '' && link.href != 'javascript:')

{
//alert('<A> onlick, id: ' + link.id);
link.onclick = '';
}

if(link.href != '')

{
if(link.href == 'javascript:')
{
//leave sorting links as-is
}
else if(link.href.substring(0,10) == 'javascript')
{
//alert('<A> href javascript, id: ' + link.id);
link.href = '';
link.onclick = '';
}
}
}
}
</script>


As you can see by examining the script, you can preserve hyperlinks by setting their id = 'EXCLUDE'. This is useful when adding your own hyperlinks that should not navigate out of the <iframe>. Note that the script removes all onclick handlers, thus it should not be used in combination with the full toolbar of lists and doc-libs.

Add this to the very bottom of the page to run the script:

</body>
<script language="javascript">

OnLoadSetHyperlinkTarget();
</script>
</html>


Note that the running of the script at the end of page load can be refined by using a onload JavaScript to wait for the page readyState to become "complete" before running it. Just running the script from after the <body> tag should work well enough in MSIE.

You must also review which column types you include in the MSCRM view of the document library. The reason for this is that the some of the column types provides options that causes navigation. I.e. use the "Name (linked to document)" as the document link column, rather than the column type that provides the drop down edit menu. Use "Modify settings and columns-Views-Edit view" to customize the MSCRM view to contain only the most basic meta-data and options; and provide a link to open the standard SharePoint view in a new browser with full doc-lib features.


Regarding the document library toolbar type, it is safer to use the 'Summary' toolbar in the new view, rather than the full toolbar. Alas, the functionality of the full toolbar might be more important than controlling the navigation options. If this applies to you, then use the full toolbar - just remeber to modify the above script accordingly.

At last, I want to refresh your memory on these two WSS tips from part I:

Do not hesitate to remove the SharePoint "Modify shared page" menu link. The toolbox can always be summoned using this querystring: ?mode=edit&PageView=Shared
&toolpaneview=2 (see
SharePoint tweaks).

Also try this nifty little SharePoint querystring trick: ?contents=1

Wednesday, June 14, 2006

Model Reference Data = Observer pattern + Reference Data + MVP (Part II)

In part I, I outlined how we use common business process reference data (BPRD) in our WinForms user controls contained in a model-view-presenter application. Before the refactoring, the presenter was used to hold and provide the data, and also had the responsibility of notifying the applicable views that the reference data had changed. This lead to a rather unreadable and unmaintainable design as the set of events and views got bigger

All who have developed a tabbed wizard control know that using a common data object shared between all the tabs is a good design. The refactored design is analogous to this, in addition to employing the Observer pattern. The WinForm user control container module described in Part I is just an advanced, decoupled MVP implementation of a multi-tabbed user interface module.

The refactoring of the module comprises these steps:
1. Extract all common reference data into a new ‘subject’ class as private members.
2. Expose the reference data as public properties.
3. Add event definitions to the applicable properties to notify ‘observers’ of changes to the ‘subject’.
4. Add a property to the presenter to hold an instance of the new BPRD object type.
5. Add a property to the view interface, of the new BPRD object type.
6. Add code in the presenter to create an instance of the reference data (BPRD).
7. Add code in the presenter to set the BPRD property of each of the views.
8. Add event handlers in the presenter and views (observers) to subscribe to applicable notifications from the new BPRD object.

In the new design, all views hold a reference (pointer) to a common, shared instance of the BPRD object. They all change the common object and they all can subscribe to whatever event they need to get notified of. Thus, the presenter need not contain any code to handle BPRD events to then invoke methods on the views. This leads to a much simpler presenter. The views are also somewhat simpler, as the view interface now contains less to implement.

The refactored view interface looks like this:

public
interface IEkspederingView

{

//note how all the get/set events from part I are gone

//property pointing to the current common, shared BPRD

EkspederingFellesData GjeldendeEkspederingFellesData{get; set;}

...

}


The new business process reference data class looks like this:

public class EkspederingFellesData

{

public EventHandler<EventArgs> KontonummerSatt;


public string Kontonummer

{

get { return _kontonummer; }

set

{

_kontonummer = value;

//subject: notify subscribers of change

if (KontonummerSatt != null) this.KontonummerSatt(this, new EventArgs());

}

}

private string _kontonummer;

...

}


The presenter looks like this:

public class EkspederingPresenter

{

public EkspederingPresenter()

{

//create and load the BPRD

_currentReferenceData = new EkspederingFellesData();


//add the current BPRD to all the views

_innbetalingView = new InnbetalingView();

_innbetalingView.GjeldendeEkspederingFellesData = _currentReferenceData;

}


public EkspederingFellesData GjeldendeEkspederingFellesData

{

get { return _currentReferenceData; }

}

private EkspederingFellesData _currentReferenceData;


private InnbetalingView _innbetalingView;

...

}


And finally, one of the views looks like this:

public class InnbetalingView : IEkspederingView

{

public InnbetalingView()

{

//observer: add event handlers to subscribe to notifications to BPRD

this.GjeldendeEkspederingFellesData.KontonummerSatt += new EventHandler<EventArgs>(OnKontonummerSatt);

}


public EkspederingFellesData GjeldendeEkspederingFellesData

{

get { ... }

set{...}

}


public void OnKontonummerSatt(object sender, EventArgs e)

{

//do function X13

}

...

}


The reference data value object is the ‘Subject’ of the Observer pattern, while the ‘Observer’ objects are the presenter and (possibly) the views. Thus, the reference data ‘Subject’ object (don’t get confused) is in fact a ‘Model’ object, although not a domain object such as a customer or an order.

If this combination of the observer pattern, the MVP pattern and a reference data object should have a name, I would call it the “Model Reference Data” pattern, the subject/model being the common, shared and observed reference data.

[UPDATE] Martin Fowler has since retired MVP and replaced it with the Supervising Presenter pattern. The new pattern is actually very like our adapted MVP usage, as it fits better with WinForms data binding.

Friday, June 09, 2006

Tell, don’t ask – MVP – Biz Process Reference Data (Part I)

A good programming practice is “tell, don’t ask, which concerns class responsibility (btw, don’t try to apply this practice at home with your wife…). In these postings, I will outline how we use this rule to avoid excessive use of events in a model-view-presenter (MVP) WinForms module to get at the reference data of the current business process.

Reference data
is used in the model to annotate the business transaction work item data with extra information such as the customer number, account number, zip code, country, etc.

I have successfully used “tell, don’t ask” to refactor code that used events to get business process reference data (BPRD) values stored in a WinForms presenter control, to use a common, shared ‘current reference data’ object to contain and control the reference data. This also leads to a better design that follows the “single responsibility principle
and leads to better cohesion / separation of concerns in the presenter and the current-reference-data classes.

The WinForms module consists of a container user control that hosts a set of child user controls inside a tab control. In fact, one of the child controls is it self a tabbed container with further child controls. Before the refactoring, the reference data was stored in the presenter, much like the view-state data of the presentation-model
. Note that we use an adapted version of MVP due to our extensive use of WinForms databinding. Note also that we by constraint cannot use CAB in this project.

See J Aron Farr’s post at JadeTower
on ‘MVC, MVP, Presenter Model for more info about the different presentation logic patterns.

The old code contained several events for getting and setting the reference data defined in the view interface (one event pair per value). The child user controls (the views) would raise an event that the presenter would handle to provide the requested reference data value. Thus, a view would need ask for the data to get it and beg for the presenter to change it. After all, raising an event is not dictating (tell) something to happen, it is more like pleading (ask). This coding style started out small with just one value to get.

An example view interface (sorry about the Norwegian naming imposed on me):


Public Interface IKasseEkspedisjonView

#Region "Events"
Event KontonummerHent as EventHandler(Of GenericEventArgs(Of String))
Event KontonummerSett as EventHandler(Of GenericEventArgs(Of String))

Event BuntnummerHent as EventHandler(Of GenericEventArgs(Of Integer))
Event BuntnummerSett as EventHandler(Of GenericEventArgs(Of Integer))

Event EkspedisjonsnummerHent as EventHandler(Of GenericEventArgs(Of Integer))
Event EkspedisjonsnummerSett as EventHandler(Of GenericEventArgs(Of Integer))
#End Region

...


End Interface


The presenter would handle these events both to provide and to update the BPRD values stored in the presenter.


Note that I do not want the views to have a pointer/reference to the presenter. In addition, to keeps things simple, the container is also the presenter. The container naturally has pointers to all the views, added automatically by the Visual Studio designer when adding the child user controls to the tab control.

The events defined in the view interface had to be implemented by all child user controls using BPRD, and even using a user control base class to implement the events only once, it still would lead to a growing number of events and handlers as the number of reference data values increased. Likewise, the presenter would have to add handlers for each new event and for each new child user control added to the container.

It was time for a simpler solution to sharing the business process reference data. The refactoring involves creating a new value object to keep all the reference data and removing all of the get/set events from the view interface in favor of property changed events on the value object. The refactoring will also remove the need for the presenter to subscribe to BPRD events for each view instance.

Stay tuned for details about the refactored business-process-reference-data object in the upcoming part II.


[UPDATE] Martin Fowler has since retired MVP and replaced it with the Supervising Presenter pattern. The new pattern is actually very like our adapted MVP usage, as it fits better with WinForms data binding.

Wednesday, June 07, 2006

Using DbConnectionScope with Suppress TransactionScope

We have been using the ADO.NET team's DbConnectionScope manager for a few months now, and it really makes the 'stay LTM' mechanism quite effortless. There are, however, a few pitfalls to avoid, especially when using it inside a TransactionScopeOption.Suppress block.

Yesterday I spent a few hours tracking down a "Transaction Timeout / The transaction has aborted" exception in a new business process method that combined several existing methods. By running the applicable unit tests, I knew that all the methods used in the new process were working correctly, so it had to be the combination of transaction scopes that caused the error.

I turned on the 'Break when an exception is: CLR exceptions: thrown' (Debug-Exceptions in the VSTS main menu) to pinpoint the bug:
... and this lead me to a transaction suppress block that used the the current connection of the DbConnectionScope like this:

Using noTransx As New TransactionScope(TransactionScopeOption.Suppress)
...
Try
Me.ReadDataNoLock()
Catch ex as TrioKasseException
'ignore error, as no record found is OK in this method

End Try
...
noTransx.Complete()
End Using

Sub ReadDataNoLock()
...
ta.Connection = DbConnectionScope.Current.GetOpenConnection(...)
...
Throw New TrioKasseException(...) 'record not found
...
End Sub

To make a long story short, this code reuses the connection of the outer required block to perform a non-transactional read inside the suppress block; and the code causes an exception to be thrown and handled during the connection usage. This causes the next attempt to aquire a handle to the "required" transaction context to fail with "transaction has aborted". The fix for this exception is to avoid the connection reuse by forcing a new connection:

Using noTransx As New TransactionScope(TransactionScopeOption.Suppress)
Using dbconn As New DbConnectionScope(Of SqlConnection)(DbConnectionScopeOption.RequiresNew)
...
...
End Using
noTransx.Complete()
End Using

Takeaway: If you use a .Suppress transaction block inside a .Required transaction block, always use a .RequiresNew companion DbConnectionScope block to ensure that you do not reuse a connection across transaction blocks.

VB.NET multi-assembly .config settings

The new 'Settings' mechanism of VB.NET 2.0 and the related My.Settings object make it convenient to add new settings and to access the configuration settings from code as strongly typed data.

To bad that the project 'Settings' property page does not show e.g. <connectionStrings> settings imported (copy-paste) into the "Syden.Trio.ClientApp.exe.config" file from the config files of other assemblies, such as the typical "Syden.Trio.DataAccessLogic.dll.config" file which most likely contains the database connection string. Neither will these non-native configuration settings be available in the My.Settings object.

If you want to have a single config file, i.e. not use multiple .dll.config files in addition to the .exe.config file, you must use the ConfigurationManager class to access non-native (imported) settings. This class gives provides a .ConnectionStrings collection, in addition to the classic .AppSettings collection.

Thus, to get to the connection string used by generated TableAdapter code, use code like this:

configInfo.Text = ConfigurationManager.ConnectionStrings
("Syden.Trio.Kasse.DataAccessLogic.My.MySettings.TrioConnectionString")
.ConnectionString

Note how VB.NET use the assembly's full namespace to prefix all config settings. This is why My.Settings does not like/support imported settings.

The ConfigurationManager is new in .NET 2.0 and requires you to add a reference to the System.Configuration assembly.